Pages

Wednesday, February 29, 2012

Leaves of Kindness


Back in January, I found myself in need of a Thank You card for a group of people, both men and women. I wanted something that would appeal to both genders, and that looked like a very sincere thank you. I was out of town when I needed this, and had brought limited supplies with me. I had also just finished designing the Rustic Wedding stuff, so this color combo was stuck in my head :)

I really like how this one turned out. And for once, I didn't spend 2 hours on it! I tend to fiddle around quite a bit with ideas before I am happy with the end result... I know I am not alone! It is so great to have  a hobby that I must slow down for, since my professional life is all about fixing people with speed, accuracy, and compassion. Wow, that sounded awfully self-important didn't it! We all have challenges in our jobs, and we have a part to play in the workings of the world. We should all feel like we are contributing to the greater good, even if it is making sure the toilets are clean (which I still have to do in my job, lol) Ok, I digress! Back to the STAMPING!!
This stamp set is so easy to work with, and I really have a soft spot for leaves.  And I think I used the Labels Framelits on every project I made for about 3 weeks, lol!


More leaves inside, a little white gel pen outlining, and the sentiment down and to the left to leave plenty of room to write a note.

  • Stamps: French Foliage, Thank You Kindly
  • Paper: Pool Party, Lucky Limeade, Soft Suede, Whisper White
  • Ink: Pool Party, Lucky Limeade, Soft Suede
  • Other: Big Shot with Label Framelits, Lucky Limeade Baker's Twine, Signo white gel pen, Stampin' Dimensionals

Sunday, February 26, 2012

Splendid Birthday


This is the last of the swaps for the birthday card swap. This is the for GENERAL category. I liked this one so much, we made it for club this month!


I love the 3 banners that are each stamped with a different leaf. For the 10 swap cards I did, I stamped the cardstock, then cut it. Great time saver! Notice I did not ink any edges or outline anything. While I am sure  this would make the card look better, I was trying to keep this fairly simple, especially since there is actual stitching on it. For the swaps, I must confess, I used a zig-zag stitch on the sewing machine...
The dovetails on the banners were made with a square punch which is super fast too.

  • Stamps: Autumn Splendor, Perfectly Penned
  • Paper: Crumb Cake, Pool Party, Daffodil Delight, Early Espresso (I used Chocolate Chip on the swaps, looks better), Whisper White
  • Ink: Crumb Cake, Pool Party, Daffodil Delight, Early Espresso
  • Other: 1¼" Square punch, 1-3/8" Circle punch, Paper Piercer with Mat Pack, White Baker's Twine, Silver Mini Brads, Stampin' Dimensionals

Friday, February 24, 2012

Stampin' Addicts 3rd Anniversary Blog Hop- Girls' Night Party


Another year older and better than ever!! Stampin' Addicts is 3 years old now! And to celebrate, everyone on this hop has done a different party theme. 

If you lose your way, here is a link to the master list for the hop. Feel free to leave  a comment on that thread also, and suggestions for future hops are always welcome :)

 I am stop #5, so you may have just arrived from Heidi's blog where she did  a Rapunzel Birthday Party. That woman always blows me away with her creativity, so I am feeling a little intimidated today :) Leave her some love! So let's see if I can wow you with my Girls' Night theme. I could have gone many ways with this, but I chose to use colors that match the walls, I mean the insulation sheets (roll eyes), in my kitchen, which are just a titch lighter than Daffodil Delight. Think banana yellow, since I am looking at the bananas sitting right next to my wall and they almost blend in.... This is a bit of a challenge to make things look good for a party. I mean yellow is not exactly a neutral color. Oh, and I do have white salad plates, and yellow salad plates, which will fit nicely in the 3 tiered goodie rack I bought before Christmas. I plan on making some carrot cake cupcakes, some Sweet Pressed Shortbread cookies with the flower stamped on them.


So let's start with the invitation! If you have followed my blog for very long, you know I love all things Crumb Cake, including the packing paper that comes in the SU orders :) I discovered that you can easily punch through 4 layers of it at once! This flower takes 8 Blossom punches to complete, and it is so full and lovely! 

Now, the Raining Flowers set is one we got at convention, and I really wasn't sure I liked it at first, but it has definitely grown on me. I like the modern feel to it and the endless combinations you can do with it. The sentiment is from Hugs & Wishes, which is only available on MDS now. 


The first project I did was actually this banner. This is only 1/4 of the banner, I couldn't get a good picture of the whole thing as it is hanging above my 5 foot wide kitchen window. Way too distracting in a photo. The centers of the flowers are all buttons and glimmer brads. I figure when I am done with the banner, I can reclaim them to use on another projects!  The white flowers are 6 layers of  White Waffle paper punched with the Fancy Flower punch, and the yellow is 4 layers of Faux Sueded Daffodil Delight cardstock punched with the 5-Petal Flower punch.


Now these are for popcorn in my mind, but could hold all kinds of things. When I think Girls' Night, I think drinks, cupcakes, cookies, cheese and crackers, popcorn, and movies. These are paper lunch bags cut with the Adorning Accents Edglit and then embossed with the coordinating embossing folder. I found that you can cut and emboss 2 bags at a time! And each one is slightly different so you can tell which one is yours :) Imaging having those flavored popcorn sprinkles for everyone to customize their fresh buttery popcorn, yum!

I had to make a wine tag. They just look so fun! Come back next week and I will tell you how I made it. Super easy. The sentiment is from Pursuit of Happiness and it just goes so well with the vibe of this theme. And I just had to do some coasters. I have gobs of blank ones in my stash, and they take ink so well, I couldn't resist. I think it too me about 10 minutes to do these 4.  

Now I can't wait to have a Girls' Night party!! All I need to do is pick a date and call the girls! ANd hope I can find a night most of us don't work, lol!

On to the next hop where Lisa is going to show us a FABULOUS bridal shower theme! Boy, I tell you it is tough to be stuck between these two because they are sure to outshine little old me! Yes, I can be clever, and make some cute stuff, but these ladies are such inspirations to me!


Thursday, February 23, 2012

Button it Up


This is #2 of my swaps for the birthday card swap at Stampin' Addicts that I did recently.  The category for this one is MASCULINE. For some reason, saddle stitch ribbon and buttons are very masculine to me. I don't know why. Woodgrain and blocky letters fit in there too.


I hope this isn't too fussy for a guy card. And I ended up using more than one set for this.... I couldn't help it!! I really try to stick to just one set for swap cards so that they are good for demonstrating at a workshop. No point in overwhelming new stampers. They will find out soon enough how addictive this stuff is ;)
 To create the dovetail on the banner, I measure up 1" from the bottom and pencil marked a dot in the center, then cut from each corner up to the dot with a scissor.
Since I used the clear mount stamps, I cut the Happy Birthday stamp into 2 pieces and was able to easily have different colors for each word, and to stack them instead of having them be one line. And when I want to have them be one line and the same color again, all I have to do is line the cut edges up on one block instead of two! The best of both worlds:)

  • Stamps: Happiest Birthday Wishes, Button, Button, Woodgrain BG
  • Paper: Very Vanilla, River Rock, Pumpkin Pie, Not Quite Navy
  • Ink: Whisper White Craft,  River Rock, Pumpkin Pie, Not Quite Navy
  • Other: Big Shot with Labels Framelits and Buttons #5 sizzlet , Signo White gel pen, White Baker's Twine, Stampin' Dimensionals

Wednesday, February 22, 2012

Lofty Birthday


Time for some swapping fun! There was a birthday card swap recently through Stampin' Addicts that I participated in and I have been dying to show you what I made! I had to wait until everyone got theirs in the mail first though...
I stamped all of the hot air balloons on this card, but it really did not take much time at all to do.


Can you see the little clouds stamped on the green strip? Gotta have a few clouds up there :) And I managed to use just one stamp set. I do like to mix things up. One of the great things about SU is that you can combine images from different sets and still have a coordinated look. But I didn't do that this time! For the swap, each person had to pick a category the card work work for. This is for a BOY CHILD. I think it might work for any adult too :)


  • Stamps: Up, Up, & Away
  • Paper: Pool Party, Lucky Limeade, Poppy Parade, Basic Gray, Whisper White
  • Ink: Pool Party, Lucky Limeade, Basic Gray, Poppy Parade
  • Other: Big Shot with Tasteful Trims die, 1" and 1¼" circle punches, Corner Rounder punch, Signo white gel pen, Lucky Limeade Baker's Twine, Silver Mini Brads, Paper Piercer, Stampin' Dimensionals

Saturday, February 18, 2012

Sweet Friend


I know this is a retired set, but I still love it :) I made this card to show my niece and nephew, Kaylee and Austin, how to do the Poppin' Pastels technique. Really fun technique and it looks great with this set. To do Poppin' Pastels, you just stamp an image with Versamark ink, then apply different colors of pastels to the image. The Versamark makes the pastels stick just where the image is!


It is also a gate fold card, meaning it opens in the center of the cardfront. This is also a very simple variation from the traditional card fold. The kids and I had a great time playing around making this card, and I showed them the Faux Suede technique too! They did great for a 9 y/o girl and a 5 y/o boy!
  • Stamps:You Are Loved
  • Paper: Pretty in Pink, Soft Suede, Whisper White
  • Ink: Versamark, Pretty in Pink, Soft Suede
  • Other: Big Shot with Hearts Framelits, 1" Square punch, Modern Label punch, Signo white gel pen, Stampin' Pastels, Stampin' Dimensionals, Qtips 


I used the sentiment that came with this set to finish it off on the inside. Such a great thinking-of-you phrase!

Friday, February 17, 2012

USWDAF- Rustic Wedding Decor

Wow! It's time for a new event already!! I designed another fun project for UStamp, and this time I went crazy with the butterflies! The tutorial for my project was posted on the Big Shot Round Up event on 2/16/12. Go check it out!

Doesn't this look fun? One of my girlfriends wants me to make this for her niece's wedding in Montana. I think that would be perfect!!


Thursday, February 16, 2012

Valentines for Sons


I was not as prepared for Valentine's Day as I should have been this year. I had quite a stash of cards to sell at work last year, but not this year. Oh well. One of my co-workers did come to me last weekend and told me she needed 4 cards. One of them would be for her adult son. She has been getting cards from me for about 3 or 4 years now, and her son had made a comment about them a couple years ago. He told her that she was finding the most amazing cards! I used to think guys didn't notice this stuff, but even the guys at work want to use my cards because they are "special" and "little works of art". Now, I don't let that go to my head, because I know that I am not the most talented  card maker out there. Not by a long shot! But who doesn't love some admiration of their efforts?!

All that being said, I really like how this one turned out. I am rather enamored with cutting birch bark with my Big Shot dies right now, and those birch bark hearts really made this card for me! And it will be going to that lovely son of Bekki's, who recognizes art when he sees it ;) (BTW, this young man is a Harley mechanic...)

I really think the Letterpress Plates are missing out on the love from most of us. They are such and awesome tool, and I love the look they give. I find myself using them just as much as the embossing folders. Check out the "son". It is form the Family Reunion set, which I earned with my sales during Sale-A-Bration last year. I love being a demonstrator :) So many great perks! There 24 stamps in the set, and 19 of them are family relation names! Bet you didn't know there were that many to use!

The birch button was cut using the Buttons #5 sizzlit. You do have to peel the birch bark to a couple layers thick for this to work, but the results are awesome! And if you are like me, and burn wood to heat the house, then you don't have to go far to find birch bark. Otherwise, you can find it online in lots of places. Or maybe you know someone else that has some you can use. And Tombow liquid glue holds the birch bark just fine!

  • Stamps: PS I Love You, Family Reunion
  • Paper: Naturals White, Cherry Cobbler, Chocolate Chip, black pen
  • Ink: Chocolate Chip
  • Other: Big Shot with Buttons#5 sizzlet, Hearts Framelit, Lots Of Love Letterpress Plate, birch bark, Signo white gel pen, Stampin Dimensionals, Early Espresso Baker's Twine

Tuesday, February 14, 2012

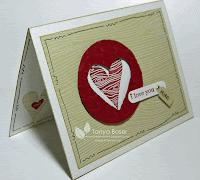
I Love You More

Happy Valentine's Day!! I am a bit of a romantic, as is my hubby. So you would think this day would be a big deal for us. It's not, because we like to do little acts of kindness for each other most every day. But maybe we should make it more special... we all like an excuse to do something extra special for those we love!

This is the card I made for my hubby. There is a little private meaning to this :) We get into a little playful fight with this phrase, and the winner is the one we says it last. Silly , I know. But silly is good for the soul. Really. It is. Look it up. ;)


I finally broke down and got the Houndstooth  embossing folder, and it is so perfectly masculine, I just love it! ANd reinked my Craft White inkpad and used the back of a plastic spoon to really rub it in. Boy Howdy, what a difference that made!


 I will have to think of something witty and sweet to put on the inside, before he gets home in 4 hours! I don't think I will share that with you all, it might get a little X rated, even after all these years ;) We have been together for 23 years, will be 24 this summer, and will celebrate our 22nd anniversary this June. How did time go so fast?!
I hope you all have a great day, whether it is with a honey, or blissfully free of commitment!


  • Stamps: Woodgrain BG, I (Heart) Hearts, PS I Love You
  • Paper: Naturals White, River Rock, Cherry Cobbler
  • Ink: Whisper White, Cherry Cobbler, River Rock, black pen
  • Other: Big Shot with Houndstooth EF and Hearts Framelits die, Word Window and 2-3/8 Scallop Circle and Jewelry Tag punches, Silver Mini brads, 1/16" punch, Stampin Dimensionals.

Saturday, February 4, 2012

Sweet Madison Rae and SA Sketch Challenge #71


It's the first Saturday of the month, so you know what that means! It is time for another Scrapbook Sketch Challenge over at Stampin' Addicts :) I went for a more simple sketch this time, trying to embrace the "white space". I tend to want to fill the page with stuff, so this was a real challenge for me, lol!


Here is the sketch, and I was pleasantly surprised to discover some goodies in my embellishments that I didn't realize I had! They are from the Noteworthy digital collection you can earn as a hostess benefit from the main catty!


And here is my example. This is the newest member to my hubby's side of the family. Our new little niece, Madison Rae born on Nov 28th, 2011. This picture was taken on Christmas and she is just such a sweet baby!! I really miss the babies....I only get to play with sick babies at work...and I usually have to make them cry.
I even got tp play with my Vintage Overlays, which I fell in love with but never really used. It took me a while to figure out how to make them look the way I wanted..just because I was being dense! I had forgottn that you can change the opacity of your images on MDS, duh!

This entire page is done on My Digital Studio, which you can get a free 30 day trial of now!! How exciting is that! Go check it out at mydigitalstudio.net now!
  • Stamps: Cheerful Treat, Vintage Overlays
  • Paper: Blushing Bride,  Twitterpated DSP
  • "Ink": Pear Pizzazz, Whisper White, Basic Black
  • Embellishments: Rhinestones, Twitterpated Designer Buttons, Doily Triple Punch, 5 Petal Flower punch
  • Font: Bored Showers
Show us what you made!! Post it on the challenge forum or link to yours in a comment here :)
Pretty please!