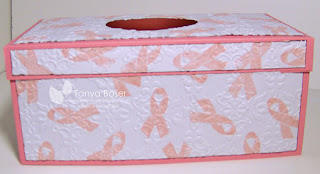
I don't know about you all, but we don't buy the little square boxes of tissues. We buy the BIG ones. So many noses you know, lol! And so I decided I had to make a cover for them because I thought the square ones were so darn cute :)
Your pieces will be such:
Box:
- two 9 3/8" x3 3/4" (front and back) scored at 8 7/8"
- two 5 1/4" x 3 3/4" (ends) scored at 4 3/4"
- one 11" x 6 7/8" (top) scored at 1" all four sides-then cut in at four corners to form tabs
- two 8 1/2" x 3" (front and back)
- two 4 3/8" x 3" (ends)
- two 8 5/8" x 3/4" (front and back lips)
- two 4 1/2" x 3/4" (end lips)
- one 8 5/8" x 4 1/2" (top)
You will need to cut an opening in the center top of your box. Use whatever cutting device you have making sure the hole in the panel is smaller than the hole in the box top so that alignment does not have to be exact. The hole can be circular, oval, or fancy shaped as long as the top panel hole is smaller and will cover the entire hole int the box top :)
Embellish:
Go wild! Emboss, layer, ink, stamp, whatever to your panels.
Assembly:
Now that you have all of your pieces cut, and all of your embellishing complete, now you can assembly it!
- First adhere all or your panels to their corresponding box pieces.
- Adhere your box front, back, and ends together with the 1/2" flaps stuck to the inside of the piece next to it to form your box base.
- Crease and fold down the lips of the box top, adhering flaps.
- Apply adhesive of your choice on the backs of the lip all the way around.
- Slide top over box base and press on the inside of the box to get good adherance of the glue.
Now, let's see yours!!


5 comments:
What a great idea! Love it!!!
This is fabulous! Thanks so much for the great tutorial!
I can't wait to try this out! Thanks for the tutorial!
Great idea! I love the embossing and the stamping together!
What a neat idea! Thanks for the tutorial.
Post a Comment