Pages

Tuesday, September 28, 2010

Justin's Birthday Card and a Trip to the Park


It was absolutely gorgeous out today, and I never made it to the park yesterday. That half a glass of margarita at lunch with Cathy yesterday did me in! I was all sleepy and fuzzy the rest of the day. What can I say, I'm a light weight when it comes to alcohol, lol!
Anywho! I thought I would share a few pictures from the park today. I went by myself and spent 2 hours walking the trails , taking pictures, and eating my lunch. I will definitely have to do this again soon! I will share more pictures from the park after the card in this post :)

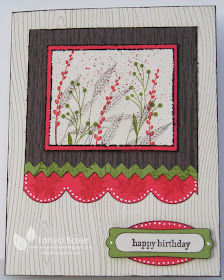
I made this card a week or so ago. I made it for my youngest brother-in-law, Justin. He was 7 when my hubby and I started dating :) I used the Color Round Up for my color combo, and the layout just evolved. I had a piece of Early Espresso in my scrap file that had already been embossed with an inked up texture plate and I used my Color Spritzer on the main image too. I had to make myself not use the Shimmer Paint, it's just not guy card material I guess... But the new Tasteful Trim die sure is handy! The large scallops and the rick-rack trim are from that die.


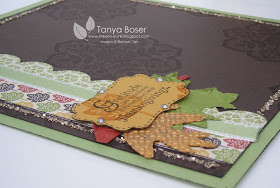
This is the lower corner of the inside of the card. I used marker to ink it up and give it the multicolor look.
  • Stamps: Autumn Days, Woodgrain BG
  • Paper: Naturals White, Poppy Parade, Old Olive, Early Espresso
  • Ink: Naturals White, Poppy Parade, Old Olive, Early Espresso
  • Other: Big Shot with Tasteful Trim die and wood grain texture plate, Large Oval punch, Modern Label punch, Word Window punch, Signo white gel pen, Stampin' Dimensionals, Color Spritzer tool, distressing tool from Cutter kit
Ok, now for more pictures from the park. I used to take the kids to Lake Bemidji State Park every fall and take pictures of them in the leaves and stuff. It is always gorgeous there, no matter what the season. Well, the kids aren't as easy to catch anymore, what with 3 of them being adults and the 4th is in 8th grade and in multiple activities, so I went by myself, and I still enjoyed every minute of it!


The sugar maples are just starting to turn that amazing golden color. In another week, they will be completely turned and the ground will be covered in this carpet of leaves that is so fun to walk through. The air was just as clean as could be, the sun was shining dappling the ground....


Still lots of green in some of the leaves.


There was a poplar tree growing sideways for about 30 feet, and there were leaves falling on the trunk. It really caught my eye and I took several pictures of it. There was a bench nearby that I sat on for a few minutes just soaking in the peacefulness of the day.


A view of the sky through the trees....


Looking out over Lake Bemidji.


Entering my driveway. Wow, I never really thought about how tall the trees are at my house. They must be close to 70 feet tall!


A red oak in my yard.Ok, I better stop. I took lots of pictures today, lol! I hope you enjoy them!

Monday, September 27, 2010

Splendid Thanks

I decided I needed a stash of little thank you cards recently and I just had to make some Fall themed ones. And I wanted a quick way to put multiple colors on the stamp. I did a double Rock and Roll on these leaves. I inked up in Pear Pizzazz, then Rocked on some Poppy Parade, and Rolled on some Early Espresso. It worked really well if I do say so myself. The buttons are actually die cuts from the Buttons Sizzlet, super cute and easy! I was able to make about 16 of these little guys in just over an hour... pretty good if you know how I stamp...very laid back! I like to day dream, talk to the kids, and watch my favorite shows on Netflix while I stamp. Of course I do some cruising on the internet too, lol.  This is my relaxation you know ;)


The bigger cards are 3x3 and the smaller cards are 2.5x2.5, using up some scraps! The small "buttons" are the little circle punch from the Itty Bitty shapes punch pack with white gel pen "holes". As you can see I matted the main image with the 3 different main colors. More scraps!
  • Stamps: Teeny Tiny Wishes, Autumn Splendor
  • Paper: Naturals Ivory, Pear Pizazz, Poppy Parade, Early Espresso
  • Ink: Pear Pizazz, Poppy Parade, Early Espresso
  • Big Shot with Buttons Sizzlet, Signo white gel pen, distressing tool from Cutter Kit, crochet thread

Today is my birthday and I plan to go out and enjoy this gorgeous weather! The leaves look like these cards, the sky is a brilliant blue, and it is supposed to get up to 65 today! Perfect weather, sigh... AND I don't work and my hubby is home, both of which NEVER happen on my birthday! I think we will go out for lunch with a friend, have CARROT CAKE (my favorite) and maybe go for a walk in the park to see if there is a carpet of golden leaves yet.
And since this is a post with Thank You cards, I believe it is an appropriate time to say this:
Thank you to everyone who visits my blog, and special thanks to those of you who leave kind comments! They really brighten my day :)

Saturday, September 25, 2010

Dark Spice......


 ....kind of like dark chocolate ;) These little tea light candles and boxes are just as irresistible, lol. Here is the link to the tutorial on how to make these if you need it. There are slight differences in these two boxes. The dark ribbon is actually Early Espresso Waffle paper. I really do love the way this stuff holds the shape you form it in to. I also really like the little pop the pearl gives on the knot of the bow. And I think the white gel pen faux stitching looks better. These are going into my stash of last minute gifts I like to have on hand. Using the DSP really made these fast to put together and since the DSP is card stock weight, they still feel very sturdy, which I love! I must confess, I bought 2 packs of this DSP right away, I knew I was going to love it so much! But, to go with the anti-hoarding rules I have set for myself, I now need to USE it, lol!


I did the Rock and Roll technique again for these leaves with More Mustard and Cajun Craze on 2 and Pear Pizzazz and Cajun Craze on the other 2. I am not sure these look quite right in this box, though. 
So when I made this box I used a different leaf image and More Mustard and Early Espresso. These coordinate better with the box :) I suppose I could make different candles for the other box, and a different box for those candles.... maybe I will :) Now for the supply list!
  • Stamps: Day of Gratitude
  • Paper: More Mustard, Autumn Spice Specialty DSP, tissue paper, Early Espresso Waffle Paper
  • Ink: Cajun Craze, Pear Pizzazz, More Mustard, Early Espresso
  • Other: paper cutter with scoring blade, Designer Lave punch, Pearls Basic Jewels, Signo white gel pen, Very Vanilla 1/2" Seam Binding Ribbon, Sticky Strip, glue Dots, Heat Gun, 1-3/8" Circle punch, 1/16" punch
Hope you still enjoy seeing tea light boxes as much as I enjoy making them, lol!

Friday, September 24, 2010

Lightly Spiced Tea Lights


I know, I know, I keep doing more of these tea lights! But I love them so much! Here is the link to the tutorial for those of you who need it. This one is made with some of the new Autumn Spice DSP. It is cardstock weight so it is a dream for 3D projects like this. The new Designer Label punch has been a dream too! It layers well with many other punches, but work well on its own too. The Seam Binding Ribbon is lovely to tie into a bow... just don't try to singe/seal the ends with a lighter. It will burn, not melt!


Here is anther view so you can see more of that luscious DSP!


And inside are the lovely little candles. The Rock and Roll technique really makes beautiful call leaves.
  • Stamps: Day of Gratitude
  • Paper: More Mustard, Pear Pizzazz, Naturals Ivory, tissue, Autumn Spice Specialty DSP
  • Ink: More Mustard, Pear Pizzazz, Cajun Craze, Early Espresso
  • Other: paper cutter with scoring blade, 1-3/8" Circle punch, Designer Label punch, 1/16" punch, Heat Gun, Very Vanilla 1/2" Seam Binding ribbon, Pearls Basic Jewels, Stampin' Dimensionals, Sticky Strip
Stop by my Kits for Sale page for kits and ribbon shares!


Thursday, September 23, 2010

Candy Cane Card Organizer


This is my new card organizer! Sorry the picture is so dark. I am still mastering this whole photography thing. I have been meaning to do a perpetual Birthday Calendar for ages, and I wanted a way to store cards with it. And I have several of these tins that I had purchased off the clearance rack right after Christmas last year. They were actually a gift tin with a S'mores like mix inside...but I just really wanted the tins, lol! The opening at the top is about 2-3/4" x 4-1/2" and irt is about 6-1/2" tall, so A2 cards fit in here wonderfully :) 

Here you can see a sampling of what is inside. I made a perpetual birthday/anniversary list for each month out of Naturals White cardstock, and yes I did draw those all of those lines with a guide and a Baja Breeze marker. Have you ever started something and realized it was the inefficient way to go, but kept going because you don't want to waste the cardstock? Yup, that was me....next time, I would just adhere some lined paper to some cardstock. And because I wanted everything to stay neatly organized even if I pull out the birthdays/anniversaries for that month, I made monthly divider tabs too. I used a variety of buttons, brads and rhinestones to decorate the dividers, and for the January divider, I added some of the fun DSP and a label since it would be visible through the window.

This is what it looks like on the inside with all the tabs and dividers in place. There is plenty of room for several cards in here!
I think I am going to make another one of these to carry with me in the car or something with different categories of cards for all of those surprise moments! I am always getting asked at work for birthday, congratulations, sympathy, and wedding cards.

Don't forget to check out the kits and shares available here!

Wednesday, September 22, 2010

Cupcakes and Scallops


Look at how sparkly that polka dot paper is!! Gotta love it....you just do! This is Kaylee's birthday card. I wish I could be there to see her open it. Oh, well. More birthday stuff from the Candy Cane DSP from the Holiday Mini! It has such fun birthday-ish colors :)
You can't really see it on this picture but I used Frost White Shimmer Paint on the cupcake frosting and the cupcake stand. My youngest son saw this card and said "Oh, man! Now I'm hungry for cupcakes..." I guess that means they look good enough to eat, lol! Of course, he is 14 and is always hungry....
I couldn't resist using a bunch of rhinestones on this card. I have now officially used up an entire package of Rhinestones and have started on the next package. I knew these were something I was going to go thru a lot of. They add so much to yor projects, and are an affordable embellishment! I tend to hoard the more expensive stuff, a habit I am trying to break, lol! I mean, we buy this stuff to use it. It doesn't do any good sitting in a drawer...
I also used the Perfect Polka Dots embossing folder and used a sponge dauber to apply Frost White Shimmer Paint to the raised dots.
The little flower is 2 of the 4 petal flowers punched with the Itty Bitty Shapes punch, edges inked with a Real Red marker, rhinestone in the center. Actually, I think I crumpled one punched shape, then peeled it into 2 layers, then all the rest.
The Scallops are from the new Tasteful trims die. And for a change I inked almost all of the edges in Real Red instead of Early Espresso , Chocolate Chip, or Soft Suede.


  • Stamps: Crazy for Cupcakes
  • Paper: Real Red, Baja Breeze, Blushing Bride, Watercolor, Candy Cane DSP
  • Ink: Real Red, Baja Breeze, Blushing Bride, Chocolate Chip
  • Other: Big Shot with Perfect Polka Dots embossing folder and Tasteful Trims die, Aquapainter, Frost White Shimmer Paint, Sponge Dauber, Corner Rounder punch, Blushing Bride Stitched Poly ribbon, Itty Bitty punch pack, Rhinestone Basic Jewels, Stampin' Dimensionals, Glue Dots, Sticky Strip
Come back tomorrow to see my new Card Organizer.

Don't forget to check out the Kits and Shares!


Tuesday, September 21, 2010

Mushroom Birthday

I don't know about all of you, but September has several birthdays in our family... I hear January is a very cold month, wink, wink! I have 2 nieces with birthdays in September and this card is for the older one, Savannah.
The Candy Cane DSP in the Holiday Mini really reminds me more of birthdays than Christmas right now. Maybe because I am more of a traditional girl when it comes to Christmas stuff! But it is still really fun paper to play with :)
I also thought you all might need a break from all things Fall and Halloween, lol! We still have birthdays to contend with all year long and you can never have enough birthday stuff...
I had a vision in my head of how I wanted this to look, but when I started the card, it just wasn't coming together. But I kept plugging along. I had it almost finished when I had the idea to add the birthday sentiment on the 1/2 Designer Label punch! It was the finishing touch that made this card feel "right". It almost looks like a crown perched up there! Who would have thought that mushrooms need a crown?! I guess it's because they are Birthday Mushrooms! And the rhinestones are so much fun!
Ok, now for the recipe....
  • Stamps: Funky Four, Teeny Tiny Wishes
  • Paper: Blushing Bride, Baja Breeze, Real Red, Whisper White, Candy Cane DSP
  • Ink: Blushing Bride, Baja Breeze, Real Red, Garden Green, Soft Suede, Early Espresso
  • Other: 3/4" Real Red Polka Dot grosgrain ribbon (retired), Designer Label punch, Rhinestone Basic Jewels, Stampin' Dimensionals, Signo white gel pen

 Here is a view with a peek inside. Don't you love the glam of the rhinestones?! They fit so perfectly in the centers of these flowers.

Tomorrow I will show you the card for the other niece, Kaylee! Later this week I will post my new Card Organizer. It is so cool I can't wait to show you all!

Don't forget to check out the kits and shares!


Monday, September 20, 2010

Halloween Wreath


Well, I love my Autumn Wreath so much, I decided I needed to make a Halloween one too. And I finally got my Early Espresso and Basic Black Waffle paper the day I made this. I was waiting so impatiently! I had ordered this stuff and then the next day, I just couldn't take it and overnighted another order with a bunch of the new stuff! I played with the gold and silver Waffle paper, but I really wanted the darker stuff for the Halloween stuff. And guess what?! You can make all kinds of flowers with the Waffle paper! The new Letterpress Plate created the centerpiece of this wreath, in fact it was my experimental run, lol! The directions recommend that you use Craft ink, but I don't have much of that, so I used Classic ink and it seemed to work well enough for my purposes. I might try inking with Versamark first then with the colored Classic ink, than seems to make a good substitute for Craft ink in a pinch.


This flower was made with 8 layers of the Scallop Circle punched Waffle paper. To punch them out, I put 4 layers of  Waffle paper between 2 layers of copy paper and punched them out. This worked really well, like it would for tissue paper. The Waffle paper is thicker and tougher than tissue paper, but still delicate. I made a couple with the Fancy Flower punch and they turned out great too!


This flower was made with the rosette spiral from the Table Settings die and went together beautifully. So loving this new product!!


And this is the whole wreath. Sorry the details are hard to see, but I had trouble getting good lighting for this shot. Most of the supplies used on this wreath are in my Halloween Accessories Kit.

Sunday, September 19, 2010

Hello Fall Card


Here is the card I did end up sending out to my customers last week. I am trying to send out more cards. I mean I am the card lady at work! It would be nice if I sent some out now and again...
This card is growing on me. I really didn't like it at first, and kept adding little touches here and ther. I really need to learn to not make cards I am going to make several of less complicated! Clean and Simple is just not generally my style!
The blue of Marina Mist and Baja Breeze really remind me of the sky in the fall so I thought I would start there. And it is most definitely apple harvest time so there are lots of delicious, fresh apples around. I already had Tart & Tangy sitting on my desk from doing the Teacher's Gift sets, which I just filled with candy on 9/13/10 and should hopefully make it to Geoffrey's teachers before this posts! I'm starting to see more possibilities for the Broadsheet Alphabet stamps. It was really easy to make the FALL background with it! And I just had to pull out the white gel pen. White gel pen makes everything better, kind of like chocolate, lol!
  • Stamps: Tart & Tangy, Broadsheet Alphabet, Hello Again
  • Paper: Marina Mist, Poppy Parade, Soft Suede, Naturals Ivory
  • Ink: Marina Mist, Poppy Parade, Soft Suede
  • Other: Big Shot with Vintage Wallpaper embossing folder, Scallop Circle punch, 1-3/8" Circle punch, 1-1/4" Circle punch, Corner Rounder punch, Pinking Hearts Border punch, 1/2" Poppy Parade Stitched Poly Ribbon, 1/8" Early Espresso taffeta ribbon, Sticky Strip, Stampin' Dimensionals, Signo white gel pen
As I was writing notes to each person, I realized I really need to learn to write smaller!!
Happy Stampin!

Saturday, September 18, 2010

A Few Halloween Treats


This is just a quick post with some Halloween Treats! This mini milk carton has some fun DSP from Wicked Fun and Rich Razzleberry Satin ribbon, all of which come in the Halloween Accessories Kit available on my Kits for Sale page. I didn't have the Early Espresso/Basic Black Waffle Paper yet, so I used some Silver Waffle paper. Frankenstein is from the adorable Batty for You stamp set, and the "happy halloween" is from the Teeny Tiny Wishes stamp set.


On this Candy Wrapper, I used the Frost White Shimmer Paint to stamp From the Crypt's spider all over it. I embossed the Silver Waffle paper with the Spider Web embossing folder and stuck a Black Basic Jewel to the center of it. I also put one on each end of the Rich Razzleberry Modern Label punch for a little more glam :)


And lastly, I still have the Coluzzle Take Out Box cutting template, so I had to pull it out to use for this. I used the Frost White Shimmer Paint again with the bat from From the Crypt. I took two 1/2" x 6" strips of Wicked Fun DSP and glued the ends together to make a 11-1/2" strip. Then I scored it at 1/4" all the way down the length and accordion folded it. Then glued the ends to form a circle and turned it out to created the fanned circle. Then to hold it like that, I stuck it to a 1" card stock circle with Sticky Strip and added the rest of the embellishments. The shimmery bat was created by spritzing a piece of Basic Black card stock with Silver Foil Smooch Spritz, then using the Bitty Bat punch. I also used Crystal Effects to adhere the Black Chunky Essentials glitter to the Large Oval and stuck a Black Basic Jewel to the center of the bat. I wonder which goodies I will fill this with!

Check out the Halloween Accessories Kit here!

Friday, September 17, 2010

Autumn Spice 8x8 pages


Still loving this new Autumn Spice Specialty DSP! This is the 8x8 scrapbook page layout swap I did. We should all be getting ours back soon :) Hopefully before this posts to my blog, lol! I used the leftover leaves from my Autumn Wreath to make these pages. I only needed 2 more Cajun Craze leaves. I told you I had a ton of leftovers!
I have to confess something....I am not really a fan of matting photos on a scrapbook page. I will do it sometimes, but most of the time I don't. Also, my ladies at club prefer to have their options be more open to placement and size of photos on their layouts. This is where I used so much of the Champagne Glass Glitter. It really adds a WOW to these pages.
  • Stamps: Gay of Gratitude
  • Paper: Pear Pizzazz, Early Espresso, More Mustard, Cajun Craze, Old Olive, Autumn Spice Specialty DSP
  • Ink: Pear Pizzazz, Early Espresso, More Mustard, Cajun Craze, Old Olive
  • Other: Big Shot with Tasteful Trim and Leaves #2 dies and Square Lattice, Vintage Wallpaper, and Finial Press embossing folders, Designer Label punch,  Champagne Mist Shimmer Paint, Stampin' Sponge, Champagne Glass Glitter, Crystal Effects, Stampin' Dimensionals, Rhinestone Basic Jewels, Pear Pizzazz 1/2" Stitched Poly ribbon, Sticky Strip


Now to find the perfect pictures to put on this layout!

Thursday, September 16, 2010

2007 Halloween page


I was playing with my Halloween kit stuff recently and made a few projects with it. This is one of them. The picture is of my nephew Jacob, and my niece Sarah all dressed up for Halloween in 2007. Aren't they adorable! Jacob is laid back and sweet, but can come up with a good come back in no time flat! That would his father's influence-ever the smart-ass! That would be MY brother, lol! And Sarah is a wild child tomboy whom we all love dearly :) She is sooo going to be a handful when she is a teenager, lol! OK enough bragging about my family! And Jacob and Sarah, I LOVE YOU!
This is an 8x8 page, and the DSP in this kit is 6x6, so I cut two 1"strips and made a 7-1/2" long strip. Then I ran it through the Big Shot with the new Tasteful Trim die, then used the positive and the negative of the cut! Of course it needed some bling, so I used Crystal Effects to glue some Black Chunky glitter to it, and then applied some Black and Rhinestone Basic Jewels. The embellishment to the right of the picture was supposed to have Happy Halloween stamped on it, but I forgot to do that before I assembled it, ugh! So it got some more Jewels on it! The Raven Lace Trim is applied to Sticky Strip on the page and ruffled as I applied it. I stuck a bunch of bats on it, and called it good!
  • Stamps: From the Crypt, Teeny Tiny Wishes
  • Paper: Wild Wasabi, Rich Razzlberry, Basic Black, Wicked Fun DSP
  • Ink: Wild Wasabi, Rich Razzleberry
  • Other: Big Shot with Tasteful Trim die, Designer Label punch, 1-3/8" Circle punch, Large Oval punch, Bitty Bat punch, Black Basic Jewels, Rhinestone Basic Jewels, Black Chunky Essentials glitter, Crystal Effects, Sticky Strip, 1/2" Raven Lace Trim, Basic Black Stampin' Write Journaler, Stampin' Dimensionals, Signo white gel pen
Don't miss your chance to get the Halloween Accessories kite available here

Wednesday, September 15, 2010

Glittery Fall card


This was one of the candidates for the card I am sending to my customers this week :) The DSP is from the new Autumn Spice Specialty DSP and is just luscious! I love the heavy weight and the texture of it all. The colors are yummy too! And I used some of the new Champagne Glass Glitter, which I love too!  There was very little stamping on this card, just the greeting and some on the inside on Naturals Ivory card stock. I didn't end up using this card to mail out to everyone. I wanted to do a full sized A2 card after I thought about it, plus, I have used so much of this glitter I was afraid I would run out, lol! I have found that using Crystal effects is definitely the way to go with the glitter though. It really doesn't shed!
  • Stamps: Hello Again, Day of Gratitude (inside)
  • Paper: Early Espresso, More Mustard, Naturals Ivory, Autumn Spice Specialty DSP
  • Ink: More Mustard, Cajun Craze
  • Other: Pear Pizzazz 1/2" Stitched Poly ribbon, Champagne Glass Glitter, Crystal Effects, Sticky Strip, Stampin' Dimensionals
Don't forget to check out the Kits for Sale page! There are a Halloween kit and 2 ribbon shares available.

Monday, September 13, 2010

Halloween Kit Card #1


I have put together a Halloween Accessories Kit featuring several of the new embellishments in the Holiday Mini. This is a card made from the contents of one of these kits. I didn't use Waffle Paper on the bottom panel because it has not arrived yet, but it would look fantastic there! Lots of fun goodies in this kit.
The layout is based on this Mojo Monday sketch.
The main image is stamped on a piece of Whisper White card stock that has been covered in Frost White Shimmer Paint. The corners were rounded, then I sponged on some Cajun Craze, Rich Razzleberry, and Old Olive ink. Then the edges were inked with Early Espresso and it was matted on a piece of Basic Black card stock.
For the bottom panel, I used the Spider Web embossing folder on Basic Black card stock and then applied dabs of Crystal Effects to the raised web and sprinkled on some Chunky Black glitter. It would look even better with the Waffle Paper! Hurry UPS man!!
The bats were created by spritzing Basic Black card stock with Silver Foil Smooch Spritz and then punching out with the Bitty Bat punch. 10 of these are included in the Halloween Accessories Kit.
Totally creepy looking card :)
  • Stamps: From the Crypt
  • Paper: Cajun Craze, Basic Black, Whisper White, Wicked Fun DSP
  • Ink: Cajun Craze, Rich Razzleberry, Old Olive, Early Espresso
  • Other: Big Shot with Spider Web embossing folder, Corner Rounder punch, Bitty Bat punch, Rich Razzleberry 5/8" Satin ribbon, Raven 1/2" Lace Trim, Stampin' Dimensionals, Sticky Strip, Basic Black Chunky Glitter, Crystal Effects, Silver Foil Smooch Spritz, Stampin' Sponges

Friday, September 10, 2010

Want Some Coffee?


My friend Holly started her very first weekly Color Challenge on her blog this week and I finally had time to do it last night! This color combo made me think of coffee so I went and dug out one my favorite sets.


I stamped coffee beans all over the card stocks, embossed the Pumpkin Pie piece with the Vintage Wallpaper folder, and a strip of Daffodil Delight was cut with the awesome new XL die Tasteful Trims! I took my Daffodil Delight and Early Espresso markers and colored some of the largest pearls before placing them on the card. I love how this card could work for a man or a woman :)
  • Stamps: Like it a Latte
  • Paper: Early Espresso, Pumpkin Pie, Daffodil Delight, Naturals White
  • Ink: Early Espresso, Pumpkin Pie, Daffodil Delight
  • Other: Big Shot with Vintage Wallpaper embossing folder and Tasteful Trim die, Distressing tool on Cutter Kit, Large Oval punch, Stampin Dimensionals, Basic Pearls, Signo white gel pen
 This set is sadly retired now, but there is a very cute new set that could be used instead, if only I had it!


You can order this set now! Just go to the SHOP NOW button to go to my demo site. Or contact me to place an order.

Don't forget to check out my kits and shares!