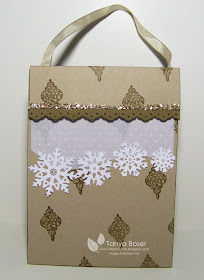
So here is the second installment of the November Stamp Club projects! I was inspired by a card created by my friend Deb Burgin. I was going to use Baja Breeze, but then remembered how elegant these browns can look together.
This is made with a plain lunch bag trimmed down to 7" tall. I used one sheet of 8½"x11" card stock, a 3"x5" piece of vellum paper, and a 2"x12" strip of Whisper White card stock. Here are some directions:
- Trim lunch bag down to 7" tall.
- Cut the Sheet of card stock in to 2 pieces: 5¼"x7" and 5¼"x8½".
- Score the 5¼"x8½" piece at 7" to create a flap.
- Stamp desired image all over both pieces.
- Take a 1"x5¼" strip of Soft Suede and punch with the Eyelet Lace border punch. Adhere to bottom edge of the flap.
- Put a line of Crystal Effects along the flap and apply Champagne Glass Glitter.
- Punch a hole about ½" from each side just below the flap on what will be the back of the bag piece of card stock. Insert the ends of a 12" piece of taffeta or seam binding ribbon and secure with Scotch tape. These ribbons are so thin, they don't create a lump!
- Emboss the vellum with the Perfect Polka Dots embossing folder.
- Trim the bottom edge of the vellum into a wavy curve. Adhere about 1½" down from top edge of the piece without a flap, but only put adhesive on the top edge, adhesive shows through vellum.
- Cover the top edge of the vellum with a 6" piece of taffeta or seam binding ribbon, tucking the ends over the sides and secure with Scotch tape.
- Use the Northern Frost Decorative Strip die to cut out your snowflake.
- Adhere snowflakes to bottom edge of vellum, then apply a Pearl Basic Jewel in the center of each.
- Adhere front and back pieces to bag, Tombow Mono Multi or Aqua work fine.
- Use a Velcro dot as a closure for the gift bag.
- Stamps: Tree Trimmings
- Paper: Crumb Cake, Soft Suede, Whisper White, Vellum paper
- Ink: Soft Suede
- Other: Big Shot with Perfect Polka Dots embossing folder and Northern Frost Decorative Strip die, Crumb Cake Taffeta ribbon (retired) Eyelet border punch, Pearl Basic Jewels, Crystal Effects, Champagne Glass Glitter, paper cutter with scoring blade, Crop-A-Dile (to punch the holes), brown paper lunch bag, Velcro
Now, you could adapt this bag to something much simpler, or more elaborate! I really love how it turned out. I think it would be great for giving homemade goodies of all sorts, baked and or crafted.
And today marks the beginning of the On-Line Spectacular with Stampin Up!


This is such a pretty bag! Amazing that it started out as a plain ol' brown bag.... tfs!
ReplyDeleteGreat job dressing up a plain bag!
ReplyDeleteGorgeous bag! I love the embossed vellum!
ReplyDeleteSo cute and simple!
ReplyDeleteMaking bags to go with homemade goodies is a great idea! I LOVE the way this one turned out.
ReplyDelete