The little baskets you can make with the Petal Cone die are so darn cute! And I found an excuse to use my Baja Breeze glitter :) We made these in club last week. I will try to do a little tutorial here, especially for my club members who could not make it.
- Stamps: Easter Blossoms, Elements of Style
- Paper: Daffodil Delight or Marina Mist, Early Espresso or Soft Suede, Naturals White
- Ink: Daffodil Delight or Marina Mist, Early Espresso or Soft Suede
- Other: Big Shot with Petal Cone die, Itty Bitty Shapes punch pack, Designer Label punch, Corner Rounder punch, 1 1/4" Square punch, Dotted Ribbon punch, eyelets, Crop-A-Dile, paper cutter, Bone Folder, Crystal Effects, Champagne or Baja Breeze Glass Glitter, Stampin Dimensionals
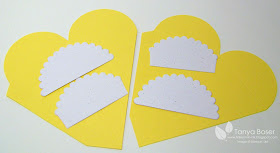
1. Cut 2 Petal Cone dies and 4 Scallops half circles. Trim 2scallops off each side of 2 of the half circles.
2. Fold the cone dies in half on score line and fold in the flaps. Crease well with bone folder.
3. Line up the top score line with the 2 5/8" line, score, move to left and line the new score line up with the 1/2" line and cut the tip off.
4. Trim off the bottom piece of the flap, clip to score line at the middle score line. Fold and crease well as shown. Stamp as desired. Adhere the 2 Petal Cone pieces together.
5. Punch or cut two 1 1/4" squares to adhere to the inside and outside of the bottom of the box.
6. Adhere half circles as shown.
7. Adhere the trimmed scallop flaps to sides of basket. Stick a couple dimensionals to the undersides of the other 2 flaps and adhere to sides of basket.
8. Use Crystal Effects to adhere Glass Glitter to all 4 flaps.
9. Use Dotted Ribbon border punch on a 5 1/2" strip of coordinating cardstock, then mat on a 1/2" strip of contrasting cardstock. Attach to basket with eyelets using Crop-A-Dile.
10. Punch out a Designer Label punch. Round the corners of a 1"x2" piece of cardstock and stamp Happy Easter on it. Punch 3 flowers with Itty Bitty Shapes punch pack. Apply Pearl Basic Jewels to centers. Adhere layers to each other and the basket with dimensionals. Glue flowers to greeting.
All done! Fill with treats of your choice :)


Tanya, these are adorable. Thanks for sharing the photos. Definitely want to case these.
ReplyDeleteTotally too cute!
ReplyDeleteCompletely adorable! Thanks for the step by step so that I can make them too!
ReplyDeleteVery cute!! Just love them!! Love the glitter too!
ReplyDeleteSo pretty! I love the flowers with the pearls. Thanks for the tutorial, also!
ReplyDeleteLove them!
ReplyDeleteYep, love these baskets!
ReplyDeleteLove these and what wonderful pictures for the steps! Thanks for posting the info.
ReplyDeleteThese are adorable! Thanks for the tutorial! Just too cute!
ReplyDelete