I got many requests for a tutorial on how I made the camouflage with the Paper Doily Sizzlet, so here I decided to do one quick. I thought you might like a closer look at the card since we are limited to 4 pictures during the hop :)
You can see the embossing and dimension of the card a little better here. The labels are both popped up.
I tried to keep it pretty simple since it is a guy card. No ribbon or bows, flowers or bling :)
- Stamps: Bring on the Cake
- Paper: Chocolate Chip, River Rock
- Ink: Chocolate Chip, Soft Suede, Crumb Cake, Always Artichoke, River Rock
- Other: Big Shot with distressed texture plate and Labels Framelits and Paper Doily Sizzlet, sponges, Stampin' Dimensionals
Inside I put another little strip of camo and sponged the edges of the River Rock with Choc Chip.
OK. Now for how to make the Camo!
Start with this mess of supplies (ink pads for the pictured sponges too)
- Paper Doily die cut
- piece of River Rock cardstock
- Soft Suede ink and sponge
- Crumb Cake ink and sponge
- Always Artichoke ink and sponge
- River Rock ink and sponge
- Chocolate Chip ink and sponge
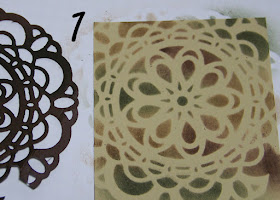
I am really just using the masking technique here. For your first sponging, use the darkest inks only and scatter them around. I am just holding the mask down with my fingers while I sponge. It does not matter if it slips while you are sponging.
This is what it looks like after you move your mask. You can clearly see the paper doily and a variety of color around it.
Now, put the mask back on the paper, shifting it so that you will be sponging a different area. Use the lighter colors in this round of sponging also.
Here is what round 2 looks like. Still lots of unsponged stuff showing, and now we are starting to get some layering of the colors.
Place your mask again exposing more of the unsponged areas and use more of the dark inks this round, but continue to use all of the inks.
It is really starting to look like camo now!
One more time, place the mask over your paper and sponge with all of the inks. Use your judgment for what you need more of at this point. Every time you do this technique, it is going to look different.
For the last sponging, I did not use the mask. I took the Crumb Cake and River rock inks only, and sponged all over. This was to soften all of the remaining unsponged areas. Now your piece can be used in your project!
I would love to see what everyone makes with this, so please post a link to your creation!


What a brilliant idea!! Thanks for the great tutorial!!
ReplyDeleteSuch a clever idea! Thanks for showing us how it was done.
ReplyDeleteWhat a great idea! I'll have to try this.
ReplyDeleteAwesome! I see lots of possiblties!
ReplyDeleteVery creative, Tanya!
ReplyDeleteWhat a great idea! Thanks so much for the tutorial.
ReplyDeleteStill hard for me to believe that this is the doily! Love it! So creative!
ReplyDelete