Pages

Friday, November 21, 2014

Courage in Pink

So, I know I should have posted this last month. October is Breast Cancer Awareness Month, and I made these cards and some coasters that I was going to take to a local bar as an awareness moment. They will have to go next year.... But I was having a month of creativity without feeding the blog monster. That's what I affectionately say when I create stuff just to make some posts on my blog. Or is that just an excuse to spend time crafting? ;)

All of the stamps and the embossing powder I used are retired. But just because SU doesn't sell them anymore does not mean that they don't still work! Just that I can't sell them to you :) Unless I wanted to sell mine, which I don't :)

This card started sometime in September when I made about 6 different panels with watercolor paper and different watercolor techniques. I went a little wild with it. I am still quite enamored with this whole watercolor thing :) Beware! Then the panels all sat there for a while, as I admired their beauty and did not have the heart to cut them up or cover any of it up. Silly, I know.
In late October, I finally decided I have savored these panels long enough and started making some cards with them. I cut this panel in half and made 2 cards that are almost identical.

To create the panel, I first embossed the ribbon in Melon Mambo embossing powder all over. Then I sponged stripes of color onto the panel, alternating shades of pink (Pink Pirouette, Strawberry Slush, and Melon Mambo) with Smoky Slate. Then I took a mixture of water and Pearl colored Perfect Pearls and spritzed the whole panel, and dried it with the heat tool. Fantastic shimmer results!

The ribbon was stamped with Pink Pirouette, then Courage was embossed in Silver embossing powder. Diecut and paper pierce the oval, diecut a 2¼" circle, and one of the banners from the Project Life framelits set in Dazzling Diamonds Glimmer paper.

I stamped all over the Pink Pirouette panel with the words in Pink Pirouette.


Inside, the ribbon is stamped in Pink Pirouette and then Hero is stamped in Silver Encore. I outline the inside panel with the white gel pen.

 Then I decided to put the second one on a white card base. I think I like this one better.

This one got outlined with the Silver Dazzle marker on the inside.

  • Stamps: Ribbon of Hope (retired), Words of Courage (retired)
  • Ink: Pink Pirouette, Strawberry Slush, Melon Mambo, Smoky Slate, Versamark, Silver Encore
  • Paper: Whisper White, Watercolor, Pink Pirouette, Melon Mambo, Dazzling Diamonds Glimmer
  • Other: Big Shot with Ovals, Circles, and PL Cards and Labels framelits, Silver and Melon Mambo embossing powder, Silver Dazzle marker, Signo white gel pen, Occasions Paper Piercing Pack and Paper Piercer, Heat Tool, Embossing Buddy, dimensionals

Built for Free Using: My Stampin Blog

I discovered that the 2 retired sets that I used are actually available as MDS digital downloads too!

Tuesday, November 18, 2014

Four Votive Candle Box Tutorial

SO, after doing only 2 videos in the career of my blog, I am trying again :) I have to say, this was the easiest one so far, despite the fact that I had an absolutely ridiculous set-up involving my cell phone, a goose neck lamp, a piece of MDF, and Painter's Tape, lol!

So here it is, a tutorial on making the votive candle box I made for the Amazing Birthday edition of the Stamp Review Crew. I hope you enjoy it. (Yes, I needed to use my inhaler-the scented candles in the box were setting me off, sorry about all of the throat clearing and sniffling. Just be glad I didn't start coughing during that take of the video, lol)


Measurements for the Box:
8½" square of cardstock
Score at ¾", 2¾", 5¾", 7¾"
Turn 90 degrees
Repeat the above scoring.

Measurements for the Slider:
3"x11"

Option one: tighter lid using the Paper Trimmer to score
Score at 3-1/16", 5-1/8", 8-3/16", 10-1/4"

 Option two: slighter looser lid using Simply Scored Board
Score at 3-1/8", 5-1/4", 8-3/8", and 10-1/2"

I went ahead and made up some more boxes with all the materials I used in the video. Waste not, want not you know!

You see the tops of all three in the banner at the top of this post, here are the sides of all of the boxes. I only stamped on the 2 sides that show when the slider sleeve is in place. Sometimes before I assemble boxes, I stamp a message in the bottom, but not this time.

For this one I stuck with the oak theme with the leaves and the acorns. I was surprised at how dark the Tangelo Twist turned out on the Naturals Ivory cardstock. But in a good way :)

I did manage to stamp these on the assembled box. It was a bit of a challenge, but that just makes life interesting, right!

This one is very simple. The most challenging thing was fussy cutting the banner.

I love how the Gold Encore ink looks on the Hello Honey banners. There is some 2nd and 3rd generation stamping here too.

I pretty much just repeated the pattern of the first box here, but with the branch. The "thanks" is part of a larger sentiment, I just inked up the word with a Versamarker and embossed with Gold embossing powder. I have had that Versamarker for years and have only used it a couple of times. It is still super juicy. I will be using it more :)

Just some simple stamping on the side of this one.

So, tell me what you think of the video, please! I can take constructive criticism and suggestions for improved video techniques and ways to edit, so please. Don't hold back :)


Sunday, November 16, 2014

Stamp Review Crew: Amazing Birthday Edition

http://stampreviewcrew.blogspot.com/2014/11/stamp-review-crew-amazing-birthday.html
Here we are again, with another edition of the Stamp Review Crew! This time we are featuring a mostly words stamp set.  Those can be a bit challenging, but I think you will "amazed" by the goodness that we create with it :)

If you are following along the hop in order you just came from Kerry Willard Bray's blog. Lovely, right! If you started here, have no fear, the hop goes full circle and you won't miss a thing. If you ever get lost along the way, you can find the full "map" on the Stamp Review Crew blog, just click on the banner at the top of this post. While you are there, be sure to catch up on any of the previous hops you may have missed :)

OK, now on to my projects!

Let's start with this slightly different take on the oh-so-popular right now technique, Bokeh! I do really love the Bokeh effect and there are lots of videos out there on how to achieve it. Most will have you sponging the circles in varying intensity with a stencil and sponge or dauber. I had a faster method :) I have saved all of those circles of rubber that we pop out of our rubber stamps. I know I got at least two from the Daydream Medallions stamp set and I have a couple more that I can't remember where I got. I have them all in a stamp case labeled "Solid Circles".

 A peek inside, and a side view to show you the popped up front panel.

  1. For this card, I sponged Strawberry Slush and Tangelo Twist all over a 3½"x4¾"panel of Whisper White in a random pattern.
  2. Then I just started stamping a variety of sizes of circles in Whisper White. As you stamp and over lap the circles, the overlapping parts are a more opaque white. 
  3. For the last layer of white circles, I used the Cake Circle and the It's For You Circle stamps from Amazing birthday. Heat set the white ink.
  4. Wipe panel with Embossing Buddy, stamp sentiment with Versamark, and sprinkle with Black embossing powder, then heat with Heat Tool. 
  5. Using a panel of Strawberry Slush that is about 4½"x5¾", diecut a scalloped edge  along the right side, then trim to 4"x5¼". By using a larger piece to begin with, you can adjust for a crooked diecut edge :)
  6. Stitch stamped panel to the scalloped mat. 
  7. Inside a white card base, stamp the Cake Circle and the It's For You Circle stamps in Strawberry Slush and Tangelo Twist along the right side, stamping off once for each image.
  8. Use LOTS of dimensionals to adhere panel to a white card base.
  9. Punch out some stars with Star Confetti punch from Glimmer paper. Adhere stars and Sequins using Crystal Effects. Done!
Built for Free Using: My Stampin Blog

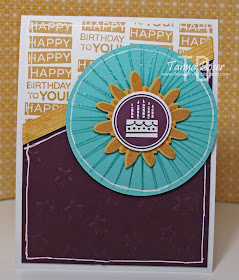
 This time I wanted there to be some drama with the cake! I combined a couple of stamp sets and some embossing to get the effect I was looking for :)


The Happy stamp is very easy to ink with markers by the way, and you can see that I stamped it in the lower right corner inside.

Built for Free Using: My Stampin Blog

Then I decided to make a little box to hold some votive candles.  I tried with the Gift Box punch board, but the sizes didn't match the candles well enough, so I went with a pattern I have come up with myself a couple of years ago. I thought I had posted it, but I can't find it now... I guess I will be doing a tutorial soon! This box holds 4 votive candles, and has a sleeve that slides on and off. The sleeve was sponged and stamped. The tag is embossed with three colors.
ETA: There is now a video tutorial for this here!

You can see the sleeve and box a little better in this view. I went a bit crazy with the sequins and stars, huh :)

I made a matching bag tag for this little box too, but left off the sequins and stars. As I put together the list of supplies below, I realized that two of the colors of embossing powder I used are no longer available, the Melon Mambo and the Tangerine Tango. So sorry about that. However, if you have been buying SU stuff for a while, I bet you have them in your stash ;)

Built for Free Using: My Stampin Blog


Well, that is it, finally, for me. Now it is time to go see what Adriana has whipped up for us!


http://escape2stamp.blogspot.com/2014/11/stamp-review-crew-amazing-birthday.html
http://www.peoniesandpaperchains.com/2014/11/stamp-review-crew-amazing-birthday-edition.html

Sunday, November 2, 2014

Stamp Review Crew: Kinda Eclectic Edition


We at the Stamp Review are pleased to feature the fabulous stamp set Kinda Eclectic for you this round! I love that it has so many great individual stamps. They all work very well together, and when used separately, and with other stamp sets. It truly is an eclectic set :)
As always, if you get lost along the way, you can always find the right links on the official Stamp Review blog, and click here for the post for this hop. If you have missed any of the past hops, be sure to go to the official Stamp Review Crew site and catch up!
If you are following along in order, then you just came from Wendy Weixler's blog. Isn't she amazing?!
I am #6 on this hop, so let's go see what I came up with :)


How about a wreath of greens is some slightly funky colors. I wanted to try it in mints and aquas as those seem to be quite popular right now. The pearls are colored with the darkest Old Olive Blenda. For the mint color I used Pistachio Pudding, and the aqua is Pool Party. The sentiment is stamped in Mossy Meadow.


I added a couple of the branches of leaves on the inside of the card, and some more white gel pen, of course!

Built for Free Using: My Stampin Blog

These 2 purples just called to me when I was making this card. I have had a little idea paper taped to my stamping area for this card for about a month now and I finally made this card just hours before the deadline before this hop! You can just make out the sentiment in the picture here, but it is much more visible in real life.

I added a couple of butterflies to the inside also.

Built for Free Using: My Stampin Blog


I featured this set in another blog hop back in June and thought I would share a couple of the cards I made for that hop.

Built for Free Using: My Stampin Blog

I just love this card. I ended up giving it to a sweet young lady who agreed to watch our pet rabbit for a week on short notice. I had completely forgot to make arrangements for little miss Chai Tea Leaf while we stayed at a cabin on vacation! Yes, my bohemian daughter named this rabbit. The cat she got a couple years later got named Rasta Punkin.... The bunny sitter told me it was the most beautiful card she had every received and immediately hung it on her fridge :) And no, she isn't a stamper, lol!

Built for Free Using: My Stampin Blog

That's all for me folks, time to head over to Debra Currier's blog to see the magic she whipped up!

http://artfeltimpressions.blogspot.com/2014/11/stamp-review-crew-blog-hop-kinda.html  

http://wickedlywonderfulcreations.blogspot.com/2014/11/stamp-review-crew-kinda-eclectic-edition.html