For those who are new to the Stamp Review Crew, here is a little background. We are an international group of Stampin' Up! demonstrators that gets together on the first and third Mondays of every month to do a blog hop. Each hop features a single stamp set to give you loads of inspiration for that set! Except this time :) This time we are featuring the Host Sets, which often get forgotten. The hops are archived at the Stamp Review Crew blog, and you will be able to click through each hop at any time, going directly to the posts for that hop whenever you want! And you can click on the banner of this post to go to the master blog roll for this hop also.
If you are following along in order, you just arrived from Rochelle Blok's blog, and she always has such beautiful projects!
There are always lots of wonderful sets to chose from when you earn host rewards! These are the NINE sets you can chose from right now! If you would like to host a party, I would be happy to help you earn some of these fun sets :)
This is my project to share. I will add more details later, I have to go to work now :)
Ok, it is "later" now :)
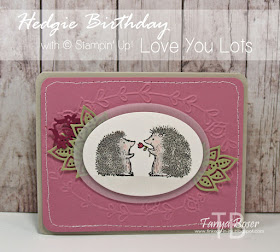
I chose this set and this image because my daughter and her fiance have a hedgehog, and I have been thinking about her a lot this week. Her birthday is next month, and I thought she would enjoy these little critters :) Her is the How-To:
- Prepare a Sahara Sand 4¼"x5½" card base, round the corners with the Corner Rounder punch. Cut a piece of Sweet Sugarplum to 4"x5¼", round those corners too.
- Center the Sweet Sugarplum panel in the Pretty Paisley embossing folder and emboss with the Big Shot. Optional: stitch around the edge, or draw a line with a white gel pen.
- Stamp the hedgehogs on a scrap of watercolor paper in Archival Black ink, watercolor with Smoky Slate and Blushing Bride for the hedgehogs, and Sweet Sugarplum and Pear Pizzazz for the flower. Ground them with very dilute Smoky Slate. Add Clear Wink of Stella over the hedgie spikes and the flower.
- Die cut the hedgehogs with an oval die, then die cut a larger oval in Vellum.
- Layer the ovals together using dimensionals. Then apply dimensionals behind the Vellum layer.
- Die cut 3 Pear Pizzazz fancy leaves, 1 Rich Razzleberry fancy leaf, and 1 Rich Razzleberry fancy flower with stem using the Paisley framelits. Arrange on the Sweet Sugarplum panel so that they will stick out behind the ovals. I stapled them where it wouldn't show :)
- Adhere the focal ovals to the Sweet Sugarplum panel. Put more dimensionals, or use cut down coasters, on the back of the Sweet Sugarplum panel, and adhere to the card base.
- On the inside of the card, stamp the sentiment from Birthday Fiesta in Archival Black ink, then use the Fine-Tip glue to adhere the Rich Razzleberry fancy leaf next to the sentiment.
- All done!
See all the dimension? I still love dimension! I tried to catch the shimmer on the hedgies too, but it is so hard to catch that in a photo. Just know that they are really sparkly in real life :)
I am really surprised that the sentiment in Birthday Fiesta goes so well with both the hedgies and the Paisleys Suite. How about you, what do you think?
We also have a Pinterest board for every hop, check it out!
Are you ready to head over to the next stop? Shana Gaff will have lots of wonderful inspiration for you!
If you have seen something you need for your crafting life, just click the image in the supply list below and it will take you to my store! If you order less than $150, please use this month's Host Code, which can be found at the top of the sidebar on the right.
And be sure to check the box allowing me to contact you when you check out. I can't send you a thank you card if I don't know your address! And I promise to only send you happy mail, no junk mail :)
Product List


Gorgeous card, Tanya! Love the embossing folder you set off that stamp with, and the stitching adds a fantastic touch. Super cute!
ReplyDeleteGorgeous card, Tanya! Fabulous colours and I love that the embossed layer surrounds the ovals! A super cute use of this set! Rochelle xo
ReplyDeleteGorgeous Tanya! Lovely to see a close up of that pretty embossing folder too. Fab colour choice and the stitching detail is a great finishing touch. xx
ReplyDeleteThis is so elegant, and the colors you picked are perfect!
ReplyDeleteLovely watercoloring and wonderful use of color and textures! The vellum layer is just perfect on this!
ReplyDeleteI love the colors you chose for this card, Tanya! The elegant touches with the hedgies gives the card a whimsical feel--perfect for a beloved daughter.
ReplyDeleteLove how you took the simple stamps and stepped up the card ... very nice!
ReplyDelete