For those who are new to the Stamp Review Crew, here is a little background. We are an international group of Stampin' Up! demonstrators that gets together on the first and third Mondays of every month to do a blog hop. Each hop features a single stamp set to give you loads of inspiration for that set! The hops are archived at the Stamp Review Crew blog, and you will be able to click through each hop at any time, going directly to the posts for that hop whenever you want! And you can click on the banner of this post to go to the master blog roll for this hop also.
If you are following along in order, you just arrived from Bronwyn Eastley's blog. I am in awe of her skills!
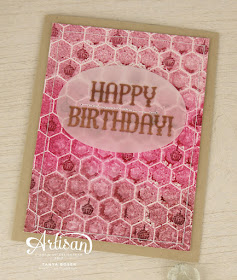
I needed to play with ink blending again. And I wanted to use a fun embossing folder as I planned to stamp the tiny cupcake on some of the details. So, here goes!
- Cut a piece of watercolor paper to 3¾"x5".
- Open the Hexagons dynamic embossing folder. Apply ink to the embossing folder by pouncing an inked sponge on the slightly smaller side of the folder. Use Sweet Sugarplum at the top, Berry Burst in the middle, and Fresh Fig at the bottom.
- Spritz the Watercolor panel lightly with water, then lay it spritzed side down onto the inked part of the folder. Run through the Big Shot. Allow to air dry, or heat set as it will be slightly wet yet.
- Stamp the tiny cupcake in the same inks in random hexagons.
- Take a scrap of Vellum at least 3½"x3", wipe with Embossing Buddy, and stamp the Happy Birthday in Versamark. Sprinkle with Copper embossing powder, tap off the excess, and heat set.
- Cut the birthday greeting out with the Layering Ovals dies. Stitch to the card front. Or use your favorite way to adhere vellum to cardstock.
- Adhere the finished panel to a Crumb Cake card base.
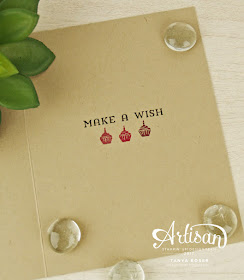
- Inside, stamp 3 cupcakes, on in each color. Then stamp "make a wish" in Early Espresso just above the cupcakes.
- Done!
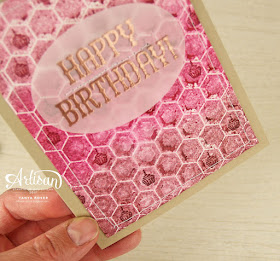
See all of that great color wash variation?! And it is so easy! It really accentuates the dimension that you achieve with these embossing folders.
And there are the sweet little cupcakes. I could have been a little straighter. But these are handmade, so I think it is OK 😁
And now, Juana Ambida!! Love her stuff as well. So very many talented stampers on these hops :)
And be sure to check the box allowing me to contact you when you check out. I can't send you a thank you card if I don't know your address! And I promise to only send you happy mail, no junk mail :)
Product List


Very cute and the water-coloring is awesome as always.
ReplyDeleteAwesome! I want to case it!
ReplyDeleteOh my gosh! I LOVE this background! What an awesome technique, Tanya! Thank you for the inspiration!
ReplyDeleteVery cool technique, Tanya ... so effective.
ReplyDeleteI think this is the most fun use of the color washing that you've done yet, Tanya! The color gradations, the water puddles, touches of white where no color landed, and the little cupcakes here and there...Awesome!
ReplyDeleteWe are going to call you the Color Wash Queen:) Another super technique and wonderful card!
ReplyDeleteWhat a cute card, Tanya! Love the embossed Happy Birthday. Makes me want to make one right away!
ReplyDeleteTanya! I am in love with this technique background. It's beautiful! A great card. So glad you got to spend some time with your daughter. Great work my friend.
ReplyDeleteWhat a fab effect Tanya! Loving this inky creation! xx
ReplyDeleteGreat ink technique! I love all the hidden cupcakes hiding in the honeycomb pattern. Awesome!
ReplyDelete