Monday, November 15, 2010

SnowFlake Tealight Gift Ensemble Part 2


Time for part 2! Today is the Snowflake die cut tealight holders! These are so cute, but a little tricky in the Big Shot. I had been planning to get the Flower Folds die to make tealight holders, which everyone else has been making for a year now! I saw someone somewhere (sorry I don't remember who) using the snowflake die, and I have that already, and I had purchased a 50 foot roll of 6" wide flashing at the hardware store about a month ago just for this kind of project. I should be able to get a lot of tea light holders out of that, lol


The trick for me to get all of the little holes punched through was to make sure the cutting plated was in full contact with the die (if it is warped, you want the middle of the plate touching the die), adding a couple paper shims, and doing 2-3 passes through the Big Shot. This is because this is such an intricate die. It you were using the Flower Folds or some other solid image die, it works just fine with just one pass. The leaf die is rather intricate also, so I would do a couple passes with that one too. Oh jeez.. I went off on another tangent! Just a peek into the mind of Tanya... I always have at least 2 things going on in my mind at any one time...

Then to pop the branches up, I set a tealight in the center and fold each branch up around it. The middle holder is done the same way with 2 Snowflakes. I tried using just Sticky Strip to hold them together but they kept coming apart. Then I tried to put an eyelet in, but I couldn't get the Crop-A-Dile in to the center to set the eyelet without bending it all up, so I put a brad in the center after punching the holes in the snowflakes one at a time. The prongs are on the top so the tealight sits flat in the holder. That is all there is to this portion of the project!
  • Supplies: Flashing (thin metal available at your local hardware store), Big Shot with Snowflake die, Crop-A-Dile, Brad
See you all tomorrow!

Sunday, November 14, 2010

Snowflake Tealights Gift Ensemble Part 1

I have a really fun project to share with you all! This would make an excellent gift for many people. I don't think these are original ideas by themselves, but I haven't seen this combination anywhere else yet :) I am going to share this with you in 3 parts, 1 each day for 3 days, so stay tuned!

There are 15 decorated tea lights here. They are the inexpensive ones from Walmart, 50/$2.50
They burn quite nicely too. I know there are lots of people out there very worried about the super thin little layer of tissue paper on these candles that could potentially burn down your house, but really. Come on. Unless you are burning this candle near something else flammable, like right next to a curtain or something, it will be just fine! There is a split second like flash that does not FLARE when the flame hits it and that is it. So, don't burn these near anything flammable, ok  :-) Now that I am done with my soapbox, on to the fun of the project!
  1. Punch out your 1-3/8" circles of tissue paper- sandwich 4 layers of tissue paper between 2 layers of copy paper to punch them out so the punch has something sturdy to bite into.
  2. Keep your sandwich together and punch a  1/16" hole in the center for the wick to slide through. 
  3. Stamp your image on the tissue paper. 
  4. Slide the stamped circle over the wick and heat with a heat gun until melted into the top of the tealight. All done!
  • Stamps: Northern Hearts
  • Paper: Tissue paper
  • Ink: Marina Mist
  • Other: 1-3/8" Circle punch, 1/16" punch, heat gun, tealights
I make so many tealights, I just punched a whole bunch of the 1-3/8" circles one day and keep them on my desk in a matchbox so all I have to do is grab and go!  You may find this helpful if you start doing a lot of these little tea lights too :)

Saturday, November 13, 2010

Tea Party Napkin Rings


I started working on the napkin rings to go with the Tea Packet holders I  made last week. I have everything cut out and embossed and placed in a baggie to take with me down to Little Falls this weekend. I like to have something productive to do while visiting. I really don't sit still very well :) And I tend to stay up really late since I am used to working until midnight and all of our family work early in the morning, which leaves me with some idle time on my hands.... we can't have that now can we! My hubby is going to go to a hockey game with his brother at St. Cloud State on Friday evening, but that isn't why we are going to visit. He is going to get the front end on his truck fixed.We don't have a garage and DH's brother's father-in-law is a mechanic and will let them use his lift :) Ok, maybe you would like to see the project, huh!

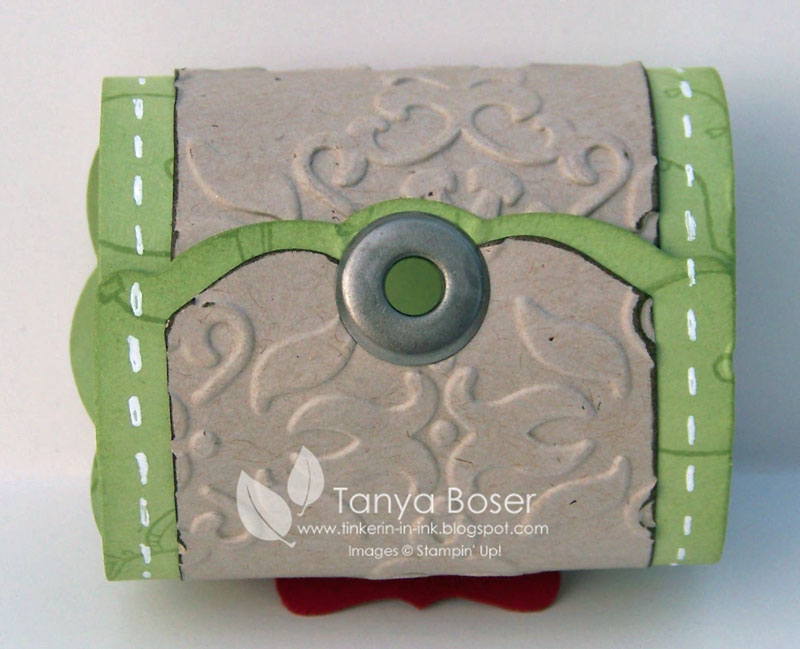
I fastened the back with a Jumbo eyelet again. They work perfectly! A tip for success: Punch your holes before overlapping the edges because the Crop-A-Dile hole punch doesn't reach in far enough, even though it will reach to set the eyelet. Go figure!
  • Stamps: Morning Cup
  • Paper: Pear Pizzazz, Crumb Cake, Cherry Cobbler, Watercolor 
  • Ink: Early Espresso, Palette Burnt Sienna (retired Non-SU hybrid ink), Pear Pizzazz, Cherry Cobbler
  • Other: Big Shot with Table Setting die and Vintage Wallpaper embossing folder, Aqua-painter, Designer Label punch, Curly Label punch, Signo white gel pen, Pearls Basic Jewels, Antique Brass Jumbo Eyelets , Crop-A-Dile, Stampin' Dimensionals, bone folder (to help curl the paper)

I will use some of the tea cup and some of the coffee mug images for a little variety on these. I am making 14 for Zohra. She is a doctor I work with and such a sweetheart! She grew up in Afghanistan and moved to the US about 20 years ago. She and her husband are both doctors and I have worked with them both. She and I both love tea, and she loves to make projects I plan. She started asking what we were going to make to decorate for Christmas THIS year already back in August, lol! the last 2 years I have had everyone help make different ornaments to decorate the ER. I haven't decided what to do this year yet...
Anyway! She asked me to make some special place setting things for her to use for special tea parties at her home.

Here are the two projects together. She loved the tea packet box, and I think she will like the napkin holders too :) I know I do! And I will be finishing them this weekend...

Friday, November 12, 2010

Mini File Folder and Box


I purchased Becky Robert's 12 days of Christmas and I am lovin it! This is one of her projects.

 These are mini-file folders! So cute and so easy! Her tutorial shows you how to make the box and the folders. I am going to use this to organize the different events I will be attending and helping with this Christmas season, along with all of the gift giving to come :) Maybe I'll even throw a couple recipes in there :) I made 10 folders so there should be plenty of room for several categories!

 There is still plenty of room in here for me to actually put things in the folders.4x6 photos fit in it too! Hmmm, I keep thinking of more ways to use this!
It was fun to decorate all of the folders, It helps to have pretties to look at while you are working, I always say!
  • Paper: Baja Breeze, Blushing Bride, Garden Green, Real Red, Candy Cane DSP, Very Vanilla
  • Other: Corner Rounder punch, Crystal Effects, Silver Glass Glitter, paper cutter with scoring blade
Happy Stampin' til tomorrow!

Thursday, November 11, 2010

Autumn Spice Organizer

This is a variation on the Accordion File Folder, and here is the tutorial for that. This is more of a book form though. I just love this paper! The prints are gorgeous and the heavy cover weight of it makes it a dream to make more durable projects with.

Here is the spine of the "book". I glued the mountain fold together, so this isn't actually and accordion fold anymore  :) This back piece of DSP was 8½"x7¾" . To help with the fold, I scored at 4" and 4-1/8" from the right side. 

There are 3 "pages" in this organizer. I am using it to keep track of the projects I am being commissioned to do! I didn't realize how many there were until I sat down and wrote them down!

I used More Mustard and Cajun Craze card stock stamped with the medallion from Day of Gratitude and some scraps of the DSP from the cover to finish the inside. The pocket edges are secure with Sticky Strip. Before securing the pockets, I put an eyelet in the back cover, threaded a loop of  some of the retired Gold Elastic cord I had around, and stapled the loose ends to the inside pocket. This wraps around the front and fastens around the Antique Brad on the front to hold the book closed.
  • Stamps: Day of Gratitude
  • Paper: Autumn Spice Specialty DSP, More Mustad, Cajun Craze
  • Ink: Early Espresso, More Mustard, Cajun Craze
  • Other: file folder, Signo white gel pen, stapler, Crop-A-Dile, Metallic eyelet, Gold Elastic Cord (retired), Antique Brad
I hope you give this project a try! And if you still need some of this yummy paper, go right on over to my store and get some!

Wednesday, November 10, 2010

Birthday Crack


Hello! That is not the view I want to start my day with, but isn't it hilarious?! At least it isn't hairy and smelly ;-)

 
A co-worker asked me to come up with a funny 50th birthday card. I saw this image on the blog-o-sphere and had to make this card. I promise, I am not going to start posting a bunch of non-SU stuff, this is a one time deal. I just couldn't resist sharing this with all my friends. :) 
The Designer Label punch is hard at work again here, one on each side of the 2½" Circle punch for the main image. This is one unbelievably versatile punch! The shirt is water-colored in Tangerine Tango, the pants are layers of Marina Mist and Not Quite Navy. The Shoes are layers of  Crumb Cake and Soft Suede. The grey hair and the metal bits are Sahara Sand. The flesh tone is Blush Blossom, although Blushing Bride is very close to it and would be a good substitute.


Here is the inside with the punch line. I still laugh every time I see this! Yes, I laugh at farts too. What can I say.... I'm a nurse and farts are good! Wait until you have to have surgery and they won't let you leave until you have a good fart... you know I'm right. You know, you can die if you can't fart...or do the stuff that follows farts.... Oh boy! Did I ever get off topic here! Back to stamping, a much safer and better smelling topic!
  • Stamps: Teeny Tiny Wishes, non-SU plumber and wrench
  • Paper: Soft Suede, Tangerine Tango, Watercolor paper, Naturals Ivory
  • Ink: Jet Black Stazon, Soft Suede, Crumb Cake, Sahara Sand, Tangerine Tango, Marina Mist, Not Quite Navy, Cherry Cobbler, Blush Blossom
  • Other: Aqua-painter, Antique Brass Jumbo Eyelets, Crop-A-Dile, Stampin' Dimensionals, 2½" Circle punch, Designer Label punch, Large Oval punch, Small Oval punch, Distressing tool on Cutter Kit, Signo white gel pen

Now, don't you think you need that Designer Label punch, AND the Aqua-painters?! I know I am sure glad I have them, they have been used on almost every project I have done lately :)

Tuesday, November 9, 2010

Acorn Napkin Ring


Napkin rings! To go with the place card I posted here. I had to go through some trial and error on this project. But that's kind of the way it goes :) It's a good thing I still have several Jumbo Eyelets left! They are perfect for this project.

Here are the two I have made so far side by side. The one on the left is the first one I made. I folded some Cajun Craze paper in half to cut out the smaller layer the second time so there was no gap and I embossed both layers on the second one hoping to have a more flexible napkin ring, but I like the Soft Suede layer better not embossed. So the next one I make will have no gap and the Soft Suede base will not be embossed, lol! I also learned that you need to let the Shimmer Paint dry before trying to use a gel pen on the paper :)  The punches are each mounted on the ring with dimensional so they conform nicely to the curved surface.
  • Stamps: Day of Gratitude
  • Paper: Soft Suede, Cajun Craze, Naturals Ivory
  • Ink: Soft Suede, Cajun Craze
  • Other: Big Shot with Table Settings die, Lots of Tags Sizzlet die, and Vintage Wallpaper embossing folder; Designer Label punch, Large Oval punch, Champagne Mist Shimmer Paint, Sponge, Antique Brass Jumbo Eyelets, Crop-A-Dile, Signo white gel pen, Rhinestone Basic Jewels, Stampin' Dimensionals
Here they are all together. I hope they live up to the anticipation!

LinkWithin

Related Posts with Thumbnails