Friday, November 26, 2010

Thanksgiving #2!


Or is it number three? We have 4 sets of parents between me hubby and I, so holidays are a bit of a challenge to coordinate :) We are having dinner with my Mom at Pizza Ranch. I think we are all a little turkeyed out.  I have no projects to share today, sorry, but I have a few pictures to share.


This is the birthday boy from yesterday, my Dad. He had to spend a good amount of time laying on the couch because Mr. Workoholic with a Bad Back just had to go help somebody put some steel roofing on a couple days ago....sigh.  He was really happy to have all but two of his 8 blended family kids over for the day! This is a major event by the way!


My brother Eric made it for the first time in years! My niece and nephew Sarah and Jacob

And these are David's , my oldest son, girls! His girlfriend Carrie and his cousin Sarah. Sarah thinks David hung the moon. 


This is David. I think Carrie took this picture. She did good!


 I took this one of David and Carrie, so sweet :)


And my youngest son, Geoffrey. Charlene, my daughter, couldn't take it any more and trimmed his hair last night. This is the before picture, I have to take an after picture yet!


And here is Steven with his posse of nieces...he was so proud! Steven is my youngest brother. I think he is 22 now. The girls from left to right are Brittany, Charlene, and Katerina. Brittney and Katerina are sisters, my stepbrothers' girls. Their fathers are brothers and they have the same mom. Go ahead, say it. My family are rednecks! But I am TOTALLY normal! ;)


This was the kids table... my brother pointed out that half of the "kids" are adults now, lol!

Ok, now to hopefully not eat to much yet again today! I'll try to have more fun pics tomorrow along with a project to share for tomorrow. And I just realized there are no pics of Dakota in here! Must fix that!

Thursday, November 25, 2010

Happy Thanksgiving!


What a wonderful day to celebrate! We all have so many things to be grateful for. Today I am thankful for my wonderful family, the fact that my hubby will be working closer to home and getting a pay raise, that my children are all healthy, and that I have everything I need in life. Family, friends, and a home to call my own. So with the richness of my life in mind, I decided to may a rich in color card. I just got the Gold Lame Smooch Accent ink last week and thought this would be the perfect time to initiate it! So I would have embossed the Pretty Pattern BG, however I brought Dazzling Diamonds glitter instead of Iridescent Ice embossing powder, which is what I meant to bring. I didn't realize it until I had already sprinkled it on the first piece of cardstock. Well, that one got scrapped and i decided to just stamp it in Early Espresso. Then I colored in the little flowers with the Gold Lame Accent Ink.


Ans since I am not at home and brought limited supplies, this is what I came up with. Wouldn't you know it, I did not bring any sentiment stamps, and no fall stamps either, so I was a little stumped for a main image for a bit. Then I thought about birds being an any time of year item, so I just made them fall colored! Problem solved :)


Then I stamped the bird image on the inside panel along the bottom and left plenty of room to write a note.  Oh, and this a 4x4 card by the way!
  • Stamps: Northern Hearts
  • Paper: Early Espresso, Old Olive, Very Vanilla
  • Ink: Early Espresso, More Mustard, Cajun Craze, Always Artichoke
  • Other: Big Shot with nesting oval and scallop oval dies, ½" Seam Binding Ribbon in Very Vanilla, Gold Lame Smooch Accent Ink, Signo white gel pen


And look at these adorable little pilgrim hats my mother-in-law, Irene, showed me how to make! I made about  dozen of them last night for the meal today. They are made with a fudge stripe cookie and a mini Reeses cup glued together with frosting. Then black and white icing to add the hat band and the buckle. So, what do you think? I think they won't last long, no matter how cute they are!


I hope you all have a wonderful Thanksgiving surrounded by family and friends and good food, without any drama or trauma!

Wednesday, November 24, 2010

Deck the Halls Mini Books


Another set of Mini Books! These things are so darn cute. I decided these counted as a scrapbooking project and this is what we made for club in November. And of course, I had to use some of that yummy Deck the Halls paper...which I am almost out of! See, I can reach my goals of not hoarding! If I have learned anything, it is that there is always something new that I will love just as much, so use it while it is current.
We made these in 3 colors, so I didn't use up my whole stash of any one color.


 Cherry Cobbler


Always Artichoke


Crumb Cake with Very Vanilla ribbon

  • Stamps: Serene Snowflakes
  • Paper: Cherry Cobbler, Always Artichoke, Crumb Cake, deck the Halls DSP
  • Ink: Cherry Cobbler, Always Artichoke, Crumb Cake
  • Other: Corner Rounder punch,  ½" Seam Binding ribbon in Cherry Cobbler, Always Artichoke,and Very Vanilla, paper cutter with scoring blade, Velcro dots
  1. Start with a 12x12 piece of cardstock. Cut into four 2¾" strips. 
  2. Cut one down to 11" 
  3. Score the three 12" pieces at 3", 6", and 9". Accordion fold and adhere into one long strip. These are the book pages.
  4. Score the 11" piece at 3",3½", 6½", 7", and 9" and fold all in the same direction. This is the book cover.
  5. Stamp on one side of each piece.
  6. On the cover, fold the 2" section over and adhere down. This creates a reinforced flap. Round the corners. 
  7. Finish decorating as desired.
  8. Adhere the accordian folds to form the pages, leaving about 1" free of adhesive at the book binding edge. 
  9. Adhere the first and last pages, which are single layer, to the 3" section of the book cover. 
  10. Stick the Velcro pieces to each other, apply to the flap, then close the flap to adhere to the other side. Doing it this way ensures that the 2 pieces will always line up the first time :)
All done! I didn't have any Velcro when I took this picture, but I do now, 3 boxes of it! I actually cut the dots in half for most projects.


And the inside of the Crumb Cake book. Can't you just imagine these filled with pictures of your kids to give to grandparents, aunts, and uncles?! I know I can :)

Tuesday, November 23, 2010

A Day in the Life....

I have been trying to keep up with a post every day in November, and today it will have to be a non project post, sorry ladies! How about a little about a day in my life?
I love in a winter wonderland! This was my house yesterday. Big, fluffy flakes that ended up adding up to 8-10" in our yard. Luckily my hubby, Jamie, got home about ½ hour before it started. He had been gone to Crookston (100 miles away) working and finished his three night shifts that morning. I had to take some pictures of the first real snowfall of the year. I mean less than 4" really doesn't feel like much!

This is an attempt to catch the giant fluffy flakes as they came down. The bigger the snowflakes, the warmer it is out, so I really like big fluffy flakes ;)

I took this picture about 2 hours after my hubby got home. Notice how much snow is on his truck already! And on the railing of our upper deck. It sure feels more like Christmas than Thanksgiving here, lol!

Look at the seat of the chair! The only vehicle that moved first thing this morning was the truck, which is 4 wheel drive. My little Neon made it out ok too. I went to town today and bought a tall bookcase and a storage cabinet. I had to do a ton of errands and had planned to only spend 2 hours in town. Yeah, right! I did get the oil changed, filled the gas tank, went to 5 stores, and got grocery and households purchases done for the week, I hope.
Yes, I am tackling the job of re-organizing my crafting area...it really needs it. I have gotten all my stamps onto the bookcase and filled the cabinet with alterable things.
Now I need to figure out what to do with all of the swaps, finished projects, retired paper, ink, and ribbon, and non-SU paper that I never use! Is it time to list them all yet? I don't know, but I do know we are leaving for Little Falls in the morning, so whatever I don't get done will be waiting for me when I get back. We were going to leave tomorrow evening, but there is supposed to be a blizzard tomorrow and we would rather drive in daylight for that.
Oh, and I had to make a surprise run to the vet with ALL FOUR dogs, in my little Neon, to get them up to date on their shots before they go to the kennel tomorrow! Ugh! I called and left a message to make reservations for the dogs at our usual kennel and then got a call at 4pm asking for records of their immunizations. The kennel had been sold in September and no records were included in the sale. Turns out we were bad pet owners and they were all overdue, and I lucked out that the vet would see them and do the shots today! And I had just started tearing the crafting area apart when this happened...
I think we will go see the new Harry Potter movie with the kids this weekend (kids being 21, 18, and 14)! Yes, I am a nerd. And I bet you would never have guessed that I am also a Sci-Fi geek! Wow, I sure did tell you a lot about myself today. I look forward to what all you smarty-pants friends of mine will come up with to harass me about :D Bring it on!
PS: my "boys" are all watching Kung-Fu Panda right now. Including my hubby!

Monday, November 22, 2010

Snow Bank Gift Bag


So here is the second installment of the November Stamp Club projects! I was inspired by a card created by my friend Deb Burgin. I was going to use Baja Breeze, but then remembered how elegant these browns can look together.

This is made with a plain lunch bag trimmed down to 7" tall. I used one sheet of 8½"x11" card stock, a 3"x5" piece of vellum paper, and a 2"x12" strip of Whisper White card stock. Here are some directions:
  1.  Trim lunch bag down to 7" tall.
  2.  Cut the Sheet of card stock in to 2 pieces: 5¼"x7" and 5¼"x8½". 
  3. Score the 5¼"x8½" piece at 7" to create a flap.
  4. Stamp desired image all over both pieces. 
  5. Take a 1"x5¼" strip of Soft Suede and punch with the Eyelet Lace border punch. Adhere to bottom edge of the flap.
  6. Put a line of Crystal Effects along the flap and apply Champagne Glass Glitter.
  7. Punch a hole about ½" from each side just below the flap on what will be the back of the bag piece of card stock. Insert the ends of a 12" piece of taffeta or seam binding ribbon and secure with Scotch tape. These ribbons are so thin, they don't create a lump! 
  8. Emboss the vellum with the Perfect Polka Dots embossing folder. 
  9. Trim the bottom edge of the vellum into a wavy curve. Adhere about 1½" down from top edge of the piece without a flap, but only put adhesive on the top edge, adhesive shows through vellum.
  10. Cover the top edge of the vellum with a 6" piece of taffeta or seam binding ribbon, tucking the ends over the sides and secure with Scotch tape.
  11. Use the Northern Frost Decorative Strip die to cut out your snowflake.
  12. Adhere snowflakes to bottom edge of vellum, then apply a Pearl Basic Jewel in the center of each. 
  13. Adhere front and back pieces to bag, Tombow Mono Multi or Aqua work fine.
  14. Use a Velcro dot as a closure for the gift bag. 
And now the supply list!
  • Stamps: Tree Trimmings
  • Paper: Crumb Cake, Soft Suede, Whisper White, Vellum paper
  • Ink: Soft Suede
  • Other: Big Shot with Perfect Polka Dots embossing folder and Northern Frost Decorative Strip die, Crumb Cake Taffeta ribbon (retired) Eyelet border punch, Pearl Basic Jewels, Crystal Effects, Champagne Glass Glitter, paper cutter with scoring blade, Crop-A-Dile (to punch the holes), brown paper lunch bag, Velcro

Now, you could adapt this bag to something much simpler, or more elaborate! I really love how it turned out. I think it would be great for giving homemade goodies of all sorts, baked and or crafted.

And today marks the beginning of the On-Line Spectacular with Stampin Up! 


Sunday, November 21, 2010

Cardinals Cocoa Card


It's that time of year again! I must do cocoa card every year for club. It's like an unwritten rule :) And I loved the way the Snowman card turned out so much, I wanted to use some of the same elements for the club card!


I also wanted to use the Letterpress Plates since they are a newer item. Most of my club members already have a die cutting machine of some kind, so there wouldn't be much of a cost to start these.
  • Stamps: Northern Hearts, Chrismas Greetings, Pretty Patterns BG
  • Paper: Real Red, Tempting Turquoise, Naturals White
  • Ink: Versamark, Real Red, Tempting Turquoise
  • Other: Big Shot with Northern Trim Letterpress Plate, Wide Oval punch, 1¾" Circle punch, Pinking Hearts border punch, Signo white gel pen, Moonlight Pearlized Accent Ink, Rhinestones Basic Jewels, Stapler, Stampin Dimensionals, Iridescent Ice embossing powder, Embossing Buddy, Heat Gun, sponges


You can barely see it on this picture, but we used the Christmas Greetings set  to add a sentiment to the back of this card, since it doesn't open.


You can see the shimmer of the Iridescent Ice embossing powder and the Moonlight Pearlized Accent Ink on this photo, amazing!  And all of my ladies were really excited that they could fit 3 of the snowflakes/poinsettias on their strips so they could use 3 rhinestones, lol!

Saturday, November 20, 2010

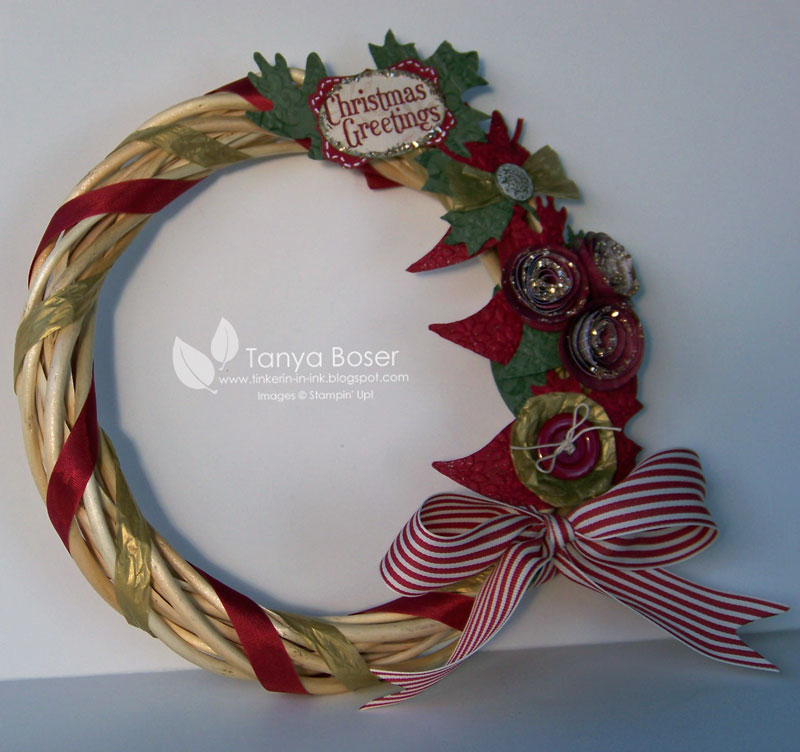
Deck the Halls Wreath


Time for another wreath! I really love making these and I needed a Christmas one. Actually I put this one in a local shop to sell, but I imagine I will make one for myself too.

 Again with the lighting challenges! The colors are really Cherry Cobbler and Always Artichoke, but there is a little too much blue tint to this photo. The striped ribbon is the Riding Hood Red from last year, but at the time I was typing this, it was still available for $1.99 for a 10 yard roll on the clearance rack.
First I sponged the whole wreath with Crumb Cake ink and Champagne Mist Shimmer paint. Then I wrapped it with Cherry Cobbler ribbon and Gold Waffle paper. The leaves were created by using the Jolly Jingles Jumbo Wheel and rolling Cherry Cobbler and Always Artichoke card stock with the coordinating ink, then sponging on Chimmer Paint, cutting out the leaves with the Leaves #2 die, then embossing the AA leaves with the Vintage Wallpaper embossing folder, and the CC leaves with  Petals-A-Plenty embossing folder.
The rosettes are made with the Table Settings die and Deck the Halls DSP, edges sponged with Cherry Cobbler ink, then Champagne Glass Glitter is applied with Crystal Effects. A Big Button and an Antique Brad, some Waffle Paper, and a handy-dandy glue gun and it's all done!
  • Stamps: Grateful Greetings, Jolly Jingles JW
  • Paper: Cherry Cobbler, Always Artichoke, Naturals Ivory, Gold Waffle paper, Deck the Halls DSP
  • Ink: Always Artichoke, Cherry Cobbler
  • Other: Big Shot with Table Settings and Leaves #2 die and Vintage Wallpaper and Petals-A-Plenty embossing folders, Champagne Mist Shimmer Paint, Champagne Glass Glitter, Sponges, Crystal Effects, Antique Brad, Deck the Halls Big Buttons, Cherry Cobbler ½" seam binding ribbon, Riding Hood Red striped grosgrain,  Designer Label punch, Wide Oval punch, crochet thread, glue gun


So, is this one as good as the Autumn Spice Wreath? Will anybody buy it? We shall see! But I like it, so it's all good :) Let me know what you think!

LinkWithin

Related Posts with Thumbnails