Thursday, July 26, 2012

Convention Swap- Comfotable Butterflies


My last convention swap. This was for an Over the Top swap. What does that mean to you? Hard to define for me because a lot of my cards have multiple layers, techniques, and embellishments. I hope this was in the running for all of the talented people I was swapping with!

I have found that the Embossing folders do a great job of embossing both sides of the paper, and the Woodgrain EF is no exception. But I found it a little hard to get it to glue down to a cardbase. SO, I decided to treat it like a Letterpress plate. Here is the sandwich I used with my Big Shot:
  • Multipurpose platform-all tabs closed
  • Cutting pad
  • Open embossing folder
  • Cardstock, face down on one half of the embossing folder
  • Crease pad
I still got a nice deep impression, and it was much easier to glue down! Oh, and I did the white gel pen outline before embossing. Much easier that way!

The next little "special" thing I did was with the Apothecary Accents die to create the fancy edge on the end of the banner. I cut the Midnight Muse paper at 2" wide and put it into the die so that only one edge was under the cutting edge. Then I only ran it through enough to cut the edge and then reversed back out. No impression on the rest of the cardstock from the die then! I did the same thing with a 1¾" wide piece of the DSP.

I think the rest of the details are pretty self explanatory. Lots of little details though.


You can see my continued addiction to dimension on cards. The butterflies are even a little fluttery!


This was a full card swap and so I had to do something with the inside, right?! I love that the antennae are a separate stamp.

So, what do you think? Over the Top enough?

Tuesday, July 24, 2012

Convention Swap- Dump Truck


While cruising Pinterest, I found an adorable Mini Milk Carton idea that I just had to use. The I Dig You set just screamed to be used with it, so off to work I went on this idea! This was for a Treat Holder swap I hope I still got to be in ;)


This is my prototype, I got smarter with the next ones. I stamped the gifts first, then the dump truck. I left the cab off also. This was the gifts were not folded over the top of the box. My Stamp-A-Ma-JIg ogt a real workout with this project :) The wheels are a ¾" black circle and a white Itty Bitty Shapes pack circle punch. I glued them on before assembling the box, being careful to have them over hang the edge the same all the way around. I even ended up makking a little box to set between the wheels to make sure they didn't get crushed on the way to and from convention. I sure hope that worked!


Be sure you fill the carton with the goodies (M&M's in mine) before you staple just the the right of the center. It is a lot easier to fill a big opening than a little one. And if you staple it right, it will stay colsed until you open the left side just like a milk carton.

The other side of the carton has the gifts stamped int he same place, then I dig you  stamped just below it, like the presents are setting on the phrase. I tried to reverse the image, but it was a blotchy transfer of of the acetate. I did not thin of finding a large solid image rubber stamp to try the transfer with until just now!


What do you think? I would love to hear what you have to say!

Sunday, July 22, 2012

Convention Swap- Secret of Life


So, this year I did not got to convention. Next year I am totally going though! This year, I had a wonderful lady agree to do some swaps for me so I made them up and sent them to her hotel. Little snag along the way, I had planned to work on my swaps the week before convention when I had a couple days off, then ship them that Friday to be waiting for her at her hotel. BUT, my fingertips all swelled up with some kind of hive like thing and they really hurt! No stamping for SEVERAL days... I ended up working hard on stuff Monday and Tuesday morning, then shipping Express mail, but they still didn't get there until a day after the official swap because I got the post office too late in the day to get it there by Wednesday at noon, UGH!
Hopefully this did not turn into a horrible pain for my convention buddy. If I get them all back in a box, it will be what I deserved! Oh well, I tried.

This card was for the As Many As You Want swap and I made 20 of them. Considering my time restraints (I designed and made these Tuesday morning), I think they turned out ok. I had to resist the urge to ink the edges as that adds up when you are making 20! I am still on the fence about the polka dots....
And I bet you didn't know this sentiment would fit in that framelit!
I used markers to color the stamp for a multicolor image. That part I am very happy with. Even though I did it 20 times...when I was in a hurry!

I used lots of dimensionals to pop op the focal image. I love dimensionals. I probably use them too much :) There are little rhinestones on the sentiment ends to accent the die cut.


For my prototype, and incidentally my copy, I always make a full card. This is the inside of the card. My white gel pen line got a little crooked so I had to get creative to make it look right, lol.
  • Stamps: From My  Heart, Distressed Dots BG
  • Ink: Lucky Limeade, Calypso Coral, Baja Breeze, Early Espresso
  • Paper: Lucky Limeade, Calypso Coral, Baja Breeze, Whisper White
  • Other: Big Shot with Chevron EF and Apothecary Accents framelits, Rhinestones, Essentials Paper Piercing Pack, Signo white gel pen, dimensionals
So, what do you think I should give a lady who went the extra mile for me at convention?

Wednesday, July 11, 2012

USWDAF Keep Calm and Stamp On


I have the honor of being a Guest Designer again with the latest UStampWithDawnAndFriends event. It is a bit of a free for all this time with the challenge being anything in the new catalog. I love to look for more crafty ideas on the web as much as the next girl and I have been looking for a good organization tool for my craft area. I have seen a lot of different ideas using a Rolodex, and I couldn't find one in town, so I decided there had to be a way I could make one myself!


And I found a way to do it! There is a tutorial available through the event and many more amazing project suites! I happen to have a die that cuts rolodex cards, but you can buy them very inexpensively also. You can change and add to this system with ease and it will hold A LOT of rolodex cards.

Come check us out and find all kinds of amazing inspiration :)


Friday, June 22, 2012

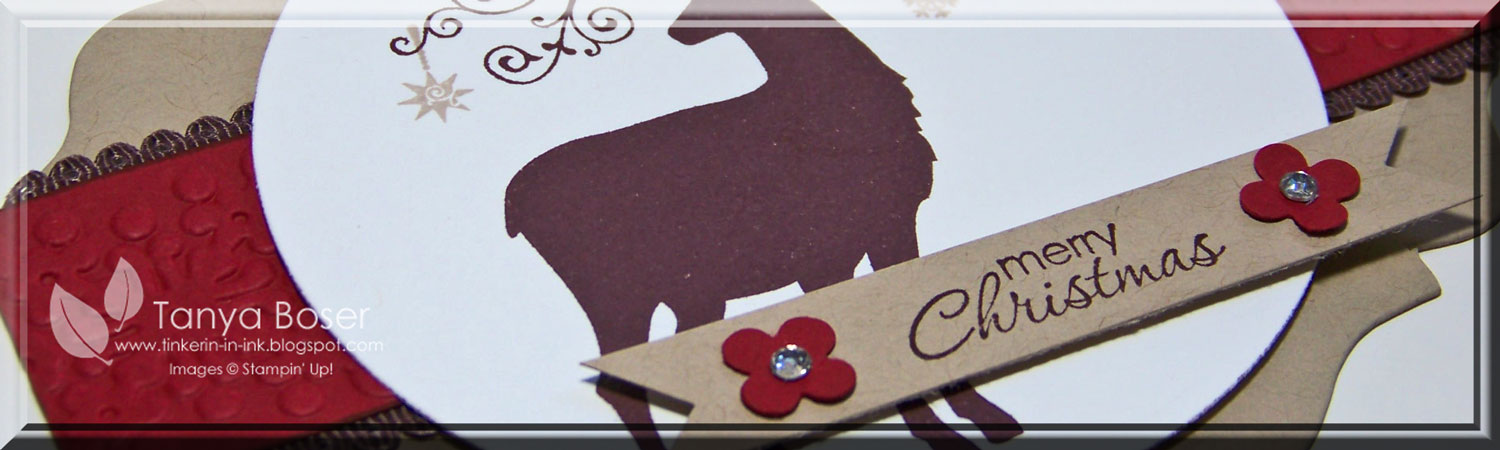
Christmas Deer


I know, Christmas in June is a little early, but if you are really planning to send a pile of homemade Christmas cards, you may already be behind! This card was made for a New Catty swap that I hope everyone has in their hot little hands before this is posted :)


I found out this weekend that I am not the only one that loves Crumb Cake as a base for Christmas cards! When I started this card, I reached for the Crumb Cake without conscious thought, that is home much I love it for Christmas cards :)
As for the stamp set I chose to use, as soon as I saw it in the new catty, I knew that it had to be mine. I love the swirls of the antlers and the little images you can add to it. And I discovered that I could lay the ornaments on the image where I wanted them and then just lay the acrylic block over the the top. Voila! Instead of inking and stamping 3 times for each card, I could do it once with the same placement on every card!
To start the card off was a little tricky though. I took a piece of Crumb Cake 4¼"x11" and scored at 5½".
Then I took a piece of Cherry Cobbler 1¼"x5½" and embossed with one of the Delicate Designs embossing folders. Adhered Choc Chip Scallop Dots ribbon to the 2 long edges, the adhered this strip to the center of the card front. Then it could finally be cut with the Oval Accent Bigz die with the folded edge just inside the die cutting edge and the strip centered properly. It took a couple trial and error runs, but I got it :)


The deer image here is inked with the new firm foam inkpad, stamped off, then stamped in the center. Then the sentiment is stamped in Chocolate Chip. Those firm foam pads are AWESOME! Especially with the solid image stamps, I ♥ firm foam :)

  • Stamps: Christmas Deer, Petite Pairs
  • Ink: Chocolate Chip, Cherry Cobbler, Crumb Cake
  • Paper: Crumb Cake, Cherry Cobbler, Whisper White
  • Other: Big Shot with Oval Accent  and 3½" Circle dies and Delicate Designs EF, ½" Chocolate Chip Scallop Dots ribbon, 1" Square punch, Itty Bitty Shapes punch pack, Rhinestones Basic Jewels, Sticky Strip, Stampin' Dimensionals

Thursday, June 21, 2012

Birds and Branches


This is the last of the Blog Hop projects, and it is the one I chose to use for a swap I participated in recently. I am hoping that everyone has their swaps by the time this is posted :) And boy-howdy, did my Big Shot get a workout with this card!


This card has many layers and lots of sponging. I made 12 of these, and I should have thought about this a little more as it took me 5 hours to make them and I started at 7pm the night before they had to be mailed! I was a little short on sleep the next day at work, but the cards were done and in the mailbox by 1am, lol!
The card base is Naturals White, then there is a layer of Very Vanilla type-print DSP from the Neutrals DSP pack. I sponged the edges and corners with River Rock ink and stamped the birds and branches image in River rock in the lower left corner. I also distressed the edges and inked them with the River Rock inkpad. Of course, I outlined with white gel pen :)
All of the other layers of this card were sponged with River Rock and edges inked with a Soft Suede marker.
For the banner, I used a ½" strip of River Rock and stamped the sentiment in Early Espresso. I also took a ¾" of Naturals White and die cut it with the Finishing Touches edglelit, then glued this to the bottom edge of the River Rock strip. Next I used a 1" Square punch to make the dovetails.  Then I paper piercer faux stitches and added white gel pen thread.

I could go on with all the steps, but I don't think there were any tips or techniques that would be helpful to list :) I hope everyone who gets one of these is at least half as pleased with it as I am!


Inside is more sponging and the birds and branches again. Can't forget the white gel pen outline, which shows up nicely with the River Rock sponging :)

  • Stamps: Serene Silhouettes, Apothecary Art, Petite Pairs
  • Ink: River Rock, Soft Suede, Early Espresso
  • Paper: Naturals White, River Rock, Neutrals DSP pack
  • Other: Big Shot with Apothecary Accents framelits and Finishing Touches edgelits, Essentials Paper-Piercing Pack with Paper Piercer and Piercing Mat, Sponge, Signo white gel pen, Pearls Basic Jewels, Vintage Faceted buttons, Naturals designer buttons, Stampin' Dimensionals, White Baker's Twine, Glue Dots

Wednesday, June 20, 2012

Sweet Thanks Mini Milk Cartons


These milk cartons come together so easily they are a natural quick little project for a last minute need.
I had found a cute holder for these by Becky Roberts last year and made some Easter gifts with the idea. I did tweak the tutorial a bit though to save some steps.

Take two 3¾" squares and score at 1" all four sides, then cut on score line to the 1" line on 2 sides to create four flaps. Then trim off half of each flap at a diagonal.
Then take a 1-5/8"x8" strip and score at 4" and fold in half. Then punch a Medium Oval handle.

 Assemble like so! I just used Tombow liquid glue to assemble this whole thing.


I couldn't decide which sway I liked the images stamped better so I used both the Summer Starfruit and Crumb Cake on the left, and the Whisper White with Crumb Cake shadows on the right. And on the holder I did some bold full-strength inking, and some stamped off images.

I also used the new mini punches from the Little Labels pack with the Lovely Little Labels set to make the tags. I will be stapling the cartons closed after I fill them with a tasty little treat, but they look pretty cute with the mini clothes pins for now :)

  • Stamps: Serene Silhouettes, Lovely Little Labels
  • Ink: Summer Starfruit, Crumb Cake, Whisper White
  • Paper: Summer Starfruit, Naturals White
  • Other: Big Shot with Mini Milk Carton die, Simply Scored, Medium Oval punch, Little Labels punch pack, White Baker's Twine, large-eyed needle and piercing mat

LinkWithin

Related Posts with Thumbnails