Thursday, August 15, 2013

Coffee and Friends

I have been dying to use this stamp set since I got back from convention. I saw so many amazing ideas from my friends and other swappers there. I even got a beautiful card from my friend Heidi with this set, thank you so much Heidi! And this amazing one-layer card from Adriana that she kindly gave me at a swap, I just love it too!


I got my color inspiration here


And used this sketch for the layout.

This was my first crack at it. I don't know about the lid and band on the cup though. I think the lid should have been green too. There is some of that yummy Core'dinations! So glad we have it in every color now :)

This is the second card, which is my favorite. I decided to mount the Crumb Cake on a Naturals White card base. It would look great on a Whisper White card base, arguably better on a Whisper White card base, but this is what I chose :) I like to use Naturals White to color on with a blender pen also. It holds up better, and is less expensive than water color paper.
  • Stamps: Gorgeous Grunge, Perfect Blend, Distressed Dots
  • Ink: Crumb Cake, Whisper White, Pear Pizzazz, Crisp Cantaloupe, Illuminate
  • Paper: Naturals White, Crumb Cake, Strawberry Slush, Crisp Cantaloupe Core'dinations
  • Other: Big Shot with Stylish Stripes embossing folder, Neutrals and Subtles and Brights Candy Dots, Blender Pen, Sanding Block, Signo white gel pen, dimensional, Early Espresso embossing powder, Embossing Buddy, Heat Gun, Paper Snip, sewing machine and thread, Distress Tool
Which one do you like better?


Wednesday, August 14, 2013

Place Setting Follow Up

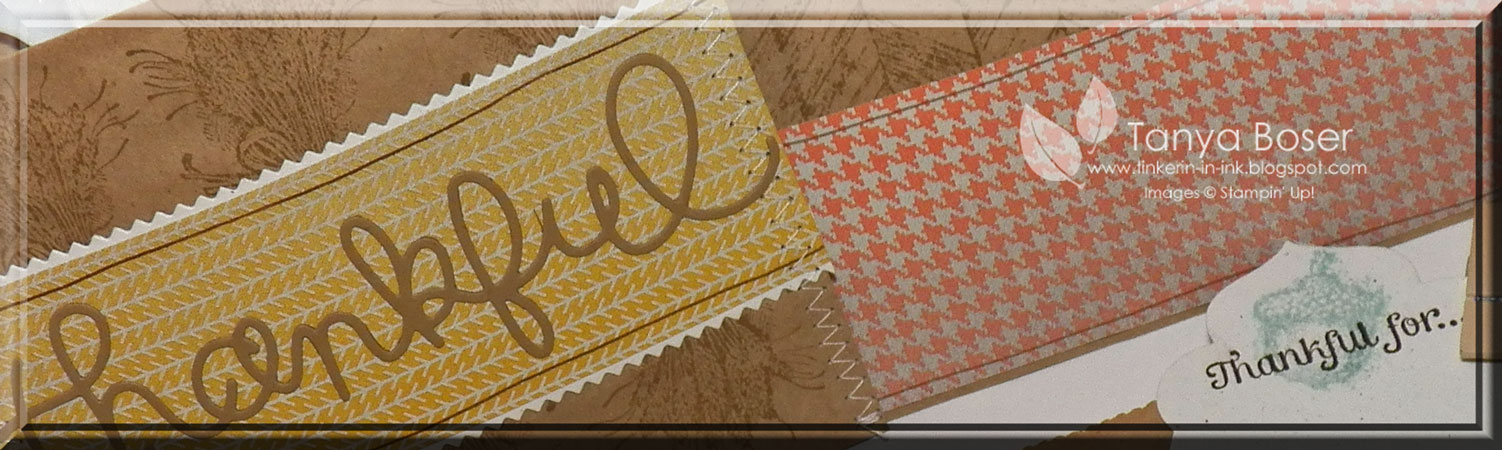
So, are you all loving the new Holiday Mini as much as I am? I sure hope so :) I'm tellin' ya, that Sweater Weather DSP is a must have, and it is definitely a year round and gender neutral bunch of patterns. I am currently in a blue and yellow phase and this DSP fits right in to that mood for me :)

These are really simple to make.
  1. I cut a bunch of 2"x5¼" strips of Sweater Weather DSP. 
  2.  To keep them a uniform size, I placed the flat lunch bags on the Simply Scored with the open end to the left and scored them all at 6¼", then I creased them well with the bottom of the bag to the inside of the pocket.
  3. I them stamped various images in Baked Brown Sugar on the bags and added the DSP strips with or without borders or the "thankful" die cut. 
  4. Stitch up the sides of the folded bag to create the pockets.
  5. Add any remaining embellishments.
For the THANKFUL FOR tags, I just die cut the Apothecary Accent shape and stamped each one simply, to coordinate with the pocket it was going in. I added the clothes pins so that the tags wouldn't slip too far into the pockets.

I thought you all might like a close up shot of each of the place settings. I have plans to make 12 different ones, one for each pattern in the Sweater Weather pack. They were quite fun to put together :) I think I would like to make of buy some muslin napkins to tuck in these. And I would use real silverware, but I was just too lazy to go get some from the kitchen to take the pictures.

 I just love that Soft Sky is back. It is one of my favorite blues. I actually had quite a stash of the card stock that I had been using very sparingly. Now I can use it to my hearts content :)


Some Pumpkin Pie with hounds tooth and chevron wood flooring. Very homey :)


And I don't know about you all, but I REALLY want a log slice platter for my kitchen! I think they are beautiful, with a light varnish on them to make them waterproof. But not so much that they are high gloss. I think it is the carpenter's daughter in me. My dad wore MANY hats, but woodworking was his true passion, and he taught me to love the character of wood and wood grain. I was working in the pig barn and the wood shop when other little girls were playing with Barbies, lol! Does this explain my love of the rustic a little bit?

I know I have done severeal projects with brown lunch bags, but I think they are the perfect blank slate for all kinds of crafting projects. Inexpensive, malleable, and holds quite a bit of stuff!


Monday, August 12, 2013

Spinner Card Follow Up


This weekend I participated in a blog hop, and I featured a couple things I wanted to go into more detail with. This is one of them. You have probably seen Spinner cards and even made a few in your time. There are a few ways to make these, and I used 2 different ways on the hop cards. This is the Wide Slot with Double Layer method.


This card has a slot that is nice and wide, so you can fit a greater selection of greetings in it. I happen to have a die that does this, but after I made the acorn card, I experimented with circle punches and my paper trimmer. Why not use what you already have, right? I have to apologize for the off-looking colors. Crisp Cantaloupe just did not want to photograph well on this dreary Minnesota day. I promise, in real life it looks fabulous!
  • Stamps: Happy Hour
  • Ink: Crisp Cantaloupe, Calypso Coral
  • Paper: Whisper White, Soft Suede, Crisp Cantaloupe, Coaster Board
  • Other:  Itty Bitty Shapes punch pack circle, ½" Circle punch, ¾" Circle punch, paper trimmer, 1-3/8" Circle punch, Big Shot with Modern Mosaic embossing folder, Signo white gel pen, Rhinestones Basic Jewels, dimensionals

So this is what I started with in addition to the white card base. I did try with 2 coaster board ¾" circles, but the back circle was too thick to slide well. Not sure why, it slide well with the acorn card. Maybe the die compressed the layers more. But anyhoo! And I used three 3/8" circles to make up some space from the double layers of the front panel.

After I decided where I wanted the slot, I cut two slits with the paper trimmer, ½" apart and the same length.

As you can see, I wasn't quite out far enough the first time I punched and so I punched again to get all of the cut lines included in the end punch. Do this on both ends and your slot just pops right out.
 Now you will want to lay this piece on top of the mat and trace the slot onto the mat, then repeat the cut and punch process. It is ok if this slot ends up bigger as the top layer will cover it. When you glue the pieces together, make sure to run adhesive along the edges of the slot so they stay good and stuck together.

You will also want to lay this assembled panel on top of the card base and trace the slot with a pencil. Then you can stamp your sentiment where the slot will be. Just be sure to erase the pencil line after your ink dries :)

Now, you will want to glue the 3 smallest coaster board circles together, then glue them between the ¾" card stock and coaster board circles. Your spinner image then gets glued to the coaster board side of the sandwich, like so. It is ok, even preferable, if the little circles are not exactly in the center, it will spin better it they aren't :)

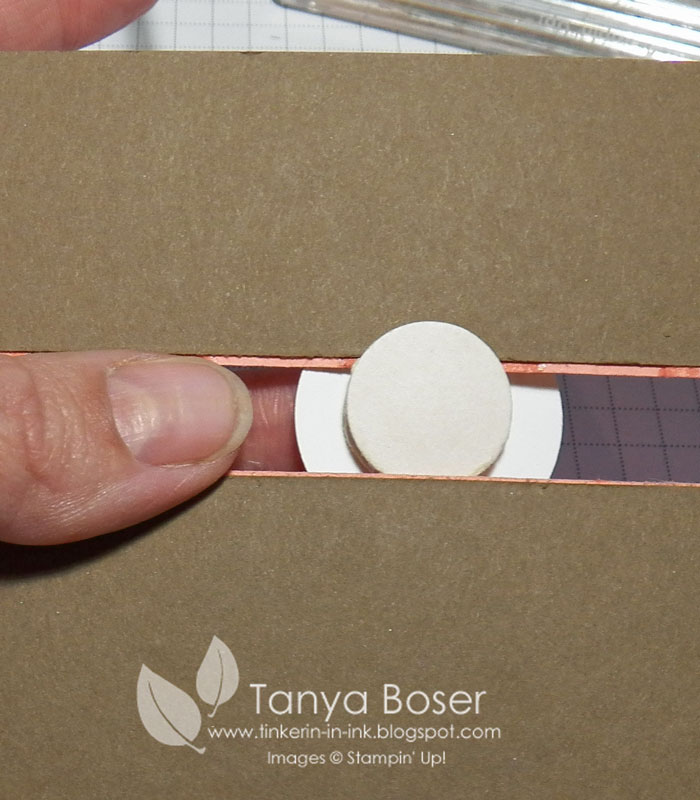
To attach your spinner image to the card front panel, slide one side in....


Then gently push the bottom edge of the slot away from you as you slip the bottom edge of the spinner circle over the bottom slot edge. I promise, it will fit and your card will look lovely :)


Now that you have you spinner attached, you can tell where the circle will slide. I recommend going overboard on the dimensionals for this card, especially around the slot. You just want to make sure you don't block the spinner mechanism. You also don't want the front panel to squish down and prevent the spinner from spinning :)

Now you can stick this puppy to the card base! I would love to see yours too, feel free to post a link to your in a comment below. I also love to hear your hints and how well this tutorial worked for you. Don't be shy, we all love to share :)
  • Stamps: Happy Hour
  • Ink: Crisp Cantaloupe, Strawberry Slush
  • Paper: Whisper White, Soft Suede, Crisp Cantaloupe., Coaster Board
  • Other: Signo white gel pen, dimensioinals, Rhinestone Basic Jewels, Circle Punches: 1-3/8", 3/4", 1/2", and 3/8", Big Shot with Modern Mosaic embossing folder, paper trimmer

Wednesday, August 7, 2013

Throw Caution to the Wind

I must admit, I have been on a masculine card run lately. And it does not stop today. I didn't mean to do it though. I was just playing with the images from the Spread the Joy set and couldn't NOT make a card with the image I played with!

This is going to be a birthday card for some fella out there, I am sure of it. I just haven't decided which one. I was going to send it to my brother Kirk, who just turned 40 two days ago. I just haven't mailed him a card yet. This is not a belated birthday kind of card, sigh...
  • Stamps: Spread the Joy, It's Your Day (retired)
  • Ink: Early Espresso, Always Artichoke
  • Paper: Sahara Sand, Always Artichoke, Sweater Weather DSP, Naturals White
  • Other: Big Shot with Alphabet Press embossing folder, 2½" Circle and 1" Square punches, Always Artichoke Denim ribbon (retired but on the clearance rack), Essentials Paper Piercing Pack, Paper Piercer and Mat, Signo white gel pen, Neutrals Candy Dot, dimensionals, Chalk Marker
Have I made you want this set yet? I know I am glad I got it :)

Monday, August 5, 2013

Thank You for Spreading Joy

It's a really good thing I had all of those swaps to share with you all as I have been working hard on a wedding favor job that I got the day we left for convention, so I was pretty much committed to using all of my free time on that until Friday. When the chance to play with my new stuff finally presented itself on Friday, I almost couldn't decide what to play with first. 
There is a delightful new stamp set available from Stampin' Up! called Spread the Joy that was unveiled at convention. It was designed by Emily Montoya, one of the Curriculum Developers and Trainers from SU Main Offices.  I instantly fell in love with it and had to order my own right away! It is whimsical and fun, and I have finally been able to play with it just a bit. This is my first creation with it. It is not an earth shatteringly good card, but it was really fun to dream up :)

There is just a bit of the new Sweater Weather DSP in use here also. Yummy, is all I can say. I thought about what kind of card would be a good way to use this image, and how we should thank those in our lives who spread joy to us all. Ta-Da!
  • Stamps: Spread the Joy, Lots of Thanks
  • Ink: Baked Brown Sugar, Raspberry Ripple, Early Espresso
  • Paper: Naturals White, Baked Brown Sugar, Crushed Curry, Sweater Weather DSP
  • Other: Signo white gel pen
 So hopefully I will now churn out a pile of goodness to share with you all :) Check out this lovely stamp set!


Spread the Joy
 CM #134784 18.95
 WM #134781 25.95

Saturday, August 3, 2013

Heart Full of Thanks

OK, this is the last swap I made for convention! Can you believe I signed up for 11 organized swaps?! Crazy right. But I am not the craziest. I saw a lady post in a thread on SCS that she had made 900+ swaps for convention this year. Wowsa, that is a lot of work, but I bet she enjoyed it :)

 Well, after designing so many swaps, I can tell you that I was feeling pretty dried up in the creativity department there for a while. So I dug through my stash of cards and CASEd myself! I changed a few things, and added a different technique, and I love it! I even designed and made it on 2 hours of sleep while I was trying to make my body flip from nights to days. I'm a little impressed with myself this time :)

It was tough to catch in the picture, but I used the Woodgrain embossing folder to create some debossing. It is a little more subtle and really lets the stamping shine through. I opened all the tabs, laid down the Crease pad, then the cardstock, then laid one side of the embossing folder over the cardstock, covered that with the Silicone pad, and topped it all off with a single cutting pad. Worked like a charm!

And what do you think of this ribbon treatment? I tried just the 2 ruffled ribbons, but it just didn't feel right, so I added the Naturals Trim and it was perfect. Yup. I am pleased :)
  • Stamps: Four You, Hearts a Flutter
  • Ink: Crisp Cantaloupe, Crumb Cake, Strawberry Slush
  • Paper: Crumb Cake, Whisper White
  • Other: Big Shot with Woodgrain embossing folder, Strawberry Slush and Crisp Cantaloupe Ruffled Stretch ribbon, Natural Trim ribbon, Rhinestones Basic Jewels
Wow, I didn't even use dimensionals!! However did that happen ;)

Thursday, August 1, 2013

Yippee-Skippee!

I have been stamping for a LONG time and I have amassed quite a collection of tools, so when Stampin' Up! came out with the new Simply Stars, I was so excited because the images fit perfectly in the retired Large and Small Star punches! But for the swaps I am in, we can only use current products. I did not realize how hard that was going to be with this set. Apparently, if I have it, I want to use it, lol! But I did manage to come up with a cute card anyway :)

This was another card for the Masculine cards swap. Once I started doing masculine cards, I had a hard time stopping! Sometimes your Mojo takes you in directions that are lovely, but not exactly what you need, hehe. I actually got to the point that I took all of the stamp pads for the colors I had already used in swaps and set them aside. I wanted a variety of color combos and realized I was in quite the blues/yellows/greens mood. But I still had some blues left to use.
  • Stamps: Yippe-Skippee!, Simply Stars, Bring on the Cake
  • Ink: Marina Mist, Smokey Slate, Soft Sky
  • Paper: Marina Mist, Naturals White, Smokey Slate Core'dinations
  • Other: Big Shot with Argyle embossing folder, Sanding Block, Signo white gel pen, Subtles and Neutrals Candy Dots
I think this is about as flat as my swaps got! I have a addiction to dimensionals :)

LinkWithin

Related Posts with Thumbnails