Wednesday, March 30, 2011

Flamingo Love


I bet you all are wondering where I went the last few days. I have been working my real job, and making 150 book box and cupcake wrapper wedding favors.... Yes, I am crazy. And my Big Shot shoulder is a bit sore...
But I did find time to participate in the Utah Divas International sketch challenge!


I got the Valentine Defined stamp set a couple weeks ago and had not had a chance to play with it yet,  but this sketch was perfect for it :)
I used the paper cutter to  create the lines but they didn't really show up very well, so I used the white gel pen :)


On the inside, I stamped the line of hearts in Early Espresso, then colored the hearts with Pumpkin Pie, Melon Mambo, and Signo white gel pen.
  • Stamps: Valentine Defined
  • Paper: Whisper White, Melon Mambo, Pumpkin Pie
  • Ink: Early Espresso, Melon Mambo, Pumpkin Pie
  • Other: 2-3/8" Scallop Circle punch, 2-1/2" Circle punch, Scallop Oval punch, Large Oval punch, Modern Label punch, Signo white gel pen, Rhinestone Basic Jewel, Stampin' Dimensionals, paper cutter with scoring blade or Bone Folder

This card will be going into my next shipment to Operation Write Home. Have you checked them out yet?

Don't forget that we only have about 1 month left on the Occasions Mini Catalog so don't miss your chance to order this fun set! It isn't just for Valentine's Day you know :)
You can always order any of the supplies here on my demo website

Friday, March 25, 2011

Petal Pizzazz for Mother's Day


As I mentioned a few days ago, I am a Guest designer for another UStampwithDawnandFriends.com event. This one is called Big Shot Brilliance and features LOTS of ways to use your Big Shot!


Here is the card I made to go with my project.


And the gift bag.....


And a cute little gift tag!


And the centerpiece of my project group, a small quilt made with lots of different Big Shot dies, all of the SU fabrics, and lots of SU embellishments!
If you would like the details on how to make this, check out the Big Shot Brilliance event, there are lots of amazing ideas posted already and we are only on day 8 out of 20 with 16 projects posted already!!


Thursday, March 24, 2011

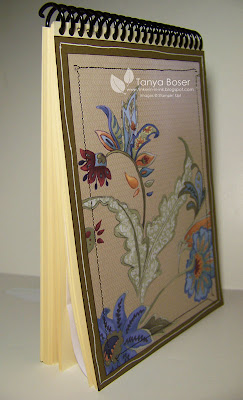
Crumb Cake Paisley Print Book


Another book made with the fabulous Paisley Prints DSP. I really thought I didn't like this particular print, but is quickly grew on me. The shimmer is added by me with a blender pen and Frost White Shimmer Paint, again... I tell you, this is an awesome way to add a little glam to your projects :)


I used the bottom right corner of the sheet of DSP for the front and paired it with Soft Suede cardstock.  No dividers in this one, it will hold all of my templates, measurements, and tutorials for projects I come up with or adapt, or print a small template for... I already have several in here! They were just floating around in different hidey-holes on my desk area. Now they are all safely tucked into this book. Sometimes I will write measurements for a project on a notepad, then want to save them for future reference. All I need in those cases is a title and the measurements, and I will remember the rest. This little book is about 5"x7¼" and has ~60 pages. It fits very nicely in a little shelf I cleared out on my desk, right in sight and in reach all the time.

This is the back which is part of the same cluster of flowers from the lower left corner of the DSP sheet. The layers were lightly adhered to the book, then stitched on with a sewing machine.


Isn't it just yummy?! I feel inspired just looking at it! BTW, I decided to use the Acorn Print one for ideas, sketches, and challenges. Should turn in to quite a little resource for me :)

Wednesday, March 23, 2011

Plum Perfect Blossoms!


Time for more tealights!! This one is spring/Easter themed with lots of shimmer. The Easter Blossoms set has so many wonderful images, and I just could not resist using the eggs to make some cute little candles.


The blossom branch was stamped all over the box pieces in Perfect Plum ink, then the flowers were shimmered up with a blender pen and Frost White Shimmer Paint. I even put some shimmer on the tops of the candles :) I also used the Moonlight Pearlized Accent Ink on the centers, like I did on the book from yesterday's post. I just now realized I used the same set for 2 days' posts in a row, oops!
Some outlining with a Signo white gel pen, and layering several punches with dimensionals, and the box is done!


There even seems to be a little bit of a blue to the shimmer paint! Love it! And I must say, it's getting easier and easier to outline the Designer Label punch. I guess practice is the secret, lol.


There is even a little greeting in the bottom of the box. I actually only added shimmer paint to the flowers inside the white gel pen frames, which saves a lot of time :)

Tuesday, March 22, 2011

Acorn Paisley Petals Book


I am still making more book! After finding these affordable spiral bound books at my local print shop, I have been having a blast decorating them. This one is very similar to the one that Carrie made with me the last time she was up from college. Hers was just so darn cute I had to do this one! (Carrie is David's girlfriend and David is my oldest son)


I watercolored the biggest Paper Daisy with Baja Breeze and Always Artichoke, the medium sized one with Pear Pizzazz and Baja Breeze, and the tiny one in the center of the Pear one with Soft Suede. The one is the bottom corner is in Baja Breeze. All of them were shimmered up with Gold Shimmer Mist. That is Always Artichoke Seam Binding Ribbon also :) Do you love the Antique Brad in the center of the largest flower? I am so glad I have a bunch of these!
 

I love that we have 3 different sizes of Pearls :) I used the graduated sizes to frame this Paper Daisy and put a Rhinestone in the center. They don't blend in as much in real life, thankfully!


 This is the back, not as decorated, but you don't really want lumpy bumpies there as it would make writing in the book a little difficult. You can also see that I drew in a Early Espresso line one the DSP and a Signo white gel pen line on the Early Espresso cardstock, which really adds a finishing touch.


This is one of the divider pages. I made 5 sections and used a tag from the Two Tags die as the tabs, accenting them with a little strip of the DSP. I stamped the flowered branch from Easter Blossoms in the lower corner of each divider page, then used a blender pen to color the blossoms with Baja Breeze and Frost White Shimmer Paint. Then I added dots of Moonlight Smooch Pearlized Accent Ink to the centers of some of the blossoms. And of course I had to outline the pages too :)


   I am using the sneak peek package of Paisley Prints DSP to make this one! You are sooo going to love this paper. I am not kidding. It is so gorgeous!! It is going to be in the new big Idea Book & Catalog in July, so we will be able to get it for an entire year! And from April 1-30th, with an order of $20, you can get up to 5 packages of this fabulous paper for $9.95 each. I have to confess I am already using my second package :)

Monday, March 21, 2011

Big Shot Brilliance Has Begun!!


I am so excited to share with you that I am once again a Guest Designer for a www.UStampWithDawnandFriends.com event! And it is a star-studded event!! Linda Hansen, Jaron Winder, Jackie Topa, and Karen Burniston (designer of many Sizzix pop-up dies) will be creating with us too!! For the fabulous price of $24.99, you will have access to 40+ project tutorials posted over 20 days!

When my project is posted, I will give a little sneak peak :) Come check it all out, I think you will be blown away!

You are in My Heart card


After seeing all the lovely stuff that Lisa Young made with this set, I just had to get it! And since I got it about the time I rediscovered the wonderful Operation Write Home project, I though these would make great general Miss You type cards.


I used a greeting from Word Play as the background. I used yellow thinking about that old song Tie a Yellow Ribbon 'Round the Old Oak Tree. And the double seat-er bench to symbolize the chair waiting for you to come home and share it with me... I hope all that makes sense to someone other than me!


And another use of the greeting on the inside of the card :) I was trying to limit my use of dimensionals for shipping purposes, but it is soooo hard! I love dimension. I think it adds so much. I also wanted to leave plenty of room for the person to write a letter to family.
  • Stamps: Have a Seat, Word Play
  • Paper: Naturals White, Daffodil Delight, Early Espresso
  • Ink: Daffodil Delight, Early Espresso
  • Other: Daffodil Delight 1/8" taffeta ribbon, Distressing tool in Cutter Kit, Stampin' Dimensionals

I really love how this card turned out. I can't wait to send another package of cards to Operation Write Home! I would love it if you went to the website and checked them out to see if you would like to participate :)

Sunday, March 20, 2011

Numbers Birthday


I used this card for double duty, my #3 son's birthday, and for stamp club! Sometimes we must maximize our time ;)I got to use some new stuff too. I just got this stamp set and the cupcake punch.


I brayered the First Edition DSP with Peach Parfait and used lots of dimensionals on this card. I love dimension! The cupcake pieces have a little Frost White Shimmer Paint applied with a Blender Pen.


And the letters are all colored with a Blender Pen and shimmered up too. 
  • Stamps: Bring on the Cake, Create a Cupcake
  • Paper: Concord Crush, Pear Pizzazz, Peach Parfait, Very Vanilla, First Edition DSP
  • Ink: Concord Crush, Pear Pizzaz, Peach Parfait, Early Espresso
  • Other: Build-A-Cupcake punch, Stampin' Dimensionals, Concord Crush 1/2" poly ribbon, Frost White Shimmer Paint, Blender Pens
     

 My son turned 19 this year. We ate out, went bowling as a family, then went home and had ice cream cake!! Yum....It was a very fun day! Too bad it was Glow and Bowl, all black lights so no great pictures :)


 But here is the birthday boy, Dakota, holding his new custom made cookbook! I think he really liked it :)


Saturday, March 19, 2011

God Bless You page

Ok, I am making an effort to get the Stamp Club projects posted in a timely fashion :) This is the 12x12 page we did. I finally got to use my Crosses of Hope set! 

I inked all of the edges with Soft Suede and outlined with a Signo white gel pen on the pieces it would show up on. I love the way the stamping turned out on the base cardstock!! And it still looks quite Easter-ish to me :)


This is the bottom corner is a journaling block I printed off of My Digital Studio on some Naturals White cardstock. Super easy and I love how it turned out.


And the main feature is definitely my brother Steven! He had to show us his moves on the skateboard, even though it wasn't even moving, lol! This was Easter at my brother Kirk's house last year.
  • Stamps: Crosses of Hope, Favorite Things (MDS)
  • Paper: Soft Suede, Naturals White, Peach Parfait, Ice Cream Parlor DSP (SAB)
  • Ink: Soft Suede
  • Other: Signo white gel pen, MDS
  

Don't you love how the pictures and DSP paper blocks form another cross on the page? I really do!

Friday, March 18, 2011

Happy Little Easter Baskets


The little baskets you can make with the Petal Cone die are so darn cute! And I found an excuse to use my Baja Breeze glitter :) We made these in club last week. I will try to do a little tutorial here, especially for my club members who could not make it.

  • Stamps: Easter Blossoms, Elements of Style
  • Paper: Daffodil Delight or Marina Mist, Early Espresso or Soft Suede, Naturals White
  • Ink: Daffodil Delight or Marina Mist, Early Espresso or Soft Suede
  • Other: Big Shot with Petal Cone die, Itty Bitty Shapes punch pack, Designer Label punch, Corner Rounder punch, 1 1/4" Square punch, Dotted Ribbon punch, eyelets, Crop-A-Dile, paper cutter, Bone Folder, Crystal Effects, Champagne or Baja Breeze Glass Glitter, Stampin Dimensionals


1. Cut 2 Petal Cone dies and 4 Scallops half circles. Trim 2scallops off each side of 2 of the half circles.


2. Fold the cone dies in half on score line and fold in the flaps. Crease well with bone folder.


3. Line up the top score line with the 2 5/8" line, score, move to left and line the new score line up with the 1/2" line and cut the tip off.

4. Trim off the bottom piece of the flap, clip to score line at the middle score line. Fold and crease well as shown. Stamp as desired. Adhere the 2 Petal Cone pieces together.


5. Punch or cut two 1 1/4" squares to adhere to the inside and outside of the bottom of the box.

 
6. Adhere half circles as shown.


7. Adhere the trimmed scallop flaps to sides of basket. Stick a couple dimensionals to the undersides of the other 2 flaps and adhere to sides of basket.


 8. Use Crystal Effects to adhere Glass Glitter to all 4 flaps.

 9. Use Dotted Ribbon border punch on a 5 1/2" strip of coordinating cardstock, then mat on a 1/2" strip of contrasting cardstock. Attach to basket with eyelets using Crop-A-Dile.


10. Punch out a Designer Label punch. Round the corners of a 1"x2" piece of cardstock and stamp Happy Easter on it. Punch 3 flowers with Itty Bitty Shapes punch pack. Apply Pearl Basic Jewels to centers. Adhere layers to each other and the basket with dimensionals. Glue flowers to greeting.

 All done! Fill with treats of your choice :)

LinkWithin

Related Posts with Thumbnails