We went snorkeling for the first time on our first cruise. That was in March 2015, and we were instantly in love! Both of us could snorkel all day long, and at least a couple times a week :) Now, every chance we get, we snorkel.
The Scrapbooking and More Creative Crew challenge for this month was to use circles on your layout, and that made our snorkeling pictures jump to my mind! I like to hang these pages in lovely frames in our house, so they are home decor too :) Usually they are of my grandson though, lol.
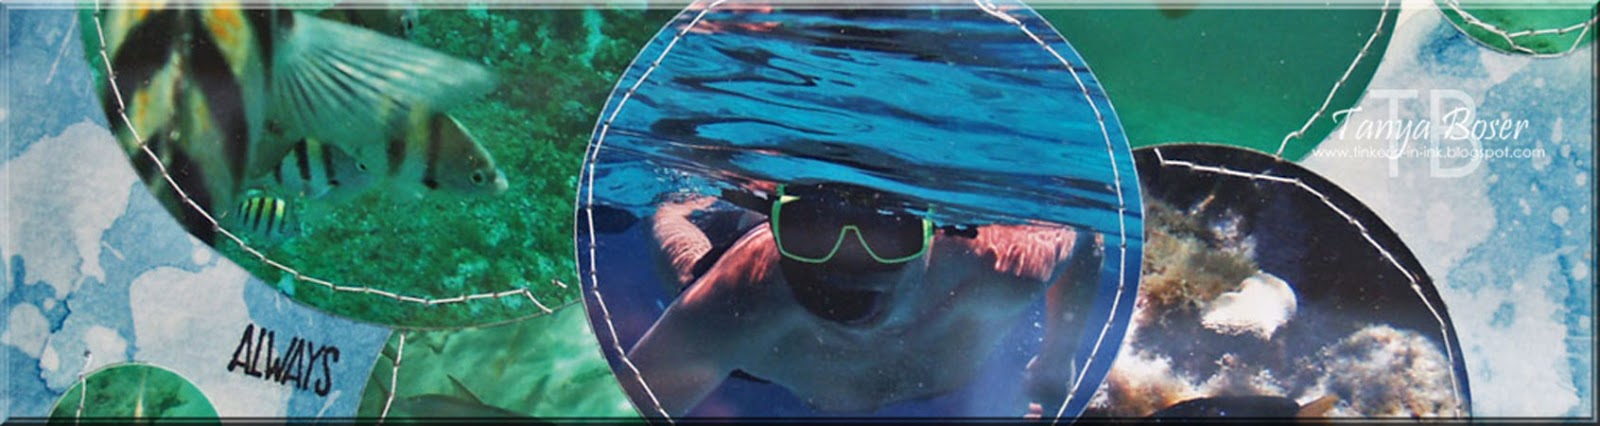
We took turns with the camera and got lots of great shots of the fish and coral. And a couple shots of each other :) SOOO much fun!!
I cut a piece of watercolor paper to 8"x10". Then I watercolored patches of Crushed Curry, Emerald Envy, and Dapper Denim, layering the colors and drying with the heat tool between colors. Then I splashed clean water on the panel, let it sit for 30 seconds or so, then dabbed it off with a sort of clean clothe. This removes some of the ink colors in splash patterns.
Then I pulled out my Circles dies and cut out a variety of pictures with 3-4 sizes of circles.
I played around with the circle placement until I liked it, then I lightly adhered the circles with tape runner. Then I decided to stitch them in place with my sewing machine to help highlight the pictures more.
I took sentiments from Sunshine Sayings and stamped them on the watercolor paper.
Then I placed the page in an 8"x10" photo frame. All done!
Here it is in the frame. I was not sure I liked how this was turning out until I added the stitching. Without the stitching, the pictures all seemed to blend together and confuse the eye.
Have you been snorkeling? Did you like it? And what was your favorite part?
If you have seen something you need for your crafting
life, just click the image in the supply list below and it will take you
to my store! If you order less than $150, please use this month's Host Code, which can be found at the top of the sidebar on the right.
And be sure to check the box allowing me to contact you when you
check out. I can't send you a thank you card if I don't know your
address! And I promise to only send you happy mail, no junk mail :)
It is another Friday in July, which means another Creative Crew Christmas in July project! This one was done for the Scrapbook and More Focus: packaging-
Make some sort of Christmas packaging, especially geared to the younger person.
What kid does not love a cup of hot cocoa, with a candy cane stir stick :) Even the kid-at-heart!
This was so simple to put together. I don't know that I would make a whole pile of these, but then again, maybe I would. They are pretty cute. And if you want to include a notecard to write on, that would be a very simple addition.
Cut a piece of Kraft to 4¾"x8½", score in half at 4¼". Then cut a diagonal piece off the top of the front panel. The angle and location of the diagonal is not important, just needs to leave a peek of the contents.
Stamp the snowflake image all over front and back in Versamark ink and heat emboss with white embossing powder.
Stamp the snowman in Versamark on a piece of vellum and heat emboss with white embossing powder. Stamp the buttons in Archival Black ink and emboss with clear embossing powder. Color the nose with Pumpkin Pie marker. Die cut with the Snow Friends die.
Stamp the santa hat in Real Red on a scrap of Whisper White, die cut with coordinating die.
Cut a piece of Dazzling Diamonds Glimmer paper to 2½"x4¼", cut roughly in half in a curvy line, then cut the edge of one of the halves with a lightly different curvy line. Layer onto the packet front to create snowbanks and lightly adhere. Stitch to front with sewing machine. Then fold the packet closed and stitch the right side and bottom of the packet closed.
Tuck the snowman into the snowbank, find where you want to stamp the snowman arms, and stamp them with Early Espresso ink. Adhere the santa hat with dimensionals, using it to secure the snowman also.
Die cut the double banner from Bunch of Banners, mask or cut apart the sentiment to fit on the banner and stamp in Archival Black. Use Fast Fuse or Tear and Tape to secure the banner to the packet front, tucking partially behind and over the banner.
Add a little Clear Wink of Stella to the hat. All done!!
How about it? Would you make these? What adaptations would you make to it to make it your own? I would love to see your creations! Add a link in your comments :)
Don't forget the July Bonus Days special, and earn yourself some $5 coupons towards Stampin' Up! product in August! And I am telling you right now, there is a limited time product coming that you are going to have to have :)
If you have seen something you need for your crafting
life, just click the image in the supply list below and it will take you
to my store! If you order less than $150, please use this month's Host Code, which can be found at the top of the sidebar on the right.
And be sure to check the box allowing me to contact you when you
check out. I can't send you a thank you card if I don't know your
address! And I promise to only send you happy mail, no junk mail :)
I was quite excited when I got the January 2016 Paper Pumpkin kit. It is called Cute Conversations and has an adorable stamp set with sayings and a font like on the little sweetheart candies! And a bunch of heart, some sequins, and some Minta Macaron twine, I had visions on Valentine treat holders dancing in my head :)
You can watch this video to see all of the goodies that came in this kit. Check out more information on Paper Pumpkin at the end of this post.
Here are just a few of the ones I created. Don't worry, this post is quite photo heavy, and you will get to see them all :)
I did discover that the retired Hearts framelits coordinate perfectly with these hearts, and I was able to cut out a bunch of the scalloped heart to use as the back of these heart pockets.
I heat embossed words and hearts in Gold and Silver embossing powders, cut out the scalloped hearts in Thick Whisper White, Kraft, Vellum, and some gold vellum I had in my stash.
Then I used a ruler and my bone folder to crease the tops of the hearts and folded them down.
I used my sewing machine to first stitch the flaps down and attach the banners.
Next I stitched the patterned paper hearts to the scalloped hearts to form a pocket.
Then I stamped the rest of the sentiments in Versafine Onyx Black.
I also stapled the sequin trim (don't you love that Watermelon sequin trim?!) and the Mint Macaron twine using a mini-stapler.
I did glue a few lose sequins to one of the pockets, but decided that I had put enough work into this set of 30 treat pockets :)
Here is a close up of one of the vellum pockets. Isn't is sweet and delicate looking? But we all know that vellum is tougher than it looks, so this pocket will hold up to stuffing just fine :)
These are the Watermelon Wonder hearts. As you can see, I did some with mostly the stripes showing, and some with mostly the solid showing. I think the stripes are just a titch more fun looking :) Here are a few of the gold vellum scallop hearts, so very pretty in real life.
Blushing Bride is my closest guess for the color of these hearts. So stinkin' cute!! I like the stripes and the solids equally with these.
Dark Mint Macaron? That's what I am calling this color. I think the Kraft was a little dark for this group, but maybe only when you see it next to the white ones. Maybe?
Light Mint Macaron we'll call this one. I am really partial to the more pastel of these hearts. Not that I don't like the other ones, mind you.
Smoky Slate, I think. And who would have thought that gray could be a Valentine's color? Not me, until I saw this!
And the light Smoky Slate. It is such a light grey that the solid side was nearly the same color as the white cardstock, so I stuck with the striped side showing.
One more, with just a few hanging. These will probably go to my work to be hung up, then given to my co-workers. I will save a few to give to my family though :)
So what do you think? Are you ready to make your own?
If you don't already have a subscription to Paper Pumpkin, now is a great time to try it out, and there is a special going on during Sale-A-Bration. Check out this video telling you all about it!
If you would like to purchase a Cute Conversations kit of your own, become an active member of Paper Pumpkin and you will be able to purchase this kit, while supplies last. There are several of the past kits currently available. Just click on the image below, and it will take you right to me store.
Contact me with any questions regarding Paper Pumpkin, I will be happy to help :) boser@paulbunyan.net
And if you would like to purchase some of the items I used today, here
are some convenient links to help you out :) And if your order is less
than $150, please use this month's Host Code: PCUN2KHD