Friday, November 29, 2019

Crafty Festival of Christmas: Fancy Fold or Mass Production Friendly

Happy Black Friday!! It is time for Week #2 of the Festival of Christmas. A few of my crafty friends and I decided to get together and create some fun. Every Friday from now until Christmas, we will share Christmas projects with you.

 Here are a few of my crafty friends!

There will be a different theme each week, to keep it interesting. This week's theme is Fancy Fold or Mass Production.

I decided to pull out the Lawn Fawn Flippin' Awesome dies and combine them with some Concord and 9th stamps.


After Copic coloring this sweet lady, and fussy cut her and adhered her to the first flap.


This hat is just stamped in Memento Tuxedo Black, then colored with Clear Wink of Stella for a white shimmery looking hat. You can't really see it on the picture, but definitely in real life!


The mittens were done the same way. They were cut out with the matching dies too. I added some snowy images in Frost White Versamark ink.


The sentiments from this set came in handy also!

I even snuck in a gift card holder! The plaid is the Buffalo Check background stamp.

Inside the card I used this awesome sentiment.

That is all I had time to pull together this week, and I hope it was inspiring!

Don't miss the gorgeous project by Lynnea!

https://www.lynneahollendonner.com/2019/11/crafty-festival-of-christmas-easy-mass.html

Blog Roll:
Tania Cordie
Linda Van Wely 

Tanya Boser
Lynnea Hollendonner
Marcia Caradinta 

Charlet Mallett

Video Roll:
Lynnea Hollendonner   https://youtu.be/6FrI4zg-m7w

Instagram Roll:
 Maria Willis
Adam Karle
Linda Van Wely
Marcia Caradinta
Charlet Mallett

Tanya Boser 

Some of the supplies listed below are affiliate links, some are not. If you use an affiliate link here to make a purchase, I may get a small compensation. I only use things that I love, and do not create paid posts.


Friday, November 22, 2019

Crafty Festival of Christmas: Snowy or Snarky

Hey friends! Glad to see you all back again. I started a new project recently, and decided to invite a few friends to join me in a Festival of Christmas! Every Friday from now until Christmas, we will share Christmas projects with you. There will be a different theme each week, to keep it interesting.

These are most of my friends that are joining me in this festival, at least the ones with photos ;)


You are going to find us on our blogs, Instagram, and YouTube. But not all of us in each space. I wanted to be sure to include people from across the social media platforms. So, there are link at the bottom of my post for all over the place!

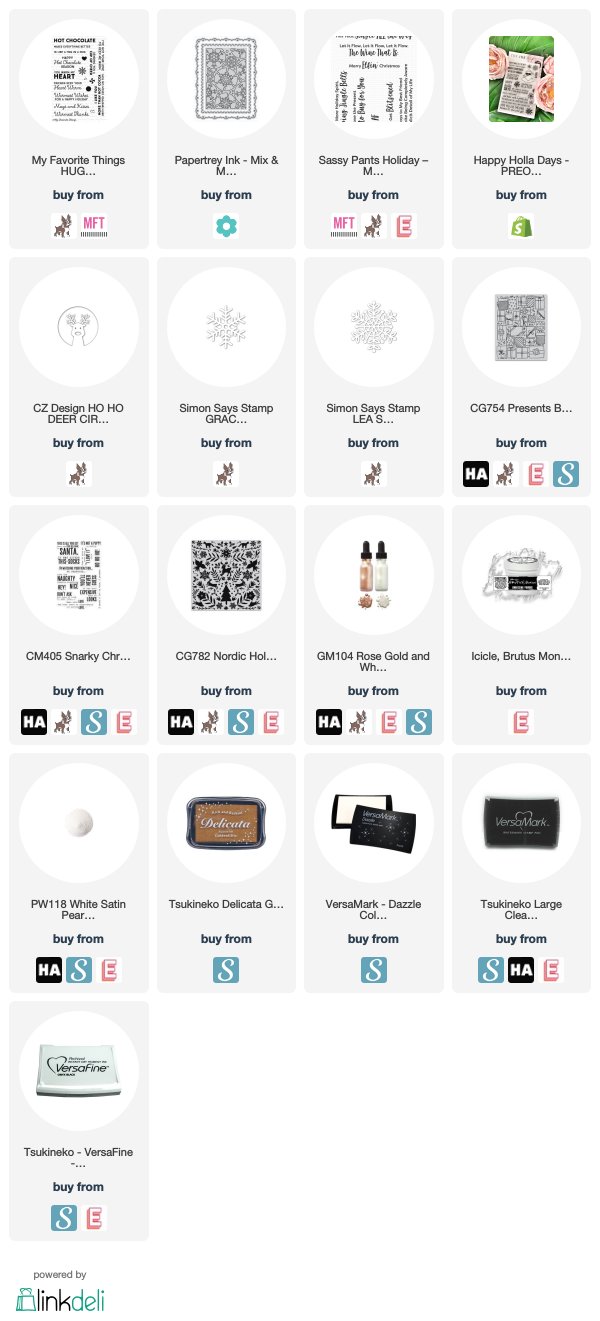
The theme this week is Snowy or Snarky. Snarky is definitely something everyone in my personal circles enjoys. It is our language of love. And I went a little crazy with this theme.

Let's start out tame. Snowflakes!! Papertrey Ink die and MFT sentiment.


So pretty! And crisp and clean, and easy to make lots of them.

Then, a gentle bit of snark. You will have to wait for the punchline for a minute. Papertrey Ink debossing plate, SSS snowflake and reindeer die, and MFT sentiment.


This is actually snowy AND snarky.


And the punchline, Love this!! The Ink Road sentiment and snowflakes.


Ok, this is in your face. And so fun! Hero Arts cardstock, background stamp, and White Shimmer paint. Brutus Monroe clear Icicle embossing powder. MFT sentiment.


I guess the spattered Shimmer paint is a bit snowy too. Hmmm.


And the snark continues inside this card.


One more!! This is a Hero Arts background stamp, cardstock, sentiment, and White Satin Pearl embossing powder.


Ink blended with Candied Apple Distress Oxide.


And the inside of this one too.

That is all I have for you. Be sure to head off to Marcia's blog. She is gonna make you spit your coffee!

https://www.thefrolickingfairy.com/blogs/fairy-notes/festival-of-christmas-snarky


Blog Roll:
1. Tania Cordie
2. Linda Van Wely
3. Tanya Boser
4. Marcia Caradinta
5. Lynnea Hollendonner
6. Charlet Mallett

7. Maria Willis
8. Jenny Hall

Video Roll:
Lynnea Hollendonner https://youtu.be/wHm5gwKqr9c

Instagram Roll:
1. Adam Karle @ark513
2. Linda Van Wely @stampinwithlizdesign
3. Tanya Boser @tanyaboser
4. Charlet Mallett @i.heart.stamps
5. Maria Willis @cardbomb


Some of the supplies listed below are affiliate links, some are not. If you use an affiliate link here to make a purchase, I may get a small compensation. I only use things that I love, and do not create paid posts.


Wednesday, November 20, 2019

Crafty Friends: The Stamp Market

Hello my Crafty Friends!! We are back with another beautiful stamp company to feature, The Stamp Market! Like a fool, I forgot to write my post last night before bed, so this went up without any content. I apologize, and hope you came back to see what I actually created. I am sure there were plenty of amazing projects to see on the other Friends blogs.

https://thestampmarket.com/
Our friends at the Stamp Market have provided us with a discount code also!! I love that they have all been so gracious to provide these codes for us.

These were the first sets to catch my eye: the Donuts stamps and dies, and the Diamond Design background.

I created the background by clear heat embossing the Diamond Design onto white cardstock, then blending on some Worn Lipstick Distress ink. And spritzing with Pearlized water.


 I love the speckly look this creates!! Yes, I am obsessed with ink blending, spritzing, and watercoloring.


For the donuts, one is cut out of some craft colored carstock and then clear heat embossed, then the frosting is die cut from a piece of cardstock I ink blended with Ground Espresso. The swirl is then white heat embossed.

The other two are cut from some white speckled paper, the same paper as the card base, and stamped with Memento Tuxedo Black ink. Then they were colored with Copic markers. And lastly, pink sparkle heat embossed frosting decor.


The sentiment inside was from the Donuts set, and was stamped in Celestial Copper Delicata ink, and I glued an extra donut above it.

Are you ready to go check out The Stamp Market? They have some great stuff, and the 20% off is a sweet deal!

Be sure to visit the other friends:

  1. Ilina Crouse
  2. Becky Roberts
  3. Sandi McIver
  4. Sue Plote
  5. Sara Sherlock
  6. Lydia Fiedler
  7. Jill Hilliard
  8. Jen Timko
  9. Amy Kolling
  10. Jenny Hall
  11. Tanya Boser---you are here
Some of the supplies listed below are affiliate links, some are not. If you use an affiliate link here to make a purchase, I may get a small compensation. I only use things that I love, and do not create paid posts.


Thursday, November 7, 2019

Creating Kindness: Fancy Fold

Hey friends! It is Creating Kindness time again. I love creative time with this group. The theme this month is Fancy Fold. I thought I would use my absolute favorite, I am calling it a Stand Up Tier card.


And there is a video! I am trying really hard to create lots of videos for you all. Have you subscribed to my channel yet? Don't forget!!

Here is the card. I used some My Favorite Things stamps and dies to create this.

Here is the basic how-to for this card.

  • Start with a 4¼"x7" piece of cardstock, score on the long side at 1½" and 5½".
  • Cut a piece of cardstock to 4½" wide and several inches long, and score at ¼" and 4¼". Crease well. Apply Scor-Tape on the ¼" flaps. Then you can trim each tier down to whatever size you need and it is all ready to be adhered to the inside of the card.
  • Figure out the placement of your images, and adhere to the tiers. 
  • Open the cardbase up, and start adhering your tiers, the furthest back and tallest tier first. Line the outer edge of the flap up with the side panel crease. Lay the next layer down, loning up with the flap crease of the tier behind it. Repeat for all tiers. Fold flap over onto the exposed adhesive. (the video shows this process very well to clear up any confusion) 
  • Line the flaps from the other side up even with the bottom of the card, remove the adhesive backing, and fold the other side of the cardbase down over the flaps to adhere them all at once. 
  • Open it up and marvel at the adorable card you just made!

Look how darn cute these critters are!! My Favorite Things has 2 sets of Sweater Weather critters, Safari and Woodland. I have them both. Why wouldn't I?! 😁

Copic colors
Tiger: Y38, YR68, W5, R01
Elephant: W1, W3, R01
Zebra: W0, W1, W6, R01
Giraffe: YR21, W1, E97, E99, R01, W4
Clothes
Reds: R56, R39, R89
Greens: G94, G99

I struggled with colors for the giraffe, so please. Share your color combos for him especially!

I love that this folds flat and is not bulky at all, which makes it the perfect 3D card for mailing!


And it fits perfectly in an A2 envelope! You can easily write your personal message on the back of the card.

I hope you enjoyed this card. Be sure to leave me some love. I would love to hear if you have made this fold before, and if you have, are you trying it soon?

Be sure to check out the next stop on the hop, Marcy Denning! And a special welcome to this month's guest designer, and my stampy friend, Sue Plote!!
  1. Sue Plote – Guest Designer – USA
  2. Tanya Boser – USA (you are here!)
  3. Marcy Denning – Canada
  4. Paula Dobson – New Zealand
  5. Lou Kitzelman – Australia
  6. Jenny Hall – USA
  7. Jay Soriano – UK
  8. Cheryll Miller – Australia
  9. Danielle Bennenk – Netherlands
  10. Charlet Mallett – USA

Video hop participant list:
1. Tanya Boser – https://youtu.be/vNj1cfPzJhs
2. Marcy Denning – https://youtu.be/tRBSqRvm7nA
3. Jay Soriano – https://youtu.be/rRxy6nzGdaA
4. Danielle Bennenk – https://youtu.be/tKxqTYxQPj4


Some of the supplies listed below are affiliate links, some are not. If you use an affiliate link here to make a purchase, I may get a small compensation. I only use things that I love, and do not create paid posts.


LinkWithin

Related Posts with Thumbnails