Saturday, October 24, 2009

Boo Banner


This was really fun to put together. Halloween is a great time for papercrafting, so many fun things you can do. I have seen lots of these little wall hangings and was inspired by Beate Johns nearly glowing skull on green patterned paper (which I can't seem to find again to link to). The skull image is embossed with black embossing powder and then Frost White Shimmer Paint is rubbed all over it, wiping off the excess. Basically an emboss resist technique. I used the faux distressed stickles  technique (mix Fine Cosmo glitter with Crystal Effects and apply to your surface-I use a toothpick- then let dry) to make the super glittery letters. The glitter doesn't get everywhere and it stays put! Then I used various punches to make the spider and bat embellies and stuck them on with dimensionals. Lots of faux stitching with a white gel pen and a Basic Black marker. Adhered the finished scalloped squares to the Black Striped grosgrain with Sticky Strip. I folded the top over and put a Corduroy Button through it. Tied a piece of Rope Twine through that so it has a hanging handle. Now to find a good place to hang this! Ok, here is the condensed supply list :)
  • Stamps: From the Crypt, Grateful Greetings
  • Paper: Basic Black, Elegant Eggplant, Old Olive, Pumpkin Pie, Whipser White, Cast-A-Spell designer series paper
  • Ink: Versamark, Old Olive, Pumpkin Pie, Elegant Eggplant, Basic Black
  • Other: Scallop Square die and Simple Alphabet dies with the Big Shot, scallop square and scallop oval and large oval and 1" circle and 1-1/4" circle punches, Celery Fine Cosmo glitter mixed with Crystal Effects, Signo white gel pen, black embossing powder, embossing buddy, heat gun, Frost White shimmer paint with a sponge dauber, black striped grosgrain ribbon, corduroy button, sticky strip, dimensionals, rope twine

Friday, October 23, 2009

Cupcakes!


Yummy cupcakes! We all love them. And isn't this an adorable way to give someone special a birthday cupcake?!  I made it by adhering 4 scalloped envelopes together. I've seen this idea several places so I don't know who to give the credit to. That cute paper is from  the Love Me DSP on the Clearance rack right now.
  • Stamps: Crazy for Cupcakes
  • Paper: Pretty in Pink, Close to Cocoa, Whisper White, Love Me designer series paper
  • Ink: Chocolate Chip, Rose Red, Regal Rose, Taken with Teal
  • Other: Scalloped Envelope die with the Big Shot, rhinestones, Scallop Circle and 1-3/8" Circle and 1-1/4" Circle punches, Stamp-A-Ma-Jig, dimensionals
ETA: I put a square of waxed paper in the box to prevent the cupcake frosting from getting all over the box. Think tissue paper in a gift bag.


And this is a card to go with that cute little cupcake box. I painted Frost White Shimmer Paint on the frosting and Platinum Shimmer Paint onto the stand. I even got to use some leftover faux suede flowers I had made a while ago (the Bermuda Bay goes pretty well with the Taken with Teal don't you think?) I used some of the Ribbon Originals Flirty (coordinates perfectly with the Loves Me papers) Teal ribbon that you can also get on the Clearance rack.
  • Stamps: Crazy for Cupcakes, Birthday Bliss
  • Paper: Pretty in Pink, Close to Cocoa, Whisper White, Bermuda Bay, Love Me designer series paper
  • Ink: Chocolate Chip, Close to Cocoa, Rose Red, Regal Rose
  • Other: Flourish texture plate and Blossom Party die with the Big Shot, Ribbon Originals Flirty Teal velvet ribbon, Platinum and Frost Ehite Shimmer Paints, Aquapainter, blender pens, rhinestone, Scalloped Oval punch, dimensionals, glue dots, Stamp-A-Ma-Jig

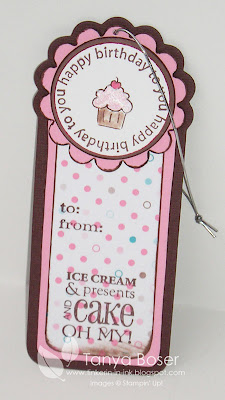
And last but not least, the tag to go on the gift :) Lots of layers on this tag, definitely for someone special! I am still making my way thru the stack of 60 tags I cut out one day. It's kinda cool to see all the different tags you can come up with out of the same shape and color!
  • Stamps: Crazy fro Cupcakes, Birthday Bliss
  • Paper: Chocolate Chip, Pretty in Pink, Close to Cocoa, Whisper White, Loves Me designer series paper
  • Ink: Choc Chip, Regal Rose, Close to Cocoa, Rose Red
  • Other: Two Tags die and Big Shot, Scallop Circle and 1-3/8" Circle and 1-1/4" Circle and Corner Rounder and 1/16" punches, Stamp-A-Ma-Jig, Silver Cord, dimensionals
So, what do you think? And did you make your own? I would love to see it! Leave a comment with a link to yours so we can all see it!
Happy Stampin!


Wednesday, October 21, 2009

Deal of the Week #3

Wow, I'm behind getting this post out! Sorry all. This week's special gives you the chance to try some of that hardware that you keep looking at, but something else just always seems more important. :) Like we need excuses to but supplies!


112581
1/2" Library Clips
8 each of 3 colors
Reg. $6.95 Sale $3.99


114348
Basic Jumbo Grommets
5 each of 4 colors
Reg. $6.95 Sale $4.49


112571
Circle Designer Brads
8 each of 2 sizes
Reg $5.95 Sale $3.99


109857
Mini Library Clips
12 each of 4 colors
Reg $12.95 Sale $8.99


Don't forget, you can click on the Deals of the Week to the right, then click on SHOP NOW in the upper right corner on my Demonstrator Website.
Happy Stampin!

Leafy Thanksgiving


Those leaves, they are a fallin'! I got in the mood to make a card with this image from Wandering Words as the leaves blew by my window the other day. I think it turned out pretty well!

  • Stamps: Wandering WOrds, Grateful Greetings
  • Paper: Dusty Durango, Soft Suede, Naturals Ivory
  • Ink: Soft Suede, Dusty Durango, Ruby Red, Old Olive, Pmpkin Pie, Crushed Curry
  • Other: Brayer and texture plates and Leaves die with Big Shot, Crushed Curry polka dot ribbon, Old Olive taffeta from Mistletoe Ribbon Originals, Vanilla Hodge Podge hardware ribbon slide, dimensionals, Spritzer tool, Champagne Mist shimmer paint with sponge dauber, distressing tool from cutter kit
  1. Ink up the Damask texture plate with Dusty Durango, run DD paper thruogh Big shot with it. Cut to 4"x5-1/4" 
  2. Ink up the stamp image with markers as shown. Stamp onto 1-7/8"x4-1/4" piece of Naturals Ivory. Distress edges. Mat onto 2-1/8"x4-7/16" piece of Soft Suede.
  3. CUt out a Ruby Red leaf with die. Run thru the Big shot with the Distressed textured plate.Spritz with Soft Suede. Sponge with Champagne Mist shimmer paint. 
  4. Make faux stitching as shown. 
  5. Put Ribbon slide on a 6" piece of Old Olive ribbon. Apply both ribbons as shown to the DD textured piece. Adhere to card base. 
  6. Adhere the matted main image to the card base. 
  7. Place dimensionals on the lower portion of the leaf and apply to card. Ink edges of card with Soft suede. Sponge edges of card with Shimmer Paint.
  8. Stamp your greeting for inside the card on Naturals Ivory and mat with Dusty Durango. Adhere to inside of card. All Done!

Tuesday, October 20, 2009

Wide Oval Pumpkins


How about some pumpkins? I made these with the Wide oval punch, Dusty Durango and Old Olive paper. These are so easy I don't think I even need to explain how I made them! They also fit on many round candies :) Or as cute pumpkins added to a card, 3-D project, or a scrapbook page! The sentiments are from Grateful Greetings and Teeny Tiny Wishes, both of which are very versatile sets. I of course had to add a little glamour to these little fellas with some Champagne Mist Shimmer Paint.

Monday, October 19, 2009

Dasher Note


Don't you just love Dasher? It is such an elegant stamp! And it is only $8.95!  I'm using another Love Note here also. I'm tellin ya! You have to go check out the Clearance Rack (look to your right)!
  • Stamps: Dasher, Teeny Tiny Wishes
  • Paper: Very Vanilla, Chocolate Chip, Rose Red
  • Ink: Chocolate Chip, Old Olive, Rose Red
  • Other: Old Olive taffeta ribbon from Mistletoe Ribbon Originals, Corner Rounder, Modern Label, and Word Window punches, glue dots, Signo white gel pen
I'll keep this one short :)  Measurements: Very Vanilla square 2-7/16", Choc Chip square 2-5/8" Image: Ink Dasher stamp with markers. Adhere Modern label punch with glue dots over ribbon. I think the rest is self explanatory.

Now, GO TO THE CLEARANCE RACK!
:)

Sunday, October 18, 2009

Serene Sky


This is another Love Note card. The base is in the ever so lovely Soft Sky. The felt snowflake is from the Little Felt Flurries ( 27 laser-cut felt snowflakes. Each size comes in Baja Breeze, Riding Hood Red, and Whisper White. Nine designs, approximately 3-1/4" in diameter and 2 mm thick all for $5.99), which are also available on the Clearance Rack (see button to the right).
I'm really having fun with these! Snowflakes are always fun. Although I could wish we hadn't already had snow more than once here in Minne"snow"ta, lol!
  • Stamps: Serene Snowflakes
  • Paper: Very Vanilla, Close to Cocoa
  • Ink: Baja Breeze, Versamark
  • Other: Soft Sky Love Note, Frost White Shimmer Paint and sponge dauber, silver brad, Chocolate Chip 1/4" grosgrain ribbon,  Corner Rounder punch, Signo white gel pen, Iridescent Ice embossing powder, heat gun, Embossing Buddy, paper piercer and mat pack
  1. Use sponge dauber to lightly apply Frost White shimmer paint to the felt snowflake. Set aside to dry (will only take a minute or so)
  2. Cut a 2-1/2" square of Close to Cocoa and a 2-5/16" square of Very Vanilla. Round 2 opposing corners of each and also of the Soft Sky Love Note. 
  3. Ink edges all edges with Close to Cocoa.
  4. Rub Very Vanilla square with Embossing Buddy. Ink up snowflake stamp with Versamark, then with Baja Breeze, then stamp onto Very Vanilla. Apply Iridescent Ice embossing powder, then use heat gun to melt embossing powder.
  5. Adhere Vanilla and Cocoa layers together.
  6. Cut a 3" length of ribbon and adhere to the matted image. Adhere this unit to the cardfront.
  7. Use white gel pen and Close to Cocoa marker to make faux stitching and dots on the layer.
  8. Use paper piercer to poke a hole in the middle of the felt snowflake and to poke a hole in the card front where you want to felt snowflake. Push silver brad through the hole in the snowflake, then thru the hole in the cardfront and open the prongs in the back. All done!

Pillow Box Treat


Are you ready for more treat holders? This one is super easy, and it fits the mini Hersey's, Whoppers, and Kit Kats for sure :)
  1. I just used the Pillow Box die and the Big Shot with some of the yummy Cast-A-Spell DSP.
  2. Stamped the sentiment from Grateful Greetings in Basic Black on Dusty Durango, then punched it out with the Scallop Square punch. Added black dots with a black marker.
  3. Took a 12" length of the 1-1/4" wide Old Olive Striped Grsograin ribbon, folded it in half, wrapped a 4" long piece of Linen thread and tied at the top.
  4. Assembled the box, put candy in it, then slid the ribbon over the box as pictured. Then slide the knotted thread down until the ribbon is snug on the ends of the box.
  5. Use a mini glue dot to stick the sentiment to the ribbon. All done!

Saturday, October 17, 2009

"BOO!" page


OK, this was the page we did for September Stamp Club, in October! The story there is that I had the flu when we were supposed to have club. I know we all like to share, but not the flu! So, instead of the last week of September, we had club the first week of October. I could not wait to try this technique with Cosmo glitter and Crystal Effects to make these glittery letters! And I got to use more SHIMMER PAINT! I love this stuff! It was a bit time consuming to do the whole page at club. The effect is gorgeous though, so it was worth it :) And this fun page would work for kids or adults. You know there are lots of adults who love to dress up for Halloween too :)
  • Stamps: From the Crypt
  • Paper: Basic Black, Elegant Eggplant, Cast-A-Spell Designer Series paper
  • Ink: Elegant Eggplant
  • Other: Signo white gel pen, Frost White Shimmer Paint, sponge dauber, Crystal Effects, Orchid Fine Cosmo Glitter, toothpick, Stampin Up! Alphabet Simple Letters dies with Big Shot, chipboard, Scallop Edge punch
  1. Cut out chipboard letters using the Simple Letters dies and the Big Shot-use the letter "i" for the exclamation point. Run a line of Dotto on a piece of scrap paper and adhere letters to it. Ink up the letters with Elegant Eggplant ink.
  2. Mix about a dime-sized spot of Crystal Effects with a small amount of glitter with a toothpick. Apply thin layer of mixture to the letters with the toothpick. Set aside to dry. Will be dry within a few minutes if you don't use too much :) It will have a nice glittery distressed look when done.
  3. Stamp the brocade image in Frost White Shimmer Paint all over 12x12 page using sponge dauber to apply thin coat of paint directly onto stamp.
  4. Cut a piece of Elegant Eggplant cardstock to 3-1/4"x12". Scallop one of the long edges with the Scallop Edge punch.
  5. Cut four 2-1/2" squares from the DSP. Adhere to the Elegant Eggplant strip.
  6. Use white gel pen to make faux stitches around edges of the Elegant Eggplant strip and the squares. Adhere about 1/2" from bottom edge of paper.
  7. Adhere letters to the DSP boxes. Adhere photos and additional embellies as desired. All done!

Friday, October 16, 2009

Penguin Bearing Warmth


There are some really great deals on the Clearance Rack on my Demonstrator Website here .
I used the Love Notes for this 3x3 card (30 cards: 10 of each color. Soft Sky, Rose Red, and Very Vanilla. Includes 30 Very Vanilla envelopes. $3.99) The Love Notes are a great deal and there are so many cute things you can do with these things. 
The next couple days, I will be showing you a few cards using the Love Notes and some of the other things you can get on the Clearance Rack while supplies last! They are only available as an on-line order so click on the Clearance Rack to the right, then on the SHOP NOW button in the upper right corner to find the great deals available now!
Now, for the details on this card!
  • Stamps: Cold & Cuddly
  • Paper: Very Vanilla, Real Red, Old Olive
  • Ink: Basic Black, Real Red, Old Olive, Only Orange
  • Other: 3x3 Very Vanilla Love Note 
  1. Cut 1-3/4" square of Very Vanilla, 1-15/16" square of Old Olive, 2-1/8" square of Real Red
  2. Use Basic Black, Only Orange, and Real Red markers to apply ink to the penguin stamp and stamp onto the Very Vanilla square. Stamp the phrase below the penguin in Basic Black.
  3. Ink edges of Love Note , the Real Red square, and the Very Vanilla square with Real Red. Ink edges of the Old Olive square with Old Olive ink.
  4. Adhere the squares together as shown.
  5. Use Old Olive and Real Red markers to apply ink to the hat stamp and stamp onto a scrap of Very Vanilla. Cut out. Adhere to the penguin's head.
  6. Stamp the mug in Real Red and Olive Olive repeatedly on the front of the Love Note.
  7. Adhere matted penguin image to the Love Note front. All done!

Batty Treat


I got the idea for this little guy from LauraLB here. I modified him a bit for the punches that I have :) He will fit nicely on candies like peppermint patties. I'll try to explain how I made him.

  • Paper: Basic Black, Whisper White, Crushed Curry (or whatever you want), Real Red


  • Punches: Boho Blossoms, Scallop Oval, Wide Oval, Photo Corner, 3/4" circle, 5 Petal Flower, and Crop-A-Dile


Wings: Photo Corner punch and Scallop Oval punch-glue together as shown.
Body: Wide Oval punch in Basic Black
Mouth: 3/4" circle in Real Red (only about 3/4 of the circle), 2 petals from the 6-petal flower on the Boho Blossoms punch in Whisper White for his fangs
Feet: 3 petals x2 from the same flower in Basic Black
Ears: Two petals from 5 Petal punch
Eyes: Use punches on Crop-A-Dile to make 2 large white circles and 2 small black circles

To have better control putting the eyes together and to put them on the body, I used a toothpick to apply a teeny tiny bit of glue, and to pick them up and move them around.

Let me know what you think!

Thursday, October 15, 2009

Two Tags Halloween Treat


I bet you are wondering how many of these things I am going to post! I am too... when I stop thinking of/finding new ideas, I'll stop. How's that sound :) This is really easy to make too. I think the white gel pen really adds pop to it. Inside is a mini Hersey's bar that is about 4" long. Kit Kat, Whoppers, etc. would work too.

  • Stamps: Pumpkin Patch, Teeny Tiny Wishes


  • Paper: Chocolate Chip textured cardstock, Chocolate Chip, Dusty Durango, and Very Vanilla card stock


  • Ink: Chocolate Chip, Pumpkin Pie, Dusty Durango, Old Olive


  • Other: 1-3/4", 1-3/8", 3/4", and Scallop circle punches, Modern Label and Word Window punches, Signo white gel pen, gold brad, Two Tags die with Big Shot

  1. Cut tag out with Two Tags die and the Big Shot. Score 1/4" below prescored line. Crease on score lines. 
  2. Stamp round pumpkin image on Very Vanilla paper with Pumpkin Pie and Dusty Durango ink using the Rock & Roll technique, the stem and vines in Old Olive, the face in Chocolate Chip. Stamp "happy halloween" in Chocolate Chip on another scrap of Very Vanilla.
  3. Punch the pumpkin out with the 1-3/8" circle punch, the "happy halloween" out with the Word Window punch. Punch a Choc Chip Scallop circle, a Modern Label, 1-3/4", and 3/4" circles out of Dusty Durango.
  4. Layer Word Window and Modern Label punches together and adhere inside the tag on the lower portion.
  5. Layer all but the 3/4" circle together.
  6. Use white gel pen to make faux stitching around tag, and to make white dots on the scallps.
  7. Pierce a hole in the center of the 3/4" circle and attach to the top of the tag with a gold brad.
  8. Adhere candy to inside of tag. Adhere matted pumpkin to the folded up edge of the tag so that the top of the circle fits inside the slit at the top of the tag. All done!


And here is a pic of the inside. Helps the directions make sense, doesn't it :)

Tuesday, October 13, 2009

Peanut Butter Cup card


More Halloween Treat decorations! I just can't stop making candy covers :) This is a 3x3 card base that fits a full sized Reese's peanut butter cup perfectly. Easy and fun, that's what we like!
  • Stamps: Sweet Centers
  • Paper: Pumpkin Pie, Basic Black, Very Vanilla
  • Ink: Old Olive
  • Other: 1-3/4" and 1-3/8" circle punches, Signo white gel pen
  1. Cut Pumpkin Pie to 3"x6". Score at 2-7/8" and 3-1/8".
  2. Stamp the halloween stamp in Old Olive on Very Vanilla. Trim down to edges of stamped image.
  3. Punch the "EEK" with the 1-3/8" circle punch. Set aside. Punch out the center with the 1-3/4" circle punch.
  4. Mat Old Olive image onto Basic Black (2-1/2"x2-15/16"), then on to card base. Adhere the "EEK" image in the center.
  5. Make faux stitching around the "EEK" with white gel pen.
  6. Adhere peanut butter cup inside!
Take a little peek at the inside :) Looks yummy doesn't it...


Monday, October 12, 2009

Week #2 Deals of the Week

Another big week of deals! Check out the Big Shot dies that are on sale this week through 9:50am MST on 10/19/09. You can order them on-line HERE then click on SHOP NOW. Or you can contact me to place an order :)


Perfect Settings XL die
        115961
         Pg 200
Reg. $42.95 Sale $25.99


Flower Burst Embosslits die

     114515
      Pg 195
     Reg. $11.95 Sale $5.99


Pop-Up Three Tier Cake Bigz XL die

116760
Pg 201
Reg. $39.95 Sale $25.49


Sunday, October 11, 2009

AutumnThanks


I made 8 of these recently, mostly to send some swaps to people and to thank them for their patience while I recovered from the flu. I'm pretty sure they didn't want to receive flu germs in the mail though ;) I did use more of the Shimmer Paint, but it does not photograph well, so you don't get to see that part. I stamped on the front of the envie, and sponged the edges of the envie with Champagne Mist Shimmer Paint too. The Crushed Curry panel was run thru the Big shot with an inked up woodgrain texture plate. I hope everyone likes them!

  • Stamps: Autumn Splendor, Grateful Greetings


  • Paper: Soft Suede, Dusty Durango, Crushed Curry, Naturals Ivory


  • Ink: Soft Suede, Dusty Durango, Crushed Curry


  • Other: Soft Suede polka dot ribbon (back side showing), texture plate with brayer and Big Shot, Champagne Mist Shimmer Paint, sponge dauber, Wide oval punch, Large Oval punch, Scallop Oval punch, glue dots


Saturday, October 10, 2009

Falling for Thanksgiving


How about a Thanksgiving card? This is a 4x4 notecard that turned out just like I imagined it would! That doesn't happen very often, I can tell you. Most of the time my projects have a way of developing as I go rather than a formed idea from the start. It helps that I get to use some of my favorite colors, the Earth Elements :)
I never would have thought to send a Thanksgiving card, but wouldn't you love to receive a little note from a loved one? Especially if you know you won't be able to get together over the holiday. It would be a nice addition to a hostess gift, not necessarily the SU workshop kind either :)
I paper pierced around the Olive mat, and made faux stitching around all of the images with either Soft Suede marker or white gel pen. The white squares are 1-1/4" matted onto the scallop Square punch, and popped up on dimensionals. I used Ruby Red, Soft Suede, and More Mustard markers to ink the acorn stamp, punched out with the 1-1/4" circle and matted on a 1-3/8" circle. I stuck cut up dimensional on the center corners of the 4 leaves, then stuck the matted acorn embellie to it so it would pop a little higher than the others.

  • Stamps: Falling Leaves, Bright Blessings JW


  • Paper: Ruby Red, Old Olive, Soft Suede, Whisper White


  • Ink: Ruby Red, Old Olive, More Mustard, Dusty Durango, Soft Suede


  • Other: Scallop Square, 1-1/4", 1-3/8" circle punches, dimensionals, paper piercer and mat pack, Signo white gel pen

Thursday, October 8, 2009

Pile-O-Pumpkins


This cheerful card is a shameless CASE from Gretchen Barrons. You can see hers here. It was just tooo cute not to try myself! And it went together very quickly :) All those pumpkins just make me smile. I wonder who I will send it to.....

  • Stamps: Pumpkin Patch


  • Paper: Old Olive, Pumpkin Pie, Naturals Ivory


  • Ink: Dusty Durango, Pumpkin Pie, Old Olive, Soft Suede


  • Other: taffeta ribbon from Ribbon Originals Mistletoe

Can you believe I didn't use any Shimmer Paint?!

Tuesday, October 6, 2009

Christmas Gift Tags

These are just a couple of gift tags I made recently. This one is done using the new embosslit Merry. I just stamped "Christmas" from the Teeny Tiny Wishes stamp on the bottom and tied some gold cord thru the hole in the top. Super easy! It probably needs a little To From on the top yet. I just have to dig up a stamp :)
And you may have noticed the silver thing in the background. That is a silver skinny tin sold by SU that I embossed ornaments from Tree Trimmings set in Silver embossing powder. Pretty slick! I am going to fill that little puppy with tags :)


And this one is with the Delightful Decorations stamp set and the Ornament punch. I inked up the stamp with Ruby Red classic ink, then used a sponge dauber to lightly apply Champagne Mist shimmer paint to the stamp. Then stamped onto Whisper White paper, punched out with ornament punch, punched a 1/8" hole in top and threaded with gold cord. Voila! You just knew I couldn't go a day without using the shimmer paint, didn't you ;)


Add Video

Sunday, October 4, 2009

Thanksgiving Pillow Box Bucket

I found this bucket tutorial by Lynn Put here. I had to try it right away! Can you believe the creative minds out there?! And it was pretty fast for a bucket. I think it would be a nice way to put some slips of paper in with things we are thankful for and use as a centerpiece for Thanksgiving dinner. Of course, you could make buckets for any occasion or season. I didn't have any DSP that would coordinate and be Thanksgiving-ish, so I made my own with Very Vanilla cardstock. I brayed with Dusty Durango, used the spritzer with Rich Razzleberry and Old Olive, then sponged with More Mustard and Champagne Mist shimmery paint. Stamped images from Falling Leaves in a variety of colors.
  • Stamps: Falling Leaves
  • Paper: More Mustard, Very Vanilla
  • Ink: More Mustard, Dusty Durango, Old Olive, Ruby Red, Rich Razzleberry, Pumpkin Pie, Soft Suede
  • Other: Pillow Box die with Big Shot, distressing tool from Cutter Kit, brayer, Spritzing Tool, Champagne Mist shimmer paint, sponges, leaf brads, slot punch, Sticky Strip
This is a close up showing you more of the shimmer. If you haven't gotten any of this stuff yet, I'm telling you, it's a must have! Very easy to use, and you can use it with stuff you already have! It will even work on fabric. And there are several techniques out already using this stuff. I can't wait to try them all!

Saturday, October 3, 2009

Pumpkin Patties

Peppermint Patty treats are so popular and cute, I thought I would try some with the Pumpkin Patch set. I love these little guys, so cute! I am sure you could make these less labor intensive by skipping the sponging and faux stitching if you wanted.
  • Stamps: Pumpkin Patch
  • Paper: Dusty Durango, Whisper White
  • Ink: Pumpkin Pie, Dusty Durango, Old Olive, Soft Suede
  • Other: 1-3/8" circle, Wide Oval, and Scallop Circle punches, sponges
  1. Ink up the pumpkin body with Pumpkin Pie ink, the use the Rock and Roll technique to add Dusty Durango to the edges. Stamp on Whisper White scrap. Stamp face in Soft suede, stem and vines in Old Olive.
  2. Punch out with 1-3/8" circle or wide oval punch, depending on which pumpkin base you chose :)
  3. Punch scallop circle out of Dusty Durango.
  4. Ink edges of both pieces with Soft Suede. Add dots and/or faux stitching with Soft Suede marker.
  5. Adhere together. Then adhere to a peppermint patty with tape runner. Use a second sponged scallop circle for the other side of the patty. All done!

Now, let's see what you can do! Post a comment and a link so we can all see :)

Friday, October 2, 2009

Scalloped Spiders


We made this little guy last year, I just thought you all might like a reminder :) he is just so darn cute! This year I actually have the 1/2" circle punch, so I used that and the large hole punch on the Crop-A-Dile for his eyes. We can always use another Scallop Circle punch animal, lol!

Trick or Treat matchbox

I have been trying to think of some cute Halloween treat containers, and this is one of them that came to me.
  • Stamps: Pumpkin Patch Holiday Best
  • Paper: Pumpkin Pie, Whisper White, Ghostly Greetings DSP (2008)
  • Ink: Pumpkin Pie, Soft Suede, markers (Soft Suede, Dusty Durango, Old Olive)
  • Other: Matchbox die with Big Shot, Wide Oval punch, white gel pen, Champagne Mist shimmery paint, sponge, Sticky Strip
  1. After cutting a matchbox out with the die and the Big Shot, I stamped the little jack-o-lantern faces from Pumpkin Patch all over the cardstock in coordinating ink.
  2. Sponged with same ink, Soft Suede, and Champagne Mist shimmery paint (Love, Love, Love this stuff!)
  3. Trimmed off about 1/4" of the short flap on the box lid (so you can get the wide oval punch centered on the box top) Punched a window out of the box lid with the wide oval punch.
  4. Sponged a piece of Whisper White (2"x2-1/2") with Soft Suede and Pumpkin Pie
  5. Used markers to color the sentiment stamps and stamped on the White paper.
  6. Glued behind the oval window.
  7. Faux stitching in white gel pen and Soft Suede marker.
  8. Sponge box base with shimmery paint.
  9. Stamp sentiment in the inside of box base in Soft Suede.
  10. Assembled box using Sticky Strip.
  11. Wrapped scraps of last year's Halloween DSP around chocolates and place in box.
All Done!

Thursday, October 1, 2009

October Deals of the Week #1

Now more ways to save! Stampin Up! is having new Deals of the Week all thru October, so don't miss your chance for a great deal :)

This week's deals (available Oct 1-12th at 9:50 MST) are:


109041    5 Petal punch       $10.99


 109183    Trio Flower Punch      $10.99


110709    My Way punch     $11.99


CLICK HERE then click on SHOP NOW to order online, or contact me at boser@paulbunyan.net .

Warm Walrus

And here is the little walrus I wanted to try. He is getting alot of cocoa! I am lovin' this Two Tags die. I cut out about 90 tags in Choc Chip textured carstock to work on when I get an idea, or have time. I am sure we will be doing a project with them too :) I did sponge the edges of the Dusty Durango pieces with Dusty Durango ink, and the edges of the tag die with Frost White shimmery paint. Man I love that stuff! I have added it to 90% of the projects I have done since getting it. So on to the supply list!
  • Stamps: Cold & Cuddly
  • Paper: Choc Chip textured cardstock, Dusty Durango, Whisper White
  • Ink: Dusty Durango, Close to Cocoa, Craft White
  • Other: Scallop Circle punch, Two Tags die with Big Shot, Scallop Edge punch, white gel pen, sponge and Frost White shimmery paint, sponge
I wonder what else I can come up with for these tags!

LinkWithin

Related Posts with Thumbnails