Friday, December 31, 2010

Occasions Mini Blog Hop!!!


(for those who see this early, the blog hop officially starts at 7:00am EST so if you came by early, please remember to come back later when all the links are working)

Woo-hoo! It's that time again! Stampin' Addicts is hosting a fabulous Blog Hop to get us all excited about the new Mini that starts in just a few days. I know I sure am excited about it. There are so many cool new toys and beautiful stamps to chose from and we are going to show you a few examples of what you can make with them :)
If you are following the links in the hop, you probably just came from Kandi's site where she did an amazing job with the Button, Button stamp set. Weren't her projects adorable?! I will be featuring the Sew Suite accessories. There are so many fun things that coordinate with each other in this collection, and I love them all! So let's get started!

 These cards feature a peek-a-boo of buttons that are made with the brand new Sweet Buttons embosslit! I just love that thing! And those that know me well know that I must ink everything. I used a marker to add some ink to the raised areas on the buttons to give them some added dimension. The panels on the card fronts are stamped with a new single stamp also, which is about 2¾"x3" and just adorable. I think I will own everything in the Sew Suite collection before long, lol! The little cupcake cup is decorated with more Sweet Buttons on dimensionals and holds some assorted loose candies. I also had to do a whole bunch of stitching on these projects ;-)
  • Stamps: Pattern Pieces
  • Paper: Crumb Cake, Tangerine Tango, Chocolate Chip, Daffodil Delight
  • Ink: Crumb Cake, Tangerine Tango, Chocolate Chip, Daffodil Delight
  •  Other: Big Shot with Movers & Shapers Punch Windows Heart die, Sweet Buttons embosslit, Perfect Setting die, Signo white gel pen, dimensionals, cupcake liner, Circle Scissor

 This is a Message Board I made with a 8x10 stretched canvas. I have been wanting to do a project like this for a while now, and this gave me the perfect excuse! I was excited to work with a the new Designer Fabric, Fabric Designer Brads, and Pom Pom trim. I really like to use those kinds of things on something that will be around for a while ;-)
  • Supplies: 8x10 stretched canvas, Sweet Stitches Designer Fabric, Daffodil Delight Pom Pom trim, Fabric Designer Brads, Chalkboard Decor Elements Sheets, Chipboard sheet, Cork sheets,  Sticky Strip, paper piercer, Pearl Basic Jewels,  hot glue gun, heavy duty stapler, Signo white gel pen, cotton batting

 I really love the colors on this set of projects, but I am a blues and greens kind of gal :) More of the Sweet Buttons embosslit and the addition of the Sweet Stitches jumbo wheel. I took the plunge and unmounted my first wheel! I am so happy I did! This was probably the best wheel to unmount as a first try. I just peeled the rubber off, put some Cling mount on the back, and cut the stitch images apart. I ended up with six 7" long strips of stitch stamps!
I also used the new Framed Tulips embossing folder in the corner of the card.with a little bit of Craft White ink sponged onto it to give it a little vintage feel. The Celery panel has a bunch of Sweet Buttons glued onto it. I even sneaked a little Smooch Pearlized Accent ink onto this card! Can you find it? 
  • Stamps: Sweet Stitches jumbo wheel (unmounted), Teeny Tiny Wishes, Occasional Quotes
  • Paper: Naturals White, Chocolate Chip, Certainly Celery, Marina Mist
  • Ink: Chocolate Chip, Certainly Celery, Marina Mist
  • Other: Big SHot with Sweet Buttons embosslit, Perfect Setting die, Matchbox die, and Framed Tulips embossing folder, Rhinestone Basic Jewels, Modern Label punch, dimensionals, Designer Label punch, 1-3/8" Circle punch, 1/16" punch, Bitty Shapes punch pack, Sticky Strip, Heat Gun, tea light candle

And last but not least, a little 3x3 note card set. I made four 3x3 cards, 2 with Naturals White card stock and 2 with Whisper White. I then made 4 Modern Label punches in each card stock of the sentiments to be attached later. And of course, more Sweet Buttons :-) I put a piece of Sticky Strip on the back of each sentiment so it is an easy peel and stick. The box to hold them all is a Fancy Favor box all decorated with Sweet Stitches, lol! I am having trouble not using these all the time!
  • Stamps: Teeny Tiny Wishes, Sweet Stitches jumbo wheel unmounted
  • Paper: Melon Mambo, Concord Crush, Old Olive, Whisper White, Naturals White
  • Ink: Melon Mambo, Concord Crush, Old Olive
  • Other: Big Shot with Fancy Favor die and Sweet Buttons embosslit and Lots of Tags sizzlet die, Modern Label punch, Designer Label punch, Slit punch (retired), sponges, Signo white gel pen, Sticky Strip
I hope I have inspired many ideas for projects here! I must confess though, I had to force myself not to make a tea light candle box set for this! I will still do it, but I am sure you have all seen those already ;-)
Now, on with the show! Please go visit Betty and see what she has come up with using the Sweet Stitches rub-ons!

Wednesday, December 22, 2010

Shimmering Peacock Feather


I'm back! Did you miss me? I have been working so much on Christmas I haven't had time to stamp! Except for stuff I can't share right now for the Occasion Mini Blog Hop (Friday, December 31st to Sunday, January 2nd) , a couple of swaps, and my projects for the next UStampwithDawnandFriends event (opening day Dec 31, 2010, last project posted Jan 19, 2011) for which I am a Guest Designer! So there will be exciting things in the near future :)
Now, I just had to have this set as soon as it came out, and then I did nothing with it!! Until I became inspired to use the Smooch Accent Ink to make the feathers all shimmery. I had just gotten the Accent Ink a few weeks ago and then I got this new paper from the Occasions mini, so this a bit of a sneak peek :)


I used the Bitty Box and Envelope die to make this envelope, and the card is just tiny! It it 2" square. I didn't decorate the inside so I would have room to write! 


SO, I cut out the envelope, then I stamped the peacock feather image all over it. I used a blender pen to color the eye of the feather with a little Pear Pizzazz and Tempting Turquoise, then used the blender pen to add some shimmer with the Gold Lame Smooch Accent Ink, so awesome!! Then I used the applicator wand that comes with it to apply the Gold Lame to all of the edges to make the edges look gilded. I also used my Chocolate Chip marker to outlines around all of the sections.


The card base has the feather stamped off once all over it. Then the squares are 1¼" and 1½", and the feather is created the same way as on the envelope. More gilding and the main image is popped up on dimensionals.
  • Stamps: Nature's Nest
  • Paper: Naturals White, Pear Pizzazz, First Edition DSP
  • Ink: Pacific Point, Pear Pizzazz, Tempting Turquoise, Chocolate Chip
  • Other Big Shot with Bitty Box and Envelope die, blender pen, Gold Lame Smooch Pearlized Accent Ink, dimensionals

Somehow this still seems in the Holiday Spirit to me :) I hope you like it! 

Monday, December 13, 2010

Angel in 3D


You can't have Christmas without the angels now can you?! I am sure that there are great ways to make her have more of a face, I just didn't have the Mojo for it when I created this :)


The wings are made with the largest butterfly wings from Beautiful Butterflies die. I made my vellum pieces a little wider than the die and made a little tab on each one. This tab slips through a slit in the side of the angel to attach the wing. The wing is upside down also, so it looks like and angel wing instead of a butterfly wing  ;-)


The head is made with the Wide Oval punch and the Decorative Label punch, ( one full punch, two slivers the long way, and a 1¾" Circle punch trimmed with the skinny end of the Decorative Label punch to make her flowing tresses).
Her arms are the Word Window punch. I used used Iridescent Ice to emboss the dress and the wings, so sparkly in real life!

  • Stamps: Medallion BG
  • Paper: Cherry Cobbler, Soft Suede, Naturals White, Vellum cardstock
  • Ink: Versamark
  • Other: Big Shot with Beautiful Butterflies die, Decorative Label punch, Wide Oval punch, 1¾" Circle punch, Word Window punch, Iridescent Ice embossing powder, Embossing Buddy, Heat Gun, Hobby Blade
 This was a little difficult to photograph... I maybe should have used a patterned paper... any suggestion would be appreciated! And if you can come up with a face for our angel, please share!

Sunday, December 12, 2010

Tree in 3D


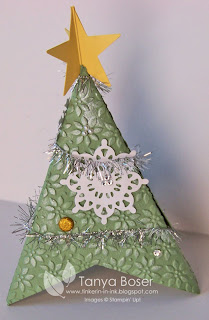
More Christmas goodness coming your way! This  is the third of the four 3Dhome decor items I have made recently, with the same base with a tutorial here. I got to use some of the fabulous Glimmer brads, Silver Tinsel trim, and other fun sparkly bits!


 To get the star to slip into the top, I made little cuts on all of the folds about ½" long, then applied a little glue to the bottom of the star and slipped it in. The star is 3 Large Star punches folded in half and then glued together.

I used some Frost White Shimmer Paint to highlight the embossed Petals-A-Plenty and used the Glimmer brads as ornaments, poking holes with my paper piercer. It was actually much easier to do than I thought it would be :)
  • Paper: Wild Wasabi, Daffodil Delight, Whisper White
  • Other: Big Shot with Petals-A-Plenty embossing folder and Northern Frost die, Large Start punch, Glimmer Brads in Brights and Neutrals, Rhinestone and Pearl Basic Jewels, Silver Tinsel Trim, Frost White Shimmer Paint, Sponge Dauber

This was probably the most fun to put together :) The Silver Tinsel actually has a wire in it so it really holds shape well around the tree. I really need to put up my tree for real though!

Saturday, December 11, 2010

Work interfers!

I was going to try to do a quick project post before work, but blogger is having a moment and I can't load any photos...ugh. I only have today left in this stretch for work, so I will be back tomorrow with more fun projects!

Wednesday, December 8, 2010

Singing Reindeer?!


No snowflakes on this project! Can you believe it?! I don't know why I have done so many thing with snowflakes lately....maybe cuz I love them :)
This is the second of the 3D projects I made the other day. I think he is so darn cute!

Here is a back view of him. I love the Chocolate Chip Swirls die for antlers, and vines. It's a pretty handy little die to have around :) The tripod base of this fella is embossed and then then the embossing is rubbed with the coordinating inkpad. 

And a side view. The arms are the Word Window punch, a full one in Crumb Cake and just the end in Basic Black, adhere together and then take a nip out to it to form the cloven hoof.
The face is the Wide Oval punch in Crumb Cake and the Small Oval punch in Chocolate Chip for a mouth. I did sponge around the Wide Oval punch. The teeth are just snipped Whisper White. The nose is the ½" Circle punch and the circle punch from Itty Bitty Shapes punch pack in Poppy Parade layered together. The book is a 2"x2½" piece of embossed Poppy Parade.

And a front view...I hope you all are rushing to make your own. They really don't take that much time and turn out so cute :)
  • Paper: Crumb Cake, Basic Black, Chocolate Chip, Whisper White, Pappoy Parade
  • Ink: Crumb Cake, Poppy Parade
  • Other: Big Shot with Swirls die and Finial Press embossing folder and Vintage Wallpaper embossing folder, ½" Circle punch, Itty Bitty Shapes punch pack circle, Wide Oval punch, Small Oval punch, Word Window punch, Stampin Sponge.
 Here they are together, the Singing Reindeer and his buddy the Snowman. The bird hasn't eaten his nose yet either, Cindy!

Tuesday, December 7, 2010

Snowman in 3D!


 I found this adorable project on SCS yesterday and had to make one of my own! I actually made 4 different versions of this basic idea and I will share them with you throughout the next week or so. Today I am showing you the snowman :)


 Here is the side view so you can see the construction. I saw the sample, had no instructions so I will try to provide some quick here. :)
  1. Cut three 4"x4" squares of Whisper White card stock. 
  2. Punch out two Snowflake punches in Basic Black. Trim to form the arms of the snowman.
  3. Score each square in half diagonally and crease well.
  4. Emboss the squares with embossing folder of your choice. 
  5. Apply Shimmer Paint, Dazzling Diamonds, or Embossing Powder to squares if desired. I used Frost White Shimmer Paint.
  6. Fold on score lines and adhere one square to another by lining the outer edge of one up to the inside of the fold of the other. 
  7. Adhere the arms on the inside of the third square about 2" down from tip on each side.
  8. Apply glue to inside of both halves of the third square and adhere to the other two to form your tripod.  You can lay it on it's side and use the bone folder to apply pressure on the inside to get a good adherence.
  9. Hat : 1-3/8" square punch with two corners rounded, a Word Window punch, a ¼" hat band, and the smallest snowflake from the Northern Frost die.
  10. Face: 1¾" Circle punch, one point of the large Star punch in Pumpkin Pie sponged with Pumpkin Pie ink, and Black Designer Jewels.
  11. Adhere Hat to Face, then adhere to tip of snowman. 
  12. Adhere buttons to front and finish embellishing as desired.
I added the bird from Merry Details die and a little Clear Tinsel as a scarf. ANd the snowflake on his hat just had to have a little bling too :) I used Tombow liquid glue for the whole project here, so Sticky strip is not necessarily needed.
  • Paper: Whisper White, Basic Black, Poppy Parade, Pumpkin Pie
  • Ink: Pumpkin Pie
  • Other: Big Shot with Northern Frost die and Buttons #5 die and Merry Details die and Northern Flurry embossing folder, Snowflake punch, Word Window punch, large Star punch, 1¾" Circle punch, Rhinestone Basic Jewel, Flourish Basic Black Designer Jewel, Clear Tinsel Trim, Frost White Shimmer Paint, Sponge Dauber, Stampin Sponge, Signo white gel pen.

And here is the little guy from the front. He makes me smile every time I look at him! Give him a try! I think he will make you smile too :)

Monday, December 6, 2010

Christmas Love 3x3


I am finally feeling human again, and I have 3 days off from work, so it is time for me to get my butt back on the blog wagon! I also have some good news, and some fun news :) First the good news:
Jamie (my hubby who is also an RN) has officially been hired to work to the Red Lake IHS Hospital! The same place I work only a different department, I'm in ER. He will be working in the clinic with totally different hours and schedule than me, but he will be home every night, work 8-5 Monday thru Friday, no weekends, and no Federal Holidays!!! And he gets a raise out of the deal :) His first day will be January 3rd! I am so excited I keep squealing at random times!!!
And the fun news:
I am going to be a Guest Designer for the next U Stamp with Dawn and Friends event, Year End Blow Out 2010! What an honor! I couldn't believe it when I got the email from Dawn inviting me to be a guest designer. Little ole' me?!  I already have my project designed, I just have to wait for my supplies to arrive tomorrow (Tuesday)  :)


OK, time for some Christmas cards!! This is a little 3x3 card that I had meant to slip in my club members bags last week, but I was so tired when I finished them, that I went straight to bed and forgot to put them in the bags the next morning when I brought them to work to deliver them. Oh, well. Maybe I will use them for co-workers :)

I haven't used Poppy Parade much yet, but I am really liking it in this color combo. I still had a pile of leftover snowflakes from the gift bag project, so I am using some up on these cards.
I used the textured card stock for the card base, and stamped the tree from Contempo Christmas on the front.
Then I punched out the Designer Label in Crumb Cake and outlined with a Signo white gel pen. The punch and the snowflake are popped up on Dimensionals.


Inside I simply stamped the sentiment from that set and outlined again. They came together really quickly and I think they are cute!

  • Stamps: Contempo Christmas
  • Paper: Poppy Parade, Crumb Cake, Whisper White
  • Ink: Poppy Parade, Early Espresso
  • Other: Big Shot with Northern Frost die, Designer Label punch, Signo white gel pen, Stampin' Dimensionals, Rhinestone Basic Jewel


I found an adorable 3D project that I am working on and plan to share this week, so stay tuned for more Christmas Goodness!

Sunday, December 5, 2010

Snowflakes...Is there a theme here?


This is just a quick post to let you all know I haven't forgotten you :) I have been short on time and projects this week due to my stomach flu turned head cold/asthma hell, then back to work! I work again today and then I will have Monday thru Wednesday off and should get some crafting time in!

In the mean time, I made these last month and still haven't remembered to look for pin backs to complete these little beauties. I totally CASEd these from Debra Burgin....

And thank you to all the well wishers after my last post! I guess I should say that I was half laughing at my trials this week as anything that ends well is great for me! I just thought it would give a few people a good chuckle to hear all the goofy stuff that was happening in the same stretch of time! That and all you people without snow would really be feeling good about where you  live ;)

Thursday, December 2, 2010

Snowflake Gift Tags


So, I haven't posted in several days. Did anybody miss me? Well, I have a good excuse.
We got back from visiting family on Friday night and the fun began. The Dreaded Stomach Flu started to hit my entire family. It each of us in turn..only 2 people at a time, and finished up on Tuesday.
I had to go to work still feeling like death warmed over because the stomach flu was gone, but I had a killer head cold that was making my asthma hell, but I made it through my 12 hour shift. It had taken me an hour to drive what normally takes 40-45 minutes to get to work, and the same thing on the way back. The roads were covered in a thick layer of ice and snow even where they did plow. Yuck!
Dakota went in the ditch with my "shiny new car" on Monday afternoon (its a 2005 Neon-not so new but I bought it when it was a year old and the newest thing I'll ever own-and everything still works in it!) Everybody was fine and he got back out with a couple of pushes.
Then my hubby was supposed to work 100 miles away at 7am on Tuesday morning and he went in the ditch with his 4x4 truck about 30 miles from home! He decided to come home and try again later...which turned into 4am Wednesday...
Yesterday was my day off and I slept in, then I HAD to go to town to get groceries. So I'm trying to stop at a stoplight in the right turn lane, slip-slide-stop, then get rear-ended by the guy behind me! Again, everybody is ok, my "shiny new car" is fine, and the other guy just added a new crack to the collection of them on his front bumper. I was glad to have some Motrin in my purse cause then I had a headache and I hadn't even gone into the grocery store yet! 
I didn't get much crafting done yesterday, still trying to put my area back together after the re-organization. And the asthma and head cold are still holding me back some, but I am hoping to be much better by morning. I did make some quick gift tags today though.


I decided to work on using up some of my more abundant scraps, so I decided to work with some River Rock. It goes quite nicely with the Cherry Cobbler here! And I have a stash of precut Northern Frost snowflakes from a previous club project. These came together very quickly :)


I have only made these 3 so far, and I put some Sticky Strip on the back so they are all set to go on a few packages.
  • Stamps: Winter Post, Serene Snowflakes
  • Paper: River Rock, Cherry Cobbler, Whisper White
  • Ink: River Rock , Early Espresso
  • Other: Corner Rounder punch, Designer Label punch, Big Shot with Northern Frost die, Sticky Strip

And here are a few shots of my side yard this morning. I love how the trees look when they are covered with snow! It will only last until the wind picks up a little and blows it all off.


Have a great day!

LinkWithin

Related Posts with Thumbnails