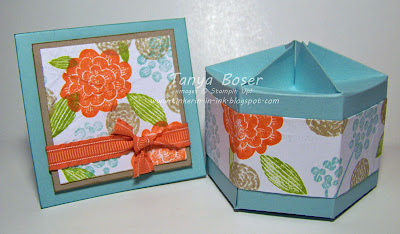
Ok, so when I got the Raining Flowers set at convention, I didn't think I liked it. When I picked it up on Friday to do a club project with it, I still wasn't feeling the love for it. But after I paired it with some of my current favorite colors and the Faux Linen technique, I can say that I do now carry a fondness in my heart for this set :) I just needed to stretch a little with it!
We made this cute little 3x3 card, which are ever so useful, and a coordinating box, which I will get to later. The Faux Linen technique is really very easy, but you might want to wait for the paper to dry before mounting it to the cardfront with dimensionals.... mine kind of bows into the center even with a dimensional there... lesson learned!!
For the Faux Linen technique, here are the steps:
- Cut a piece of tissue paper a little bigger than your finished piece will be. You will be gluing this to a white cardstock base. Stamp your images on the tissue paper.
- Apply a thin coat of liquid adhesive all over your white cardstock piece and stick your tissue paper to, making sure you have wrinkles in the tissue paper and that the wrinkles are glued down. Fold the tissue paper over the edges and adhere to the back.
- ALLOW TO DRY ! :) Then use as desired on your projects.
- Stamps: Raining Flowers
- Paper: Pool Party, Crumb Cake, Whisper White, tissue paper
- Ink: Pool Party, Calypso Coral, Crumb Cake, Lucky Limeade
- Other: Calypso Coral ruffled ribbon, Stampin Dimensionals, Sticky Strip (to attach the ribbon)
See awesome this looks?! Now don't you love Raining Flowers too?
And here is the little box I made to go with the card. Ad can you guess what I made it with? The Mini Milk Carton die!! Brian Pilling showed us how to make this at convention, but I discovered something else cool about this box.... if you crease the score lines well at the base of the top, you can push the top down into the box a little and it will stayed closed! How cool is that idea?!!
This is "open"- the crease line I am talking about is the top edge of the flat portion under all of the "peaks"
So you push down like so....
And it stays down and looks like this! I love this... maybe I'm just easily amused though ;)
My club ladies were super excited about this and thought of all kinds of uses for it!
Ok, that's it for today! Still trying to get back on track with more frequent posts. Hopefully I will get some productive time in in the next day or so cuz I work 6 out of 7 days starting Tuesday. Just keep smiling!


7 comments:
Gorgeous card, fabulous technique, and awesome box!! I want to try all of them!
Wonderful card! Colors are just perfect! Love that little box! We made it at my club on Friday too!
Wow beautiful and your all killing me you really want me to get that die don't you! lol
Love what you did with this set. Mine still hasn't seen any ink yet.
I did find this a hard set to use, but like you, it's growing on me. Love your colors!
Love this box. Didn't have the die so I borrowed from a friend and made 3 (so far)then ordered my own die. I also found it perfect to fold down the top and put one of those big flowers that everyone is making on the top. Did I say I love this box. You can decorate them sooooooo many ways.
Cute card! Thanks for sharing this technique!
Post a Comment