For those who are new to the Stamp Review Crew, here is a little background. We are an international group of Stampin' Up! demonstrators that gets together on the first and third Mondays of every month to do a blog hop. Each hop features a single stamp set to give you loads of inspiration for that set! The hops are archived at the Stamp Review Crew blog, and you will be able to click through each hop at any time, going directly to the posts for that hop whenever you want! And you can click on the banner of this post to go to the master blog roll for this hop also.
If you are following along in order, you just arrived from Dawn Tidd's blog, who is wonderful in every way!
My first set of projects uses the Spooky Night DSP and the Mini Treat Bag framelits to create a bunch of Witch's Brew treats! I plan to fill them with cocoa packets to give to friends and co-workers. I know a few ladies who would get a kick out of these as birthday favors. I remind you, I am an ER nurse. We are a slightly twisted bunch 😉
Now, these prints are a bit busy, but look pretty good with the black embossed circles to break it up a bit. Doesn't the Garden Trellis embossing folder look a bit like bats in the background?!
I adore these prints, so these are my favorites of the bunch. And true confession.... I hated the print on the right until I used it here. It reminds me of a flannel shirt! I love flannel. It is the perfect layering garment. Layering is important in Minnesota 😊
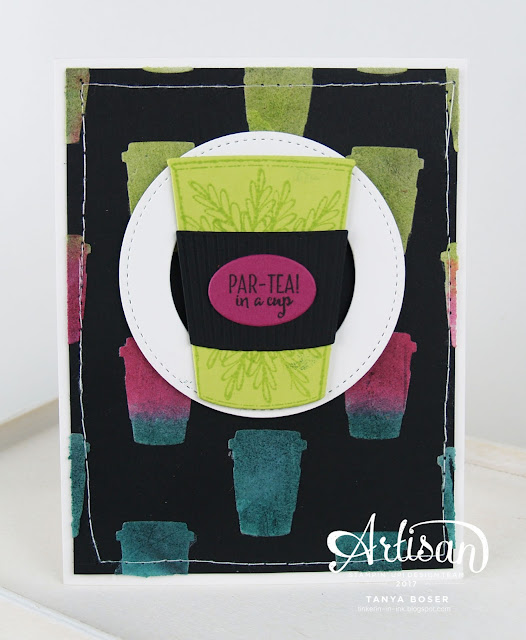
Let's switch gears and go a bit neon. I don't normally think of neon and tea together, but we'll go with it 😁
I saw a card on Pinterest that had multicolored heat embossing on black, and I decided to try it with Embossing Paste. 💥
Well, first I had to create a stencil with the little cup die. I picked up a pack of stencil blanks cheap at Hobby Lobby a few months ago, so I whipped up the stencil and went to work! After the embossing paste dried, I put the clean stencil back in place and sponged Lemon Lime Twist, Berry Burst, and Tranquil Tide over the cups. I love how vivid they are!
I did learn that the sponged ink take a long time to dry....I accidentally transferred ink to the circle, but was able to hide it for the most part.
This time, I CASed myself. I had made a similar card with Colorful Seasons, and had to make another one. Lemon Lime Twist, Berry Burst, and Pumpkin Pie were sponged and stamped in each area after masking with scratch paper and washi tape. It went pretty quickly, and turned out as good as I had hoped 😍😎
OK, enough from me. It is time to hop over the Kelly Kent's blog, and she is sure to blow you away with her talent!
Have
you seen this?! the October and November Paper Pumpkins kits are
designed to coordinate with each other. How awesome is that!
Oh, you don't Paper Pumpkin? Maybe you want to give it a try the next 2 months. Sign up here.
Oh, you don't Paper Pumpkin? Maybe you want to give it a try the next 2 months. Sign up here.
And be sure to check the box allowing me to contact you when you check out. I can't send you a thank you card if I don't know your address! And I promise to only send you happy mail, no junk mail :)
Product List


12 comments:
Great cards, Tanya!! I especially love the last one -- so fun and such great colors!
Sweet treat packs and your cards are fabulous! Love the bright colors!
Super fun projects, Tanya! I love the card with the embossing paste, great idea! The last one is so bright and cheery, adorable.
I love everything about this including that you CASEd yourself!!! Three great cards with a perfect Tanya style! Kelly x
Beautiful messy art, Tanya! I love those little treat bags -- my favorite kind of project!!
All of these are amazing!! That sponged card has my heart though, really awesome card (and colors).
Love them all, but that neon one really caught my eye!
Oh my gosh, your sponged/stamped card is awesome, and the treat bags are, too (what? ER nurses have a twisted sense of humor?), but the neon on black is simply amazing! I am totally going to share this technique with my stamping friends next time we get together!
What fun techniques you always share! I had not thought of adding ink to embossing paste after it dried - I had always mixed it in before applying it, but I love how the sponging looks, and I now have a ton of ideas to try out! Also, I'm glad you CASEd yourself, because that first card (and now this one) with the stripes are some of my favorite ones you've done!
I am so in love with your treat bags, Tanya! They are right up my alley! And your cards...WOW! They colors are fabulous! Great job showing the versatility of this set!
What a great array of projects, Tanya! Love the neon coffee cups the best but those treat bags and the sponging are pretty awesome, too! I was doing embossing paste projects this weekend with my stamp clubs and forgot to mention the drying time on the ink sponging so one of my card makers had a fun experience when she laid her envelope front on top of her sponged brick wall. It actually turned out to be a pretty cool affect.
Post a Comment