For those who are new to the Artisan Design Team, here is a little background. We are a group of 20 Stampin' Up! demonstrators from around the globe, handpicked by Stampin' Up! to bring you inspiration and projects with the latest and greatest supplies
If you are following along in order, you have just arrived from Sylwia Schreck's blog. And she has done some amazing things!
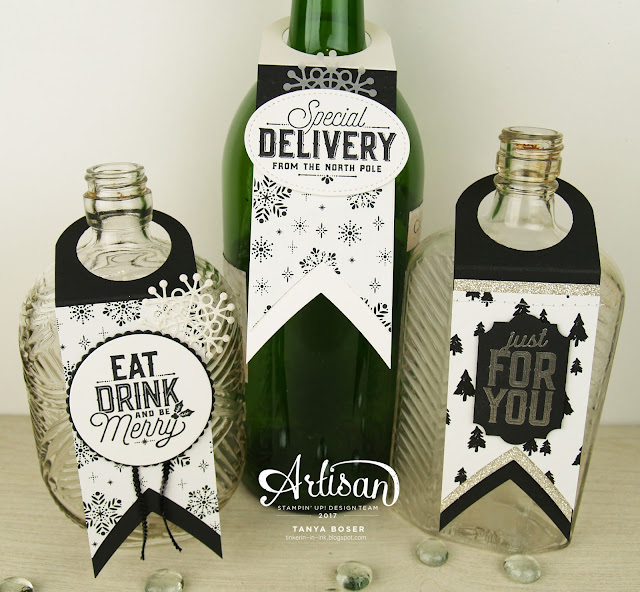
I am doing a craft fair in a few days, and I have been cranking out all kinds of papercrafting Christmas gift-giving items. (Actually, the craft fair will have already happened when this post goes live... and these sold very well! I made about 30, went home with less than half that.) And for some reason, I am loving the idea of wine bottle tags lately! I have been wishing and hoping for a die for this from Stampin' Up! But until then, I figured out how to create them with supplies we already have.
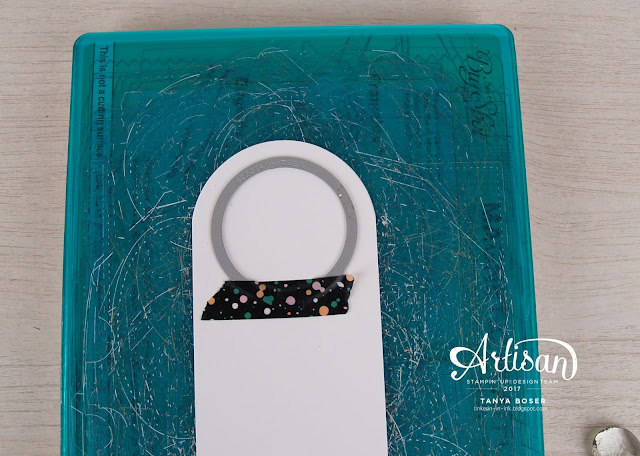
Start by cutting a strip of cardstock to fit the diameter of the circle die you will be using to round the top. This one is 2-3/8"x7-3/4". Then do some partial die-cutting. You are only going to round one end of this strip with the die, so the top cutting plate needs to only cover the part you want to cut.
After you have rounded the top of the strip, use a smaller circle die to cut a hole. Line it up so that there is an even amount of cardstock left around the hole. You can secure the circle die with a piece of Washi tape to be sure it does not shift.
To create the dovetail end, use the largest simple heart die from Sweet & Sassy framelits. I center the point on the cardstock, and make sure that the bottom points of the strip are just visible inside the die.
Here it is with all of the die cutting done. Then you need to add a score line below the hole. For this size, I have been scoring it at 2-3/8" from the top.
And now, let the embellishing begin!
The base of this tag is Basic Black, and there is a layer of Merry Little Christmas DSP on top. Mini Sequin Trim in black adds some glamour, and the sentiment is kept simple, and since we were using the Layering Circles framelits to make the tag, I decided to stick with those to cut it out. There is a Dazzling Diamonds Glimmer paper snowflake cut using the Seasonal Layers framelits. That snowflake is perfect with this DSP!
Same concept with this one, except I used vellum for the snowflake, die cut the sentiment with the Stitched Shapes framelits, and added an accent strip of Basic Black cardstock embossed with the Softly Falling embossing folder.
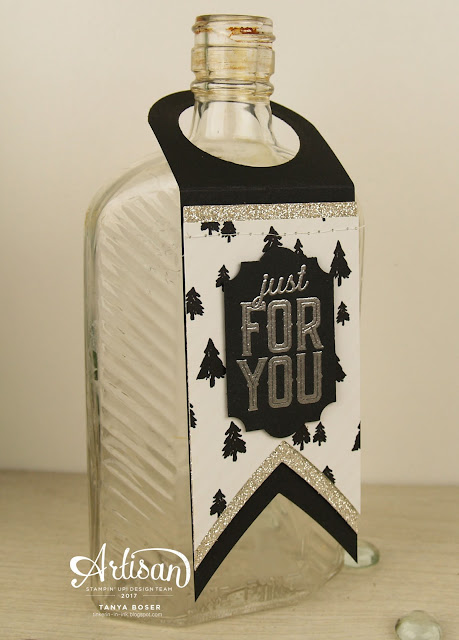
And here we have the Everyday Label punch, with Silver heat embossing and Silver Glimmer paper. I snuck in a little machine stitching at the top of the DSP as I thought it needed a little more detail. The Glimmer layer is popped up on dimensionals.
That is all for me. I hope you found some inspiration here, and that I will see lots of Wine Bottle Tags popping up soon 😀
I am the last stop on this hop, so if you started with Allison, you have reached the end. And seen so many fantastic ideas with this stamp set and this Designer Series Paper. If you started somewhere in the middle, you really must keep clicking through! You wouldn't want to miss a thing :)
Tanya Boser- You are here
If you have seen something you need for your crafting
life, just click the image in the supply list below and it will take you
to my store! If you order less than $150, please use this month's Host Code, which can be found at the top of the sidebar on the right.
And be sure to check the box allowing me to contact you when you check out. I can't send you a thank you card if I don't know your address! And I promise to only send you happy mail, no junk mail :)
Product List And be sure to check the box allowing me to contact you when you check out. I can't send you a thank you card if I don't know your address! And I promise to only send you happy mail, no junk mail :)


5 comments:
Wow who would have thought to use a heart to make tags ends, not me. Love your ideas for bottle tags.
These are FUN and that's a great little hack/tip! <3
Great use of the dies. Thanks for those tips.
And now Tanya I have gone upstairs for a glass a wine. :) HAHAHAHAHA COol sneaky tips too!
Really cool, thanks for the direction. Just curious, what did you sell them for?
Post a Comment