Monday, March 22, 2010

Mother's Day Mojo 131

I thought I would actually try to do the Mojo Monday challenge as soon as I got it today. I am supposed to be sleeping right not because I work the night shift at 7:30pm, but I slept until 11am, so I will just take a little nap before work and play with my stamps until then, lol! This is the first time this stamp set has seen ink and I have had it for over 2 months! For shame, I know! It was fun to put this together, it just kept evolving as I went along. I also used a color combo challenge from Stampin Addicts called  SACC47 Forest Friends Easter Greetings. 
 Check them out, there are lots of great challenges there! 
You probably can't tell in this picture, but there is Shimmer Paint on the MOM and on the Pink Lattice pieces and on the butterflies and I inked up the texture plate with So Saffron before I ran the paper through the Big Shot. 
  • Stamps: Messages for Mom
  • Paper: So Saffron, Pretty in Pink, Chocolate Chip, Whisper White
  • Ink: So Saffron, Pretty in Pink, Chocolate Chip, Frost White Shimmer Paint
  • Other: Beautiful Wings embosslit, Lattice die, and Perfect Details texture plate with Big Shot, brayer, sponge, Cutter Kit for distressing tool, Pinking Hearts border punch, Aqua painter, Pretty in Pink 1/4" grosgrain, Scallop border punch

Sunday, March 21, 2010

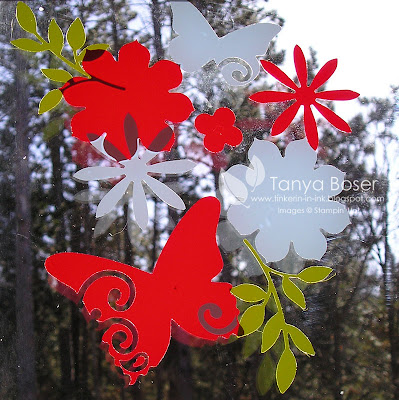
Spring Window Vinyl


I did some window vinyl ornaments and snow flakes around Christmas, and thought it was time to do something springy. So  here are some butterflies and flowers! These were all made with various Big Shot dies and Sizzlets, were cut with different dies on 1 piece. I'm thinking these would look fine layered, if it was on something other than a window. Right now the sun shining through makes stuff on the bottom layer visible. I put these in the upper corner of the door to our 2nd story deck and in the background you see the Norway Pines that give us what little green we have this time of year, lol. 
  • Dies: Stampin Up! Beautiful Butterflies, Stampin Up! Blossom Party, Scribbles Swirls, Stampin Up! Little Leaves
  • Vinyl: Real Red, Bashful Blue, & Old Olive Decor Elements Vinyl Sheets
Our Decor Elements Vinyl Sheets are available in 22 colors, including Clear, Kraft, and Chalkboard and they include the transfer sheets. Some come in a tube with 2 sheets of 14-1/4"x24" vinyl and 2 sheets of transfer paper for 14.95. The rest of the colors come in 12"x24", 2 sheets vinyl and 2 sheets of transfer paper.
The possibilities are endless! I have even drawn an image on the paper backing of the vinyl and hand cut the image. 
If you are interested in purchasing some for yourself, please visit my demo site (click on the SHOP NOW icon in the upper right corner of my blog and then in the upper right of my demo page).
So, show us what you come up with! Leave a comment and link to your effort :)

Saturday, March 20, 2010

Pet Sympathy Card

One of our friend's dog died on Friday and I know how much we miss our pets. They are a part of the family and it's hard to lose someone so suddenly. So this card is for Maria and Richie.
I used  Mojo Monday sketch 130 and some retired colors. I'm just feeling the need to use something old that is new again lately, I guess. The weather continues to be unseasonally warm here in Northern Minnesota. I can't believe I have been able to have the windows open and air things out a couple times already! That really influences my choices in colors. It feels like spring so pastels and florals are very much on my mind, lol! I am sure we will  get hammered with a blizzard yet sometime soon. But I will enjoy this weather while I can! My deck door is open right now in fact! I think it is about 35 degrees out and the sun is shining bright right now! Positively Balmy!
  • Stamps: D is for Dog
  • Paper: Kraft, Groovy Guava, Soft Sky, Chocolate Chip, So Saffron, Tea Party DSP
  • Ink: Groovy Guava, Soft Sky, Chocolate Chip, Close to Cocoa, So Saffron
  • Other: Finial Press embossing folder with Big Shot, Circle Scissor, paper piercer with mat pack, Signo white gel pen, Champagne Mist Shimmer Paint with sponge,  Pinking Hearts border punch, Stampin Dimensionals, Groovy Guava stitched ribbon, Chocolate Chip poly-twill ribbon, mini glue dots

Hostess Bag Tags

I have been working on  making tags for the bags I give my ladies when it is their turn to be hostess for Stamp Club. Well, I finally finished 10 of them. I will bring them to club next time and everyone can pick which one they want and then use the Billboard Alpha die to put their names on them|! These are the first ones I did. All of them are 2"x3".The Paper on these is from the Sale-A-Bration paper pad called Welcome Neighbor. The brad on the left is from the Circle Brad assortment and the the brads on the right are the Filigree brads and Fire circle rhinestones.  The ribbon is Bermuda Bay. I used the Jumbo Eyelets in Antique Brass on all of them.The base is made out of chipboard I had laying around-it came from packaging for kits I got from Stampin' Up at convention. I can't throw anything away, right?!

Then I made these. I started using scraps of all the great paper I have laying around. Love this print from Razzleberry Lemonade! Rich Razzleberry and Melon Mambo ribbon added some details.

More Razzleberry Lemonade paper, and I used the ruched ribbon (Crushed Curry) method we used on our March Stamp Club page. The flowers are the adorable Flower Brads we carry. They come in an assortment of 4 colors- So Saffron, Pumpkin Pie, Chocolate Chip, and Pretty in Pink.
These are made with Kaleidescope DSP, Dusty Durango and Bermuda Bay ribbon, Kraft and Summer Sun corduroy buttons and ecru crochet thread.


Again , more Kaleidescope DSP, and Certainly Celery and Bashful Blue grosgrain ribbon with a Bashful Blue button from Sherbet Designer Buttons tied with more crochet thread.

More Kaliedescope DSP with Melon Mambo ribbon, Flower Fusion felt flowers, and  a Clear Rhinestone Brad.
I hope everyone like them and that they are different enough for everyone to tell which one is theirs :)

Friday, March 19, 2010

Just Note Cards swap

Another day, another swap! This is supposed to be just a note that you would slip to someone inside a gift or just by itself. It is 4" x 5-1/4", I believe. I made the butterflies all shimmery too. It just shouts spring, doesn't it! Giving some love to the rubber that we all loved last year this time after it sat so neglected all fall and winter in favor of more seasonal images....
  • Stamps: Great Friend
  • Paper: Naturals Ivory, Pretty in Pink, So Saffron, Perfect Plum
  • Ink: Old Olive, Rose Red, Chocolate Chip, Rich Razzleberry marker
  • Other: Beautiful Wings embosslit with Big Shot, Stamp-A-Ma-Jig, Frost White Shimmer paint with a sponge
Doesn't this just make you want to go wash your windows?! Or maybe just open then, lol!

Thursday, March 18, 2010

Vintage Razzleberry

This is the 3x3 card I did for a swap I participated in. Hopefully I will have my swaps back before this is posted :)  This vintage thing is really growing on me, lol! I have had these Flower Fusion felt flowers since early last summer and I am just now starting to use them, go figure. I have got to stop hoarding stuff until it is almost going to retired.... The image and layers are popped up on dimensionals and I punched both layers of the card base along one edge with the scallop trim border punch and stamped the small flower all over the card base in Rich Razzleberry ink. The inside has more little flowers and the phrase from the stamp set in Rich Razzleberry also.
  • Stamps: Vintage Vogue
  • Paper: Rich Razzleberry, Old Olive, Naturals Ivory
  • Ink: Rich Razzleberry, Old Olive, Soft Suede marker
  • Other: Scallop Trim border punch, Flower Fusion felt flower (pumpkin pie), gold brad, paper piercer with mat pack, Stampin Dimensionals
As always, leave a comment and let me know what you think! And if you are interested in purchasing any of the supplies used to make this card,click on the icons on the right to get to my demo website and order online :)

Wednesday, March 17, 2010

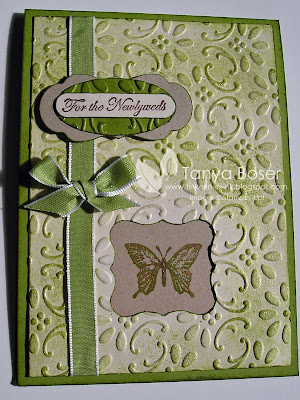
Vintage Wedding Card


I found my inspiration from Michele Tech on her blog here but I of course had to change a few things. I loved the green on the white that looked like a wonderful tin typed ceiling or wall tile. So I had to try it myself. The hardest part was finding an image that would fit in the Curly label punch window that I made that fit in with the vintage feel of the card. I wanted it to stay relatively simple and elegant. I hope I succeeded.
  • Stamps: Dreams du Jour, Teeny Tiny Wishes
  • Paper: Naturals Ivory, Old Olive, Kraft
  • Ink: Old Olive, Chocolate Chip, and Dusty Durango ink and markers
  • Other: Old Olive taffeta ribbon, Lots of Tags Sizzlit and Finial Press embossing folder with Big Shot, Curly Label punch, Word Window punch, Large Oval punch, Champagne Mist Shimmer Paint, sponges, Stampin Dimensionals, Mini Glue Dots, scoring blade with paper cutter

I dabbed and rubbed on the embossed card stock with a sponge and Old Olive ink, then with shimmer paint to achieve the distressed/vintage look. This is a different angle trying to show the shimmer, which is gorgeous if I do say so myself! It's hard to photograph though. I also inked up the butterfly with Old Olive, then thumped Chocolate Chip and Dusty Durango on with makers, then added shimmer paint with a sponge dauber. THEN I stamped the image onto the Kraft card stock. And don't you love how the word window, large oval, and tag from Lots of Tags layer together so nicely?!

And this is the inside. I haven't put a sentiment on the inside yet. I will when I am ready to use it :)
I used the scoring blade on my paper cutter to create on embossed border around the edges. Subtle but lovely...
Tell me what you think, leave a comment!

Tuesday, March 16, 2010

Dakota's Birthday Card

My #3 child turned 18 on Sunday. Man I feel old sometimes! I'm not even 40 though, lol!
I brought out some retired stuff for this card, cuz it coordinates with the only DSP that works for big boys, lol! I remember when I first got Circle Circus. I couldn't stop using it. Now it sits there forgotten. Until this weekend when I needed to make a card for Dakota. I used a Mojo Monday sketch for the layout and I think it still needs something, but I was making this while the cake baked, so I couldn't mess around too much, lol!
  • Stamps: Circle Circus, Starring You
  • Paper: Pacific Point, Kiwi Kiss, Very Vanilla, Muirfield DSP (you could use Brilliant Blue and Old Olive instead)
  • Ink: Pacific Point, Kiwi Kiss, Chocolate Chip ink and marker, Old Olive marker
  • Other: Signo white gel pen, corner rounder punch, 1-3/8" and 1-1/2" circle punches, scallop circle punch, Pacific Point ribbon, dimensionals, SNAIL
And this is the birthday boy! My daughter, Charlene, took his senior pictures. She is going to college for photography, and she is good. No bias here! And this is one handsome boy, it I do say so myself :) we call him Sasquatch cuz he has big feet (size 15!) and is furry, lol! And he has great big bear paw hands. We love our boy, can you tell?!

Thursday, March 11, 2010

March Stamp Club projects

I am just going to post pictures of our projects from tonight real quick because I need to go to work in the morning! I will post directions later this coming week.

ETA: I have added instructions in this post. 

 
This is the page we did. Lots of watercoloring on the letters and the eggs. I also did some real stitching around a couple edges with a paper piercer, the mat pack, and embroidery thread. I used Frost White shimmer paint on the butterflies which are from the Beautiful Wings Embosslit- so pretty! And a new technique with the ribbon :)
  • Stamps: My Matryoshka, Teeny Tiny Wishes, Well Scripted
  • paper: Certainly Celery, Melon Mambo, Pretty in Pink, Regal Rose, So Saffron, Kaliedescope DSP, watercolor paper
  • Ink: Melon Mambo, Summer Sun, Old Olive, Jet Black Stazon
  • Other: Aquapainter, Wide Oval and Scallop Trim border punches, Beautiful Wings embosslit and Simple Alphabet dies with Big Shot, Frost White Shimmer paint, sponge, Signo white gel pen, paper piercer and mat pack
 Here is a close up of the letters. I just love how they turned out! After cutting out the eggs (wide oval punch) and the letters from watercolor paper, I stamped then with line images with Stazon ink. It is permanent on any surface, so it will not run when you watercolor on it :). I then used markers to add a little bit of color to the images, then watercolored them with an Aquapainter. The ribbon effect is achieved by applying SNAIL to the back of the ribbon, then fold/pinch the ribbon as you stick it down to the paper. Easy peasy! You will notice that the butterflies are also shimmery. I applied Frost White Shimmer Paint to the paper before running through the Big Shot with the Beautiful Wings embosslit.


And a close up of the eggs.

This is the card that we made. I totally copied this from Lisa Reber, But I did add Frost White Shimmer paint to the embossed part, which really steps it up a notch!
  • Stamps: Well Scripted, Chocolate Bunny
  • Paper: Crushed Curry, Soft Suede, Whisper White
  • Ink: Crushed Curry, Soft Suede
  • Other: Other: Petals-A-Plenty Embossing Folder and Flower, Daisy #2 die with Big Shot, Fresh Favorites buttons, glue dots, Crushed Curry polka dot ribbon, Frost White Shimmer paint with a sponge

     And a close up of the details of the card. I colored the flower centers before applying the Shimmer Paint with a sponge so everything is shimmery. The bunny is stamped in Soft Suede on Soft Suede and then cut out. The Daisy and button are held on with a glue dot in the center.


    Ok, this is the chipboard frame that I made to use for this technique. I cut the chipboard down to 4-1/4x5-1/2", then traced an oval and cut it out with a Hobby Blade. This would be much easier with an oval steel rule die :)


    You will put this frame under the embossing folder, not inside when you run it through the Big Shot.


    The sandwich goes as follows:
    Multipurpose Platform with all tabs closed (the thickest setting)
    Chipboard frame
    Embossing folder with card stock inside
    1 cutting pad


    And last but not least, an Easter candy carrot! So darn cute! And I got this idea from MIshelle H who got it from Becky Roberts. Sorry, no link!
    • Stamps: Woodgrain background stamp, Well Scripted
    • Paper: Only Orange, Certainly Celery, Whisper White
    • Ink: Only Orange, Chocolate chip
    • Other: Scallop Circle die with Big Shot, Scallop Oval punch, Scallop Circle punch. 1-3/4" Circle punch, Certainly Celery 1/4" grosgrain ribbon, small cello bags, glue dots, staples and stapler, hemp twine
    To make the carrot cone, curl the edges in and staple it. Take 3 scallop oval punches and staple them to the back top. Attach the ribbon bow to the sentiment piece with a glue dot, then use a couple glue dots to attach to the carrot. To make the carrot shaped bag, take a small cellophane bag, fold bottom right corner up to left side of bag, then use SNAIL to adhere it this way.  Super easy!
      I hope you like them!

      Sunday, March 7, 2010

      SA Celebs page


      Ok, I'm making this photo really big so you can see the clever us of Shimmer Paint on the Bashful Blue card stock :)  I mixed some Frost White Shimmer Paint with a couple drops of Bashful Blue re-inker, then used that to ink up my stamps.It turned out super cute in real life, but kinda hard to capture in a photo. These were a few of the wonderful people I met when I went to convention last summer. They are kind of big shots in the SU stampers websites :) I also did a lot of faux stitching and layering of the letters and the bracket I cut out with the Big Shot. This was a really fun page to do. I hope you like it as much as I do :)
      • Stamps: So Cool
      • Ink: Bashful Blue, Frost White Shimmer Paint, Soft Suede
      • Paper: Rich Razzleberry, Bashful Blue, Certainly Celery, Kaliedescope DSP
      • Other:  Signo white gel pen, Soft Suede marker, Simple Alpha and Hearts & Brackets dies with the Big Shot, Scallop Trim border punch, Rich Razzleberry and Bermuda Bay polka dot ribbon, Sticky Strip, Sponge Dauber 

      Saturday, March 6, 2010

      Onsie for Big Shot Swap

      I participated in an awesome swap through a demonstrator website that was focused on what you can do with the Big Shot and fabric. This is what I came up with. There are so many luscious fabrics out there! It is scary.... ;)
      I applied Heat & Bond to the fabric, then cut out using the Big Shot and the Beautiful butterflies die. Then I ironed them on to the onsies and hand stitched around the edges. I even put one on the butt so you could see it while little one is crawling across the floor :)  

      LinkWithin

      Related Posts with Thumbnails